
The need for resizing images arises from time to time and one name that has become synonymous with picture editing is Photoshop. Developed by Adobe, Photoshop is an image editing and creating software that comes loaded with a wide range of functions. Using the layer-based editing process; the software is compatible with Windows and Mac systems. So you can resize image Photoshop and perform several other functions using this graphic design software.
Part 1. Photoshop Alternative to Bulk Resize Images Online Free
Photoshop is a popular image editing tool but on the flip side, using the software requires you to have the technical know-how to the program and you need to purchase the license to use it. So if you are looking for a simple and pocket-friendly option we suggest Wondershare Online UniConverter as the best alternative. This browser-based program is free to use and requires no download and installation. Images in JPG, PNG, BMP, and GIF can be resized using the program. You can add up to 5 images of 5MB each at a time for the process and the resizing can be done by pixel size or by the percentage of the original file. The resized files after the process can be saved to the computer or Dropbox. The process of resizing is simple and quick where you just need to add the files from the computer and select the output file size.
Steps to resize images using Online UniConverter:
Step 1: Run Image Resize on your computer and click on the + sign to add the images
Step 2: Choose the output file by size or by the percentage
Step 3: Click on the Start button to start the process.
Part 2. How to Resize A Layer Using Photoshop
The need to resize layer Photoshop arises when you want to add some individual elements in the picture, add a text, or create a composite picture. The layers give you the freedom to change the image as you like by editing the parts needed and leaving the rest.
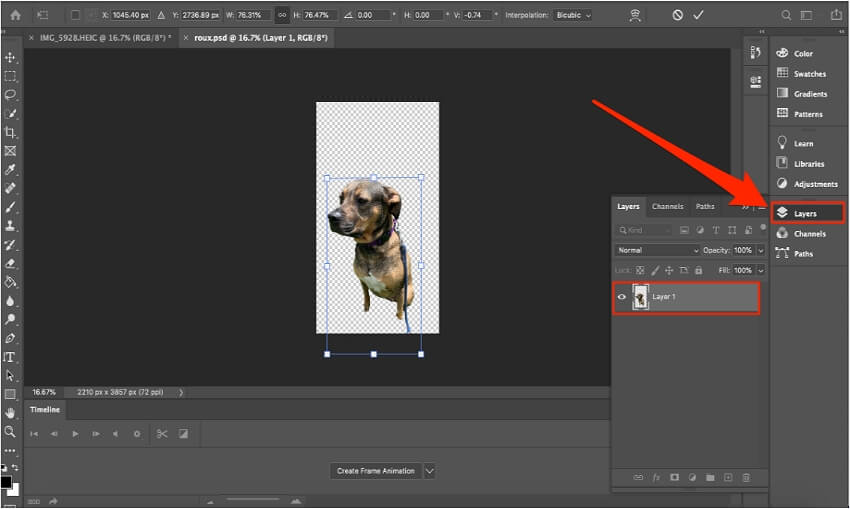
Steps on how to resize a layer in Photoshop
Step 1: The Layers panel can be seen at the right-side screen of the Adobe software and from here you can select the layer to be resized.
Step 2: On the top menu go to the Edit tab and select the Free Transform option. You can now see the resize bar over the layer
Step 3: Next, drag and drop the layer to the size needed. You can also move in the direction you want to change. To retain the aspect ratio, press and hold the Shift key.
Step 4: Finally, to confirm the selected size, click on the Enter button or double-click or tap.
Part 3. How to Resize Image in Photoshop by Dragging
Step 1: Open the installed Photoshop program on your system and then add the image to be resized. Next from the top menu bar open Image > Image Size.
Step 2: An Image Size panel will now open with multiple options. You can either select the customized width and height of the file along with the resolution or choose from pre-defined sizes option available at Fit To: tab. You can even change the file dimensions in terms of percentage, points, and other units. At the Resample tab, you can keep it to be Automatic, or choose from the available drop-down options.
Step 3: Click on the OK button to confirm the settings and resize the selected file.
In addition to the above, the images in Photoshop can also be resized by changing the canvas size, using the crop tool, and the transform tool.
Part 4. How to Use Photoshop t Batch Resize Images
Photoshop is there to make your image editing task not only simple but quick as well. The program supports batch processing where multiple files can be resized at one go using the image processor script. Before proceeding with the steps, make sure that all the images that you want to resize are saved in a single folder on your system.
Steps on how Photoshop batch resize images
Step 1: Launch the Photoshop program on your system and open File > Scripts > Image processor. A pop-up image processor dialog box will now open.
Step 2: Click on the Select Folder button to browse and load the folder that includes all the images that have to be resized.
Step 3: Next, choose the location and the folder where you want to save the resized images. If you select Save in Same Location option, a subfolder by the program will be created and the file will not be overwritten. And in case if the name of the subfolder already exists, a sequential number will be added to the processed file.
Step 4: Next, choose the file type, quality (0-12 where 12 is the highest) and the resized file size in terms of width and height. You can select the Resize to Fit option as well. Choose the file type and its related checkboxes. If needed, you can also choose to run an Action on your pictures.
Step 5: Finally when all settings are done hit on the Run button that will automatically open, resize, save and close all the images in the selected folder.
To resize images without losing quality, Photoshop works as the best and a professional tool. Once you get the hang of the software and its working, editing images creatively will be a quick and simple task using the program. For basic editing for free, Online UniConverter works as the best solution.