

If you want your audio file as a text file, then audio transcription is the best option for you. It can be any kind of audio recording like a music video clip, an interview, an academic study or a conference recording. Automated audio transcription is a secret weapon for the journalists to focus fully on their interview and without worrying about note-taking, get the best information. From online classes, and long lectures, to big business meetings, and product information, audio is being shared a lot around the world. From an audio file, it can be difficult and time-consuming to access information. That’s why you have to transcribe audio to text but many of us don’t know how to do it.
Microsoft Word is a famous and most used word processing software among people, but a lot of users don’t realize it has a transcription feature built into it. For Microsoft 365 premium subscribers, it provides an audio transcription service that allows you to dictate a file in real-time and convert it to a document. So you do not need to run around looking for an alternative to manual typing if you are an MS Word user. In this article, we are suggesting to you how to transcribe audio to text in Microsoft word for free. Read this article briefly to transcribe it without any fault.
- Part 1. Record and Convert Live Audio to Text in Microsoft Word Online
- Part 2. Transcribe Recorded Audio to Text in Microsoft Word
- Part 3. Edit Transcriptions in Word Online
- Part 4. Add a Transcription to a Word Document
- Part 5. Fix Microsoft Word Transcribe Not Working
- Part 6. FAQs about Transcribing Audio to Text in MS Word
Part 1: How to Record and Convert Live Audio to Text in Microsoft Word Online?
You can easily use the Microsoft dictation function to turn live speech to text on Microsoft Word. Here is how to do it –
Step 1: Login in to the Word online with your Microsoft 365 account. Then go to the Home tab and click on the Dictate menu. From the drop-down list, choose the Transcribe option.
Step 2: Select the Start Recording option from the Transcribe pane to record. You can transcribe up to 300 minutes of the speech content per month.
Step 3: Give the browser permission to use your mic if it’s your first time transcribing. A dialog might pop up in the browser or you need to go to the browser settings.
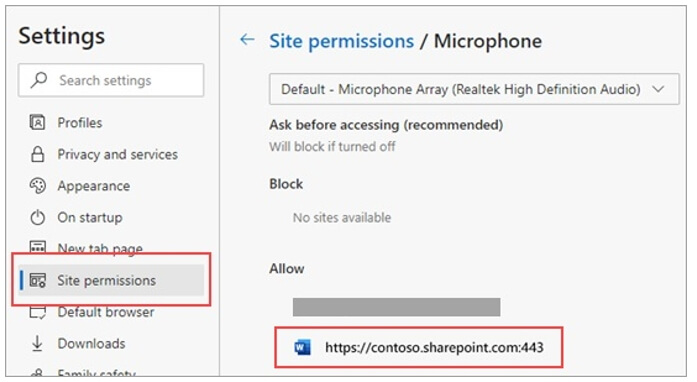
If you are using Microsoft Edge, then you have to launch Settings and tap on the Site permissions from the Settings page. After that click on Allow https://[your company URL]...sharepoint.com from the Microphone.
In Chrome, you have to open Settings and then click on Privacy and security. From the Site settings you have to choose Microphone and after that tap on Allow https://[your company URL]...sharepoint.com.
Step 4: Once it has been started, start the conversation and speak clearly. While recording, leave the Transcribe pane open.
Step 5: Click the microphone icon again to pause the recording. Again, if you want to resume recording, select the microphone icon.
Step 6: To save your recording to OneDrive, select the Save and transcribe now when you finish and then the transcription process starts.
Step 7: Depending on your internet speed, transcription may take a while. While the transcription is being made, keep the transcribe pane open.
Part 2: How to Transcribe Recorded Audio to Text in Microsoft Word?
Besides recording and turning the audio to text in Word online, you can also upload a pre-recorded audio or voice file and transcribe it. Please keep in mind that you can only upload up to 5 hours of transcription time each month.
Step 1: Under the Home tab, go to the Dictate dropdown menu and click on the Transcribe option. Click on the Upload audio in the Transcribe pane to upload the recorded audio file.
Note: You can only upload an audio file in .wav, .mp4, .mp3 and .m4a format to transcribe on Word.
Step 2: Depending on your internet speed and the length of your audio file, it may take a while to transcription. While the transcription is happening, be sure to keep the Transcribe pane open.
Note: you may need to verify your identity before accessing Office on some browsers.
Step 3: Now you will find the transcribed texts in the panel. Check the transcribed texts, label the speakers, or correct any issues in the transcription.
Part 3: How to Edit Transcriptions in Word Online?
Alongside the Word document, your transcript will appear complete with the recording. Click on the plus icon if you want to pull, for instance, a quote from it, and the same quota will be inserted.
Alternatively, you can simply click “add all to document” if you want to send the entire transcript to someone and the complete transcript will be laid out in Word.
If you want to know more about how you can edit and interact with your transcript, then check out Microsoft’s support page.
Part 4: How to Add a Transcription to a Word Document?
Adding transcription to a word document is not rocket science actually. It’s easy when you know the step-by-step process to do it. Microsoft word speech to text is a great feature, and here are the steps to add transcription to a word document –
Step 1: Hover over the section to add a specific transcript section and choose the “Add section to document” icon.
Step 2: Select the “Add all to document” to add the entire transcript to the document.
Step 3: Choose “New transcription” to delete the transcript or create a new one. If you want to create a new transcript for the document, the current transcript will be deleted because you can only store one transcript per document. If you have added any transcript sections to the document, it will remain in the document. But it will not be in the Transcribe pane.
Part 5: How to Fix Microsoft Word Transcribe Not Working [Troubleshooting]
Go to MS Office Online and check if this is a known bug before using any troubleshooting methods. It will not be the first time that Transcribe has disappeared from Word Online. Follow these troubleshooting methods to fix Microsoft Word Transcribe not working –
1. Change Your Language Settings
You need to change your Office language settings to English US in order to use the Transcribe option. That’s the only language the tool supports for the time being.
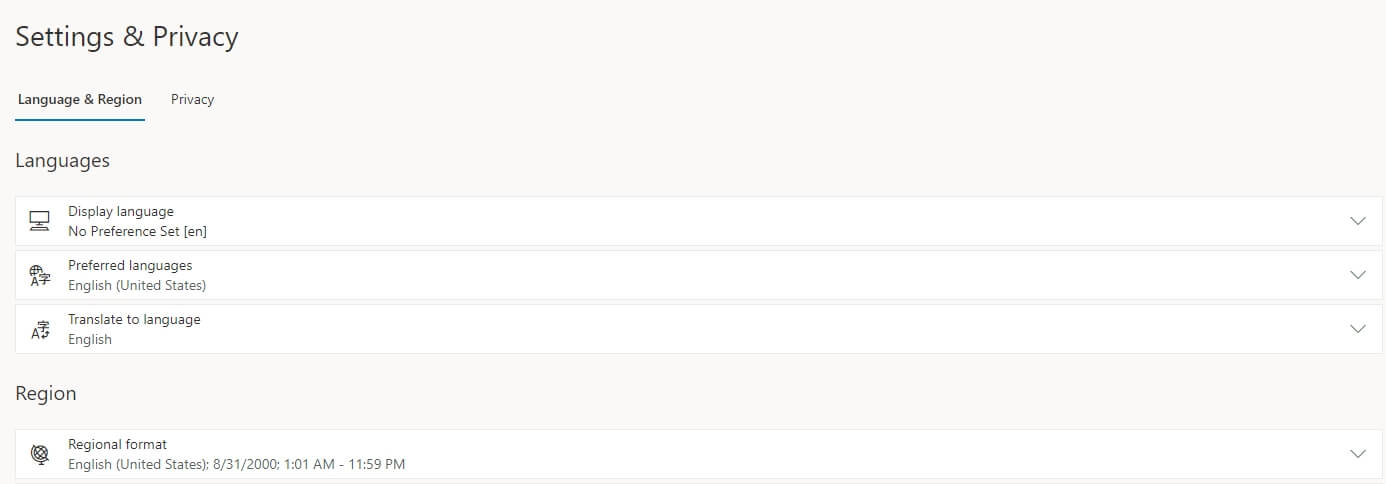
On the web MS office interface, click the cogwheel icon. After that, you have to choose “Change your language” and select English US under Display language. Now save the changes.
Or to set the language, tap on your profile picture and choose “My Profile”. Now scroll down to “Language Info” and you have to set the Display Language to English US.
You may need to go to “Settings” and choose “Microsoft 365 Settings” if your organization is using a different configuration. After that tap on the “Settings” option. From the “Settings”, you need to go to the “Language and time zone” option and choose English US.
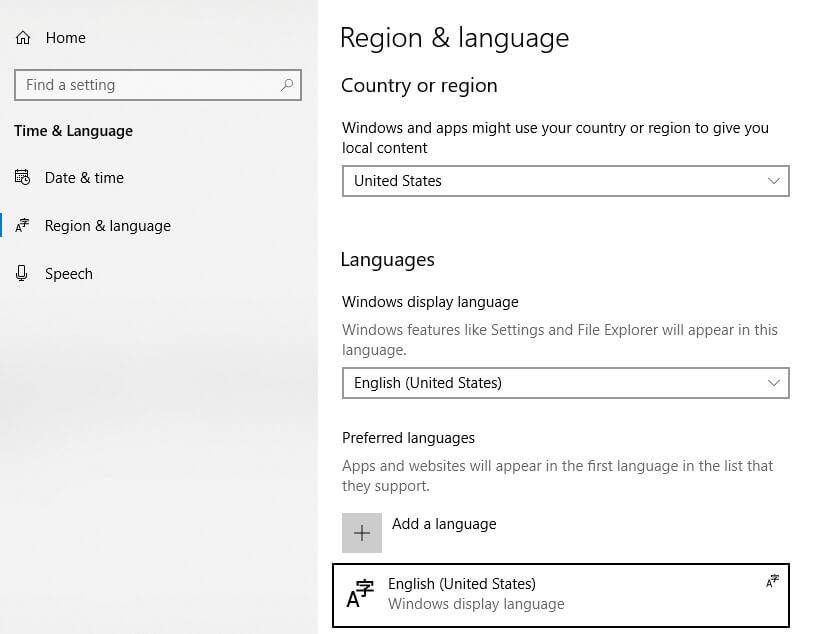
To avoid any language incompatibility issues, check your desktop app language settings. Open your Word app and choose the “File” option. Now go to “Options” and select the “Language” option. Select English US by going to “Office display language” and tapping on “Set as Preferred”. Set your browser and OS language to English US as well if the issue persists. Go to “Settings”, choose “Time and Language” and after that select English US under “Windows display language” to change your Windows 10 language.
Click on the browser menu and go to “Settings” if you’re on Chrome. In the search bar, type “language” and as the language used to display the Chrome UI, choose English US.
Go to “Settings”, choose “Languages” in the left pane if you use Edge and check if the UI is set to English US.
2. Update your Browser
Check if you’re running the latest Edge or Chrome version on your computer next on the list. On the latest versions of these two browsers, Word for the Web works best. Click on your browser menu, go to “Help” and choose “About Google Chrome”. Choose “Help and Feedback” and after that “About Microsoft Edge” if you’re on Edge.
3. Disable Your Extensions
With Word’s scripts blocking the Transcribe feature, your browser extensions might be interfering. Ad blockers and other privacy extensions are known to do that as a matter of fact. To disable all your extensions, click on your browser menu, go to “Extensions” and disable it.
FAQs about Transcribing Audio to Text in Microsoft Word
Please do some research and answer the questions below with correct information in 50-150 words.
1. Will Microsoft save my audio files after transcribing?
No, Microsoft will not save audio files after transcribing. “Your audio files will be sent to Microsoft and used only to provide you with this service. When the transcription is done your audio and transcription results are not stored by our service.” which is according to Microsoft.
2. Can I edit the transcription texts in Microsoft Word?
Absolutely yes, you can edit the transcription texts in Microsoft Word. In this article, we have suggested how can you edit transcription texts in Microsoft Word easily. So if you want to know, go through this article.
3. Can I save and share the transcribed file with others?
Yes, you can share the transcribed document with others in 2 different ways. You can add the transcript to the document first and then share it as a Word document as usual. Or you can share the Word document as usual, and the recipient will find the transcript under the Transcribe pane.
4. Where is the transcribed audio file?
The uploaded or recorded audio file is saved in OneDrive.
5. Why can’t I use the Transcribe feature in Word?
As long as you have a premium subscription to Microsoft 365, you can use the Transcribe feature in Word Online. The Transcribe option may still be visible if you don't have a premium subscription to Microsoft 365, but you'll get a prompt to upgrade if you try to use it.
Conclusion
In various factors of life, we need to transcribe audio files into a text file. By converting audio to text, you can access the required information, edit it and share it fully or partially with anyone as you want. Microsoft word has a transcription feature built into it. It will allow an audio transcription service if you are a Microsoft 365 premium subscriber. But a lot of people don’t know how to transcribe audio to text in Microsoft.


