Unwanted objects in a video can be captured easily and unintentionally. It not only impacts the outlook of a video but also affects its engagement. Moreover, the video looks unprofessional and unattractive. That is why it is important to remove objects from video. You can do this proficiently by using some exceptional object removers.

However, if you don't know any object-removing tools or how to remove things from videos, this article is for you. Here, you can find a solution to remove the unwanted objects in the video.

In this article

Part 1: 5 Methods to Remove Objects from Video
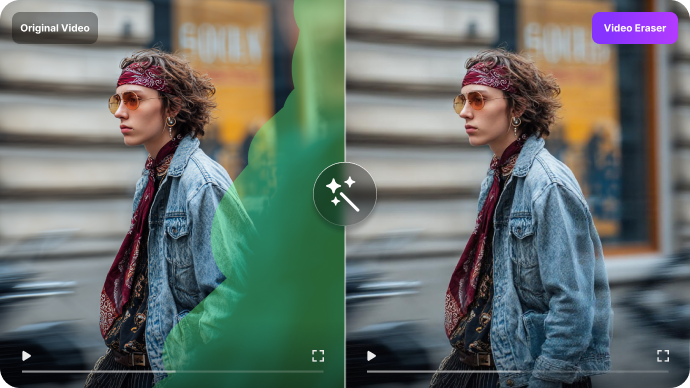
s

Are you confused about which tool is best to remove objects from videos because there are a lot of tools available on the internet? In this part of the article, we will discuss the top 5 tools with steps for using them.

Method 1: AniEraser

First, you need to know the most reputable tool. AniEraser is an object remover that can help make your video more powerful and attractive by removing objects with it. Using this intuitive tool, you can remove things from the video without limitations. In addition, it also helps in retouching the video, as you can also remove spots and blemishes with it.

Moreover, you will see that the quality of the video will not be lost even after you remove things from it. The higher functionality of AniEraser never fails to attract more and more users. Thus, you can make your videos share-friendly with AniEraser.

Supported Devices
  • Windows, Mac, Online, iOS
Universal Key Features of AniEraser
  • AniEraser has a very tidy and easy-to-use user interface. With this, you can accomplish all of your video tasks without facing any problems.
  • The processing speed of AniEraser is ultra-fast. No matter if you are using an online, desktop, or mobile version, you will not see lags in it. n
  • It is very budget friendly as you buy one license of AniEraser and use it on multiple platforms without any problem.
How to Remove Objects in Video with AniEraser

Removing objects in video with AniEraser is not a complicated task. You can do this perfectly by following the steps listed below:

Step 1 Access AniEraser and Import Video

To begin, download and launch AniEraser on your device, and from the home interface, click on "Video Object Remover" and import the video from which you want to remove objects.

select video object remover tool
Step 2 Select Area and Remove the Object

Following this, select an area around the object by pressing the "Select Area" option and then enable the "Preview" option. By this, you can see how the video will look after object removal.

tap on the select area option
Step 3 Save the Video in the Device

Afterward, disable the "Preview" option and click on the "Folder" icon to select a destination folder. Once the folder is selected, click on the "Start All" button.

start the removal process

Method 2: Premiere Pro

Premiere Pro is one of the other industry-leading software used to remove unwanted objects from videos. This tool of Adobe can help you in maximizing the functionality of your video. Moreover, you will not face problems regarding interface and processing speed. Moreover, it also helps in enhancing the beautification of a video.

If you want to make a video personalized, you can also do this by using the features of Premiere Pro. However, make sure you know the editing metrics before using this tool.

Supported Devices
  • Windows, Mac
Persuasive Key Features of Premiere Pro
  • With this tool, you can remove both static and moving objects in a video. Thus, no matter if it's a text person or something else, it can help you with all.
  • The process of removing unwanted objects from a video is not so complicated in Premiere Pro.
  • You can also select an integrated time limit for the removal of the unwanted object from a video. Both starting and ending times that can be customized.
How to Remove Unwanted Objects from a Video with Premiere Pro

If you want to erase an object from the video, then the below-given instructions will help you a lot:

Step 1

To get started, access Premiere Pro on your device and import the video into it. After importing the video, drag it to "Timeline" and manage its length. After this, hold "Alt" and video in "Timeline" together to create a duplicate layer.

Step 2

Once the duplicate layer of video is created, go to the "Effects Control" panel and select "Masking Tool" from here. Afterward, draw a mask around the object and access "Feather" in "Mask Setting." You can increase the feather for a better outline view.

adjust the mask feather value
Step 3

Following this, go to "Position Properties" and move the text in an upward direction. Now, access the "Color Panel" and adjust the gradient until it blends smoothly.

customize the color panel values

Method 3: HitPaw

HitPaw is an innovative desktop tool that can help you to remove moving objects from video. With this tool, you can enjoy this process without getting bored because of its illustrative interface. Other than this, HitPaw can do lots of video tasks for you. So, you can make your video free from unwanted objects along with good editing with the assistance of HitPaw.

Moreover, it supports diversified devices, so you can use it anytime and anywhere without any restrictions. You can also use its online version if you don't want to compromise the space of your device.

Supported Devices
  • Windows, Mac
Persuasive Key Features of HitPaw
  • With this tool, you can add aesthetic retouching to photos. It also supports various formats like BMP, PNG, and JPG, which you can use for conversion.
  • Extracting audio, changing the speed of audio, and cutting it is a very easy things with HitPaw. You can also merge and compress audio files for your ease.
  • You can loop, reverse, and mute videos with HitPaw conveniently. Moreover, it also allows you to face-animate the video and compress it for easy sharing.
How Can You Remove Unwanted Objects In a Video With HitPaw

You can remove objects from a video by using HitPaw, even without any editing skills. Feel free to follow the enlisted steps to do better while implementing this task:

Step 1

Open HitPaw on your device and import the video from which you want to remove objects. You can do this by clicking on the "Choose File" icon from the main interface.

import the video file
Step 2

After importing the video, click on the "AI Object Removal" button and frame the unwanted object. Now, click "Next" and adjust the removed area. You can also click on the "Reselect" icon if you are unsatisfied with the results.

select video object remover tool
Step 3

Once done with selecting an object, hit the "Preview" button to check the results without the unwanted object. If satisfied with the results, press the "Export" button on your device.

preview the video

Method 4: After Effects

Adobe After Effects also holds its name in the list of reliable object-removal tools. With this, you can use complimentary after-effects and make your video more attractive than ever. This tool is perfect for implementing your creativity in a video. It not only helps get rid of unwanted objects in a video, but you can also give it engaging outlooks without doing much.

It also works smoothly with other Creative Cloud applications. You can use layered PSD or Premiere Pro along with this tool to improve your video's efficiency.

Supported Devices
  • Windows, Mac
Elemental Key Features of After Effects
  • With this tool, you can add illustrations and multiple types of motion graphics in a video to tell the story.
  • It also supports preset motion designs like spin graphics that can help you add well know motions to a video.
  • You can also animate the text and create visual effects for your viewers in a video with After Effects.
What is the Process of Removing Unwanted Objects with After Effects

The steps involved in removing unwanted objects with After Effects are mentioned in this section. Follow these steps carefully to eliminate unwanted objects:

Step 1

Import the video in After Effects and go to the "Window" menu. Select the "Content Aware Fill" and the "Tracker " tool from here.

select the tracker option
Step 2

Next, select the "Pen Tool" and choose the video from "Timeline." After this, using the pen tool, frame the area around the object. Afterward, access the video properties and select "None" for the "Mask" option.

choose the none option
Step 3

Following this, access the "Method" dropdown menu in the "Tracker" settings and choose a method per your requirement. Now, go to "Mask," select "Subtract," adjust "Alpha Extension" and "Fill Method," and click on "Create Reference Frame."

create a reference frame
Step 4

This will open Photoshop on your screen, from where you have to create a reference frame by accessing the "Fill" tool and selecting "Content-Aware" as the "Contents" option. Afterward, adjust the reference frame position above the video in the timeline to remove the objects from the video. You can also use the "Generate Fill Layer" option if you want After Effects to do all the work.

use the fill option

Method 5: KineMaster

KineMaster is well-known software to remove objects in a video. It is widely used to make edits in a video as per one's requirements. The area also presets templates in it which you can use to edit videos without any problem. Moreover, it is an easy-to-use mobile app, so you can use it without editing skills. It is also used to cut out unwanted objects from vlogs, music videos, and more.

You can also replace the media with other types of media like images, sounds, and more. Adding captivating filters and effects is also a straightforward thing with it.

Supported Devices
  • iOS, Android
Prevalent Key Features of KineMaster
  • It also supports a green screen, so you can replace the whole background of an image or video.
  • You can save high-quality edited videos and share them on multiple social media platforms.
  • There is a wide array of soundtracks and effects in it which can be used to make videos more upgraded.
How to Remove Unwanted Objects from Video in KineMaster

To remove unwanted objects from videos in KineMaster, follow the steps mentioned below:

Step 1

The first thing you need to take is a screenshot of the video in which the object you want to remove is clear. Afterward, remove that object from the photo using any object removal tool for images, such as AniEraser. Now, open KineMaster on your device and import the video and screenshot.

add the photo and video
Step 2

Next, adjust the photo and video clip in the timeline, such as cropping the picture with the "Cropping" feature of KineMaster. Next, apply an "In Animation" effect on your photo to properly blend it with your video to give a natural look.

add an animation effect
The Last Words

In short, cutting out unwanted objects from videos is very important. You can do this perfectly by using object removing tool. The above-mentioned objects removing tools hold higher capabilities in this domain. However, the best among them is AniEraser. With this AI tool, you can remove objects and give professional outlooks to your videos.

Manuel Gonzalez
Manuel Gonzalez Oct 31, 23
Share article:

ai-headshot
ai video generator
AI video enhancer