AI (Artificial Intelligence) is now a key player in our lives. One of the fields where AI is ubiquitous is photography or image generation. With a tool like Midjourney, you can create high-quality photos for printing or share them with online friends. But because this AI tool comes with limited resolution and size, the images may look grainy when printed out. So, in this tutorial, we'll learn how to create an AI image using Midjourney and how to upscale Midjourney for larger resolutions, hence clearer printouts. Let's learn!
In this article
Part 1. How to Create High-Res Images on Midjourney?
Before we learn to enhance Midjourney images, let's first discuss how to create photos using this AI-powered tool. At first, using this program may sound intimidating. However, creating an amazing AI photo will only take a few seconds. And guess what? Using Midjourney to create photo art is absolutely free.
Follow these steps:
- Before creating a Midjourney account, sign up on Discord, a free voice and text chat service. Thankfully, creating a Discord account is also quick and free.
- Once you have a Discord account, launch Midjourney on your browser and tap "Join the Beta" at the bottom-right corner. From there, the site will redirect you to Discord, where you'll accept the invite and log into your Discord account.
- Inside your Discord chatroom, you'll see the Midjourney icon on the left rail, a white ship-like symbol. This means the two servers are successfully joined.
- Now open a browser tab and type https://discord.gg/midjourney.
- Select one of the newcomer rooms on the left pane and type /imagine before entering the keywords for the images you want to create. For example, you can tell Midjourney to generate an image about dragons, nature, forests, etc. You can also instruct Midjourney to upscale to 4K and make it hyper-realistic.
- Type --v 4 to use the program's previous version 4, which will give you the best results. You can also specify the aspect ratio as 2:3 by typing --2:3. You can also use 1:1 or 3:2 aspect ratios.
- If all the commands look set, tap the Enter button and wait for Midjourney to create your photo. Choose a version you want to upscale and generate up to 25 image versions of the image. It's that easy!
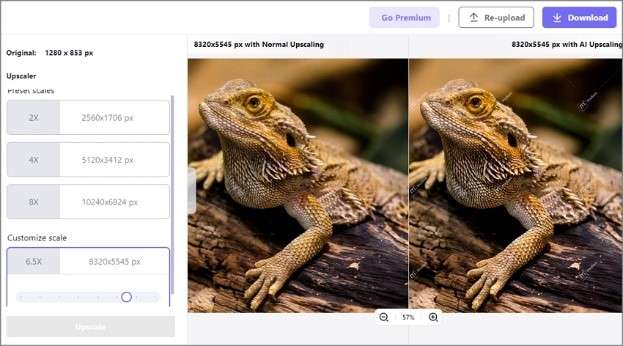
Part 2. How to Upscale Midjourney Images in 1 Click [Free]
Using Midjourney to create trendy photos is an exciting prospect, especially for techies. However, Midjourney can only process a maximum image resolution of 1664 x 1664 pixels. While there wouldn't be any problems viewing this on your phone or computer, you may need a higher resolution for crisp-clear prints.
With Media.io AI Image Upscaler, you can upscale Midjourney images up to 8x or 800% of the original size without losing quality. It's a free online program that allows you to upscale Midjourney photos up to 4000 x 4000 pixels. Media.io works with popular image formats, including JPG, JPEG, PNG, and BMP. However, make sure that the image size is below 10MB.
Follow these steps to upscale a Midjourney photo using Media.io:
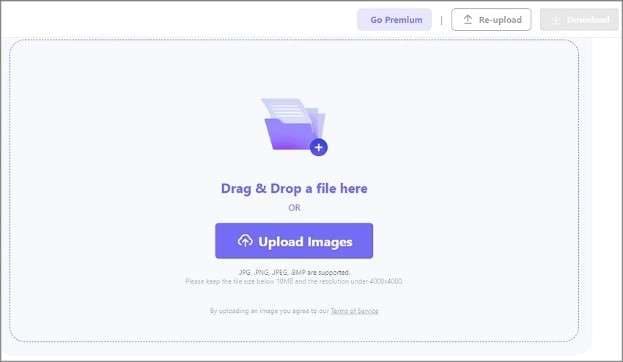
Step 1 Upload your Midjourney Image Online.
Launch Media.io AI Image Upscaler on your browser, then drag and drop the Midjourney photo on the program. Alternatively, tap the Upload Images button to browse your folders for the Midjourney photo.
Step 2 Choose an Image upscale Rate.
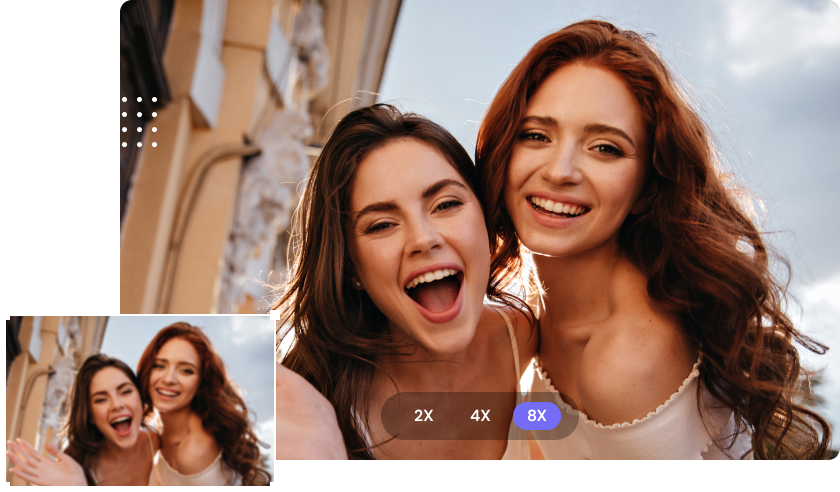
Select the 2x, 4x, or 8x preset Midjourney upscaling rates. You can also choose a customizable rate by dragging the slider between 1x to 8x.
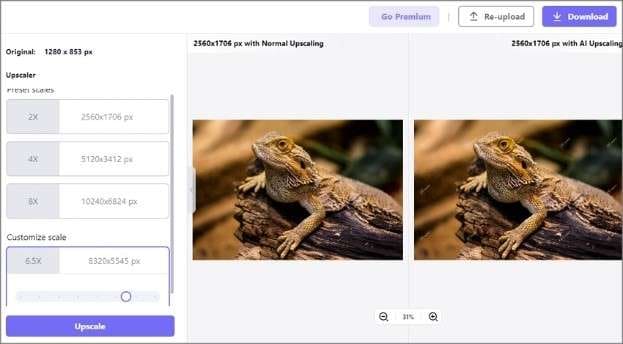
Step 3 Preview and save enlarged Image
Now tap the Upscale button to increase your Midjourney photo's resolution. Once the image is upscaled, you can preview it before downloading the picture to your local storage.
Part 3. [Extra Tips] Upscale Midjourney Images for Printing
Most people often overlook the image DPI (dots per inch) when creating printable photos. It's important to note that your printer will add up to 300 drops of ink per inch to the picture. Therefore, the Midjourney photo must have the same number of PPI (pixel per inch) that will be printed. Remember that some printers may have less or more DPI.
Create a 300 DPI Image
Most people often overlook the image DPI (dots per inch) when creating printable photos. It's important to note that your printer will add up to 300 drops of ink per inch to the picture. Therefore, the Midjourney photo must have the same number of PPI (pixel per inch) that will be printed. Remember that some printers may have less or more DPI.
Consider this; your printer can support 300 DPI. In that case, you must know the number of pixels to input into your printer. For instance, if you want to print out a 5x5 photo using a 300 DPI printer, you'll need a minimum image resolution of 1500 x 1500 to get the best prints. So, don't forget this minor math.
Sharpen and Edit the Photo
Nobody would be attracted to a print image that looks dull and blurry. The thing is that image prints require a bit more sharpening than a computer or mobile photos to improve clarity. Many programs can help sharpen your Midjourney photos, including Deep Image AI, Topaz, Photoshop and Media.io. But be careful not to overdo it.
Besides sharpening, you can also use an image cropper to resize your photo if it already has the correct aspect ratio. This can come in handy if you want to remove unwanted image backgrounds. But it's critical to use a cropping tool that allows you to lock the aspect ratio while editing to avoid printing out uneven images.
Use PNG Format
This one is more self-explanatory. Most beginners can be tempted to use JPG on the Midjourney prints. However, JPG is a lossy image format, meaning the image will only get worse with more pixels. On the other hand, PNG is a lossless format for compressing your Midjourney photos without sacrificing the original quality. In addition, PNG is usually more friendly to text prints. So, always use PNG to print pictures unless stated otherwise by the printer manual.
Create a Test Print
Another straightforward but often ignored printing practice is making a test print. Before you print the final product, it's vital to make a test print to see how the final image will look. Luckily for you, most printing services offer test prints for free. You can also crop a small section of a big picture and print it on paper to crosscheck if the final print hits the mark.