

The colors in pictures and videos are capable of changing by color grading. It is an essential technique for editing videos to give them a more polished appearance. Additionally, it is used for many things, such as fixing visual issues and altering image modes. Color grading gives your video a more polished appearance and for special effects like wipes, fade-outs, and black screens.
It is impossible to disregard the importance of color grading in video production. One of the most crucial things you can do to improve the appearance of your films is this. This article will show you how to make stunning, dramatic color schemes for your videos using final cut pro color grading. You may also change the brightness, contrast, and exposure with the tools in Final Cut Pro.
In this article
Part I. Understanding the Color Correction Workspace in Final Cut Pro
A video clip's colors are adjusted during the color-correcting process to make them appear more attractive and natural to viewers. Using Final Cut Pro's color-correcting tools is the most effective approach to accomplish this. You may alter your film in the color-correcting workspace to change how it appears in front of the viewer. Color correction changes the brightness and contrast levels of various regions within your movie.
Color Correction Tools in Final cut pro
Editors may change the hue and tone of their video material using a range of color correction tools in Final Cut Pro to get the desired appearance and feel. We will discuss some of the color correction tools in this article.
- Use of color board
It modifies the colors and saturation of your videos and photographs, giving them a professional appearance. It contains a board that consists of four controls. The first control is used to change the colors of the entire film. The second one is used to add colors to the video. The last controls adjust the mid-tones and highlights.
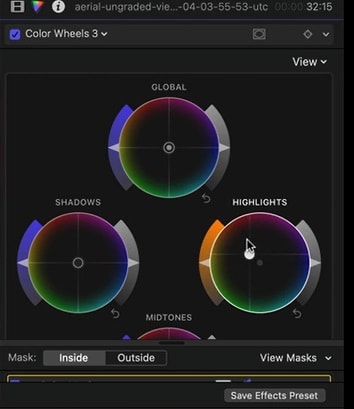
- Use of color wheel
It is a capable color-correction tool in Final Cut Pro. By using three hue wheels for the shadows, mid-tones, and highlights, you may adjust the brightness, contrast, and saturation of your videos and images. The color wheel is used to achieve styled effects and balance the colors and tones in your film.
The basic colors on the color wheel are red, green, and blue. These are the colors that are applied to generate the other colors in the color wheel. To make a specific hue, you blend these primary in different quantities.
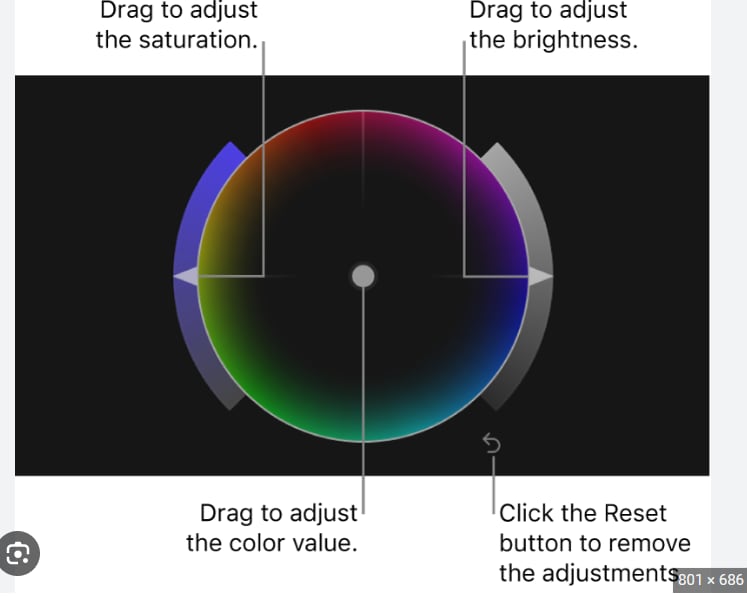
Click the "Color Wheels" button in the color correction area of the Effects browser. Change the hue and tone of the darkest part of your project by adjusting the shadows. To adjust the color and tone of the middle sections of your videos, use the mid-tones color wheel.
- Use of color curves
Color Curves is a color editing tool that uses lines to modify color. You may change the contrast and color balance of your film, as well as create customized effects. Lines are the shadow adjustment region, where you may change the color intensity. Color curves can be used to brighten or darken particular areas of an image or video, modify the saturation levels of colors, and correct color balance concerns.
- Use of Hue and Saturation curves
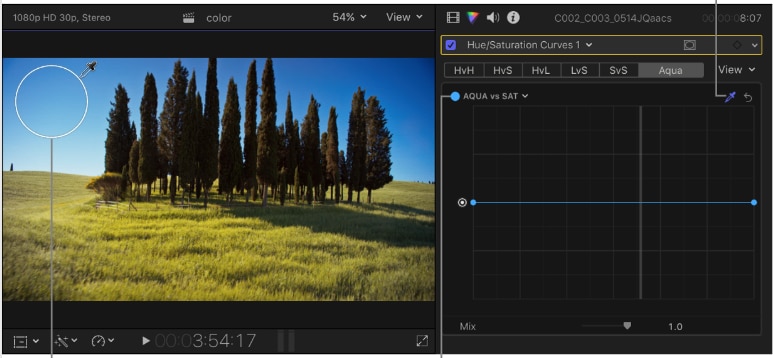
In Hue and saturation curves, adjust the saturation levels of individual colors in your project. It has six adjustment layouts: Hue VS Sat, Hue against Hue, Hue VS Luma, Luma VS Sat, Sat VS Sat, and Color VS Sat. You may customize the saturation, hue, luma, and so forth.
You may modify the overall color of the video by adjusting the Hue curve. To make your clip seem more natural, modify the saturation curve so that it is not too strong.
How to navigate the color correction interface?
Color correction is an essential aspect of the video-producing process due to its big impact on the overall clarity of the produced video. Color correction can improve your clip's clarity and brightness. Accessing the color-correcting interface in Final Cut Pro may appear difficult initially, but once you get the hang of it. It is rather simple. You can navigate the color correction final cut pro by following these steps:
- After opening the Final cut pro software on your laptop, go to the Windows tab, then click on Workspaces. And then move to the color and effects.
- Select the video or picture to correct colors from the timeline or the internet.
- Click the Color Correction button in the top corner of the viewer or press Command-6 on your keyboard.
- Color correction tools like color wheels, hue curves, saturation, color board, and so on may be used to change the color and exposure of your film. To match the color of one clip to another, color balancing and color matching can be utilized.
- A split-screen display of your video will show in the color correction interface. The original clip appears on the left, while the updated version is shown on the right.
Part II. How to color grading in Final Cut Pro?
Color grading may substantially increase the attractiveness of a video or image, making it more visually attractive to the audience. Colors and tones may shift dramatically while filming in different locations or lighting conditions. Color grading is a way to combine and make a film appear more unified. Here are some basic steps of color grading in Final Cut Pro X:
Step 1 Recording Your Clip
When making your video, you must select the finest quality parameters on your camera. It's easy to imagine that getting as much hue in your shot as possible during recording is beneficial. It is vital to film with a flat color profile. Shooting with a flat color profile provides you with additional color grading choices in production.
Step 2 Create a new project
You can import your video by dragging it into the project video or by clicking the "Import " button. Press the inspector button and move to the information tab. A drop-down will appear then you have to select the Color LUT dropdown. Lastly, select the color profile according to your videos.
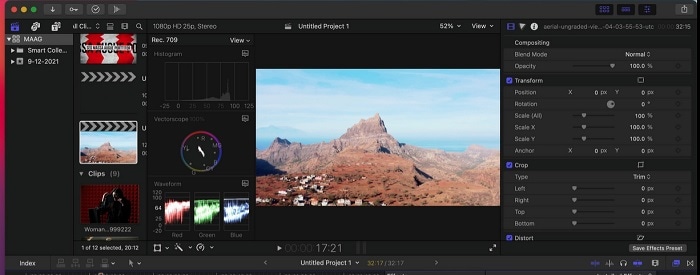
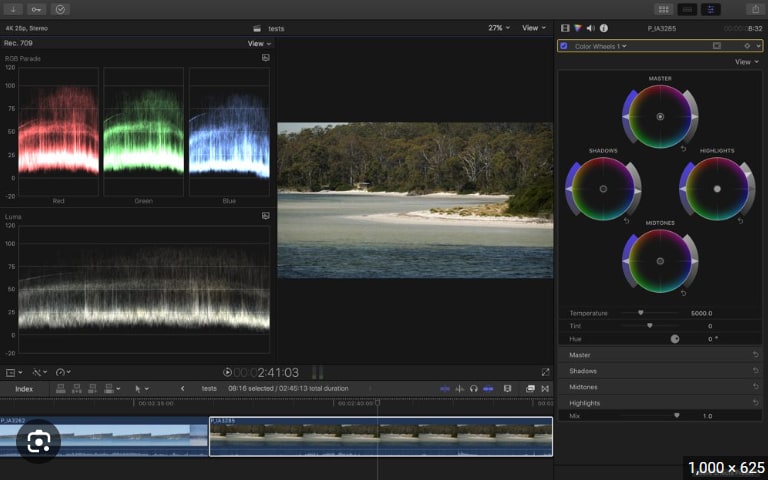
Step 3 Turn on the video scopes
Scopes offers all of the information on the colors used in the clip. When you select a view from the drop-down menu, several alternatives appear. Then, choose Show in Viewer and Video Scopes. Scopes determine if the color and exposures are in the appropriate spot.
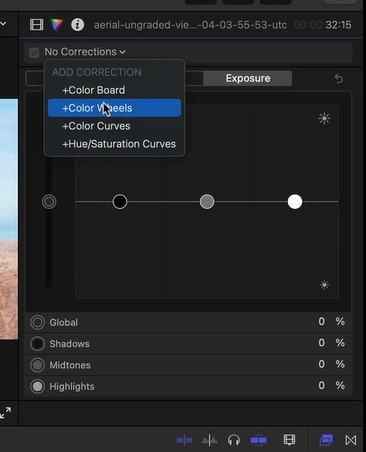
Step 4 Add color wheels to the clip
Click on No correction then a drop-down will appear. You can see various options in it. It likes the Color board, Color wheels, Color curves, and hue/saturation curves. Then click on the +Color wheels.
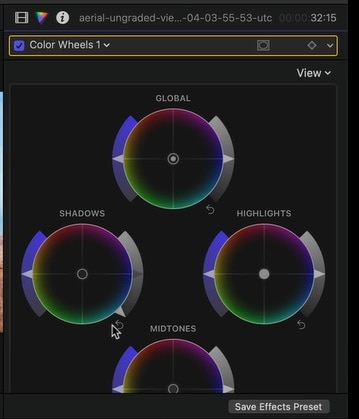
Move on the Shadows wheel and move it downwards; drag the Highlights wheel and turn it upwards. It will remove extra shadows from the clip and gives a smooth finish.
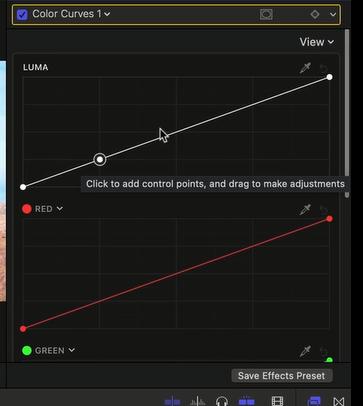
Go to the color wheels dropdown and select the +color curves. Add the control points on the line and adjust them by dragging.
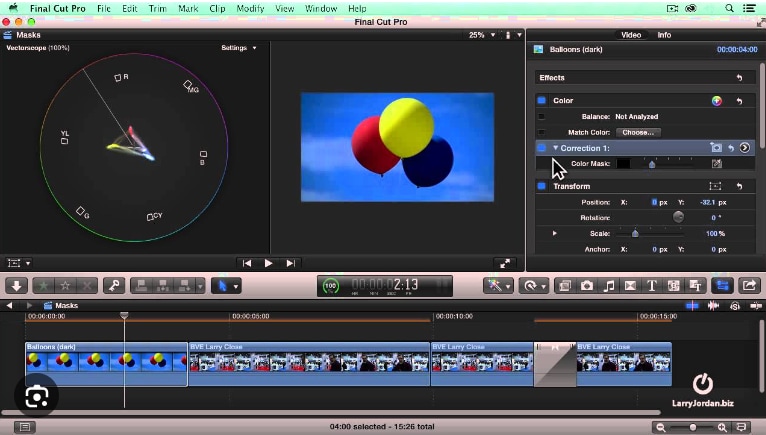
Again add the color wheel and then add the color mask. Drag the cursor to cover the area of the image. Go to the shadows wheel and move its center point to another side.
Go to the correction drop-down and add a third color wheel. Then click on the color mask and select highlights. Move the center point of the highlights wheel upwards to orange color.
Part III. Finishing Your Color Grade
When you are done with FCPx color grading, you may add final touches to make your video look more professional. Your video must look consistent and attractive across several devices. After following all the steps of color grading, you can see a visible difference between the original and the colored clip.
Export your clip and run it via a variety of devices to confirm that the colors are consistent. Go to file and choose Master file from the dropdown of share. A dialogue box will appear, go to the settings and fill in all the information about formatting, resolution, color spaces, etc. In the end, click on next to export your video clip.
The Best Online Color Correction App: Media.io
Searching for a quick and easy solution to color-correct your videos? Look no further than Media.io. This online software is suitable for fixing color balance, saturation, and brightness in your videos. Additionally, even if you're a newbie, it is very simple to use. Thus, if you're searching for a quick and perfect approach to color-correct your clips, check out Media.io.
Media.io is artificial intelligence (AI) free software that improves the quality of your movies and photographs. To improve the clarity of the video, you must upload the project to the program. Dark shadows may be made lighter, and light shadows transform into darker ones. It adjusts the temperature, exposure, and contrast automatically.
Features of Media.io for color correcting
The Media.io app is an excellent tool for color correction photographs and movies. It has a variety of features that make it simple to choose the appropriate colors for your project. The Media.io app has the following features:
- You can do color correction of your projects with a single click. It makes the whole editing easier.
- You can also export your video for free without any watermark on it.
- A person with basic knowledge can also do editing and color correcting.
- io supports various formats, which include MP4, JPEG, JPG, MOV, and Webp.
How to Use Color Correction in Media.io?
As we know that all photographers use different software for color correction. No doubt, those software gives a flawless look to the videos and images. But the worst thing is that they are highly paid tools and not everyone can afford them. Media.io offers a color correction feature to edit videos. Here is a step-by-step guide to using color correction in Media.io:
Step 1 Import your videos or images
Go to your browser and search for Media.io auto color. You can see two options on the front page of the screen, one is Upload an image now, and the second is upload video now. If you want to edit your image, then click on upload image. You can also drag your media into it.
Step 2 Editing the videos or images
The program will automatically correct the color when you upload media. Uploading videos or images takes time. The processing time is determined by the size of the file. You can also compare your original or edited image to see the difference.
Step 3 Preview and export the media
When you finish the color correction of your image, click on the download button, where you can see the file type and image quality. Then export the image to your desired location.