Adobe Premiere Pro is an exceptional software for editing media content. Color grading Premiere Pro helps you in making unattractive videos more attractive. You know that Premiere Pro is not that easy to use. It takes at least a month to master skills to work with it. However, if you are short on time and want to learn it in the best way, then this article is for you.
By the end of this article, you will know all the basics of Premiere Pro. Moreover, we will also give you some polished tips to help with learning Premiere Pro. The bonus tip provided at the end of the discussion will give you the best straightforward solution for auto color correction.
In this article
Part 1: A Brief Introduction to Premiere Pro - A Robust Timeline-Based Video Editor
There are considerable numbers of color-correcting tools out there. Yet color grading Premiere is known to be the most reliable one. This tool allows you to add more leverage to your creativity to derive better results. It has a tidy and flexible interface, making it an intuitive tool. There are many organizational tools in it, and all of them work at ultra-fast speed.
With its color correction and grading workspaces, you can accomplish the task of Adobe Premiere color grading without compromising the overlays of videos. You can also add multiple types of effects to the video to make it more visually appealing.
Key Features of Adobe Premiere Pro
- All social media platforms have their preferences for aspect ratios. With Premiere Pro, you can not only edit the video but can also import it in different aspect ratios with its auto reframe feature.
- It has a decent number of preset effects, which can help you fine-tune. They are non-destructive and can apply to many videos without any issues.
- Lumetri color of Premiere Pro has all the capabilities to handle your needs regarding color problems. With this, you can work on videos like a professional colorist and add optimal colors to videos.
Pricing Plans of Adobe Premiere Pro
| Premiere Pro Single App | $20.99/month |
| Creative Cloud All Apps | $54.99/month |
| Students and Teachers All Apps | $19.99/month |
| Business | $35.99/month per license |
Part 2: Easy and Straightforward Instructions to Use Color Grading Premiere Pro Features
Are you impressed with color correction Premiere Pro and want to make your videos intuitive with it? Worry no more because the steps listed below will help you with this issue:
Step 1
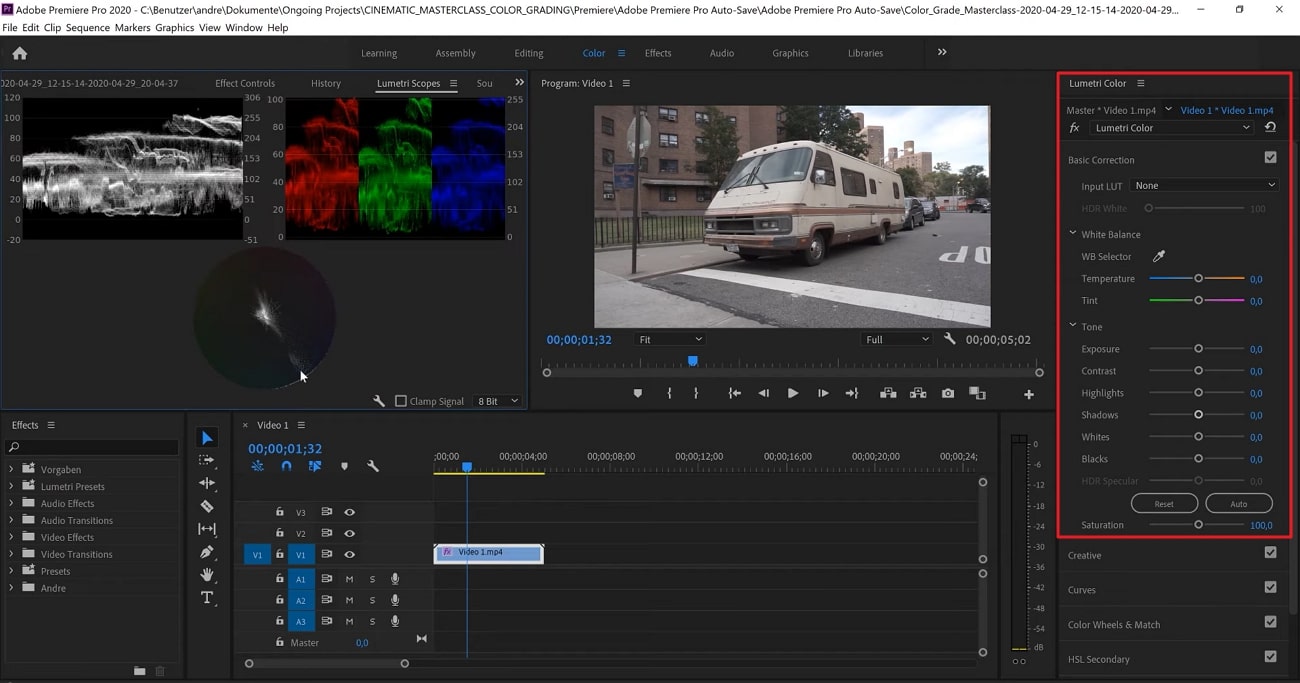
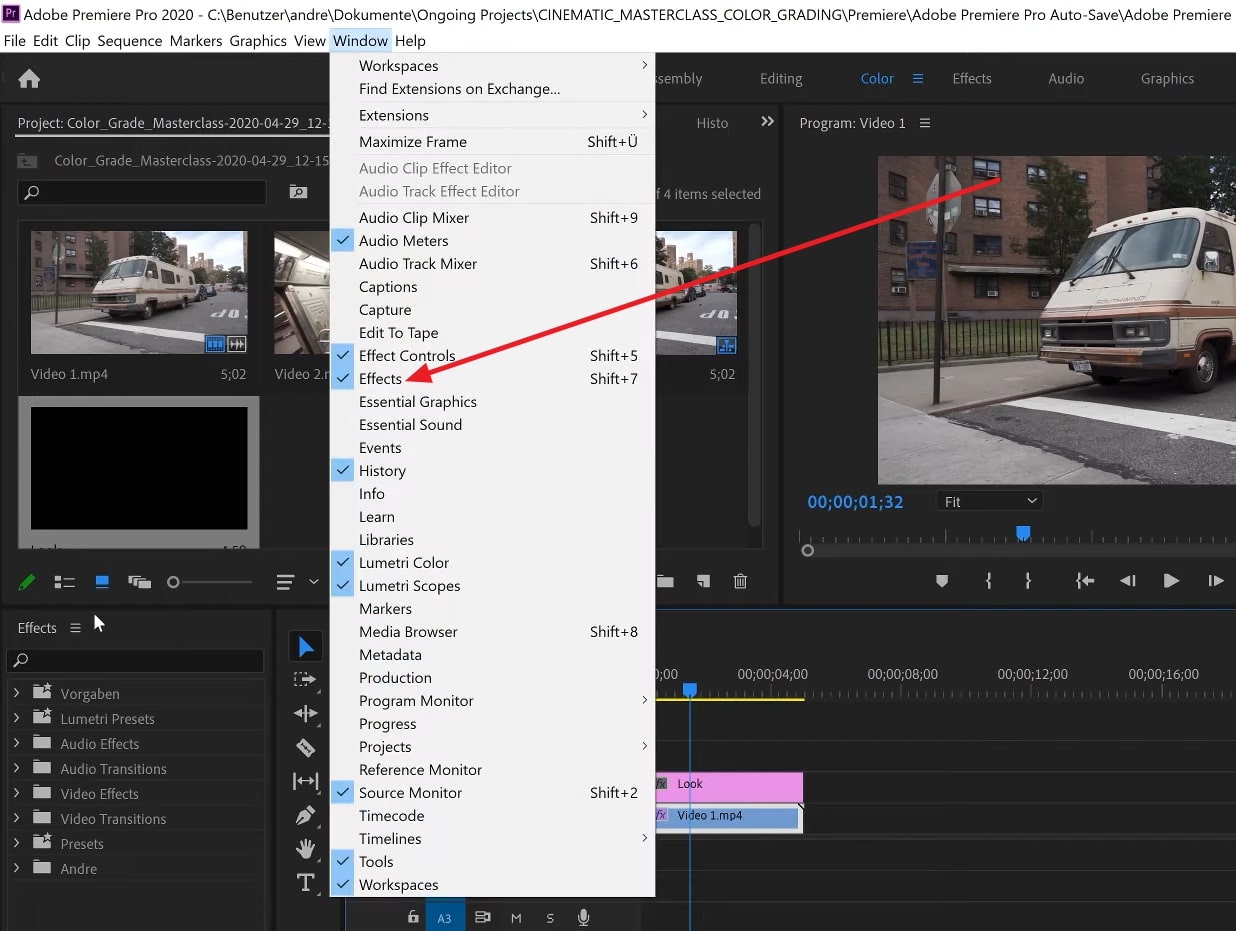
Import the video in Premiere Pro and click on the "Color" panel from the above screen. After this, click on the "Window" tab and select "Lumetri Scopes." Hit the "Tool" icon and choose "Waveform." Afterward, go to the "Lumetri Color" panel and manage the colors with sliders. You can also manage shadows, exposure contrast, and highlights with it.
Step 2
Next, access the "Project" panel and locate the "Adjustment Layer" option to create a new layer. You can also rename it for your ease. Drag the new layer above your video in the "Timeline," tap on the "Window" tab and select "Effect."
Step 3
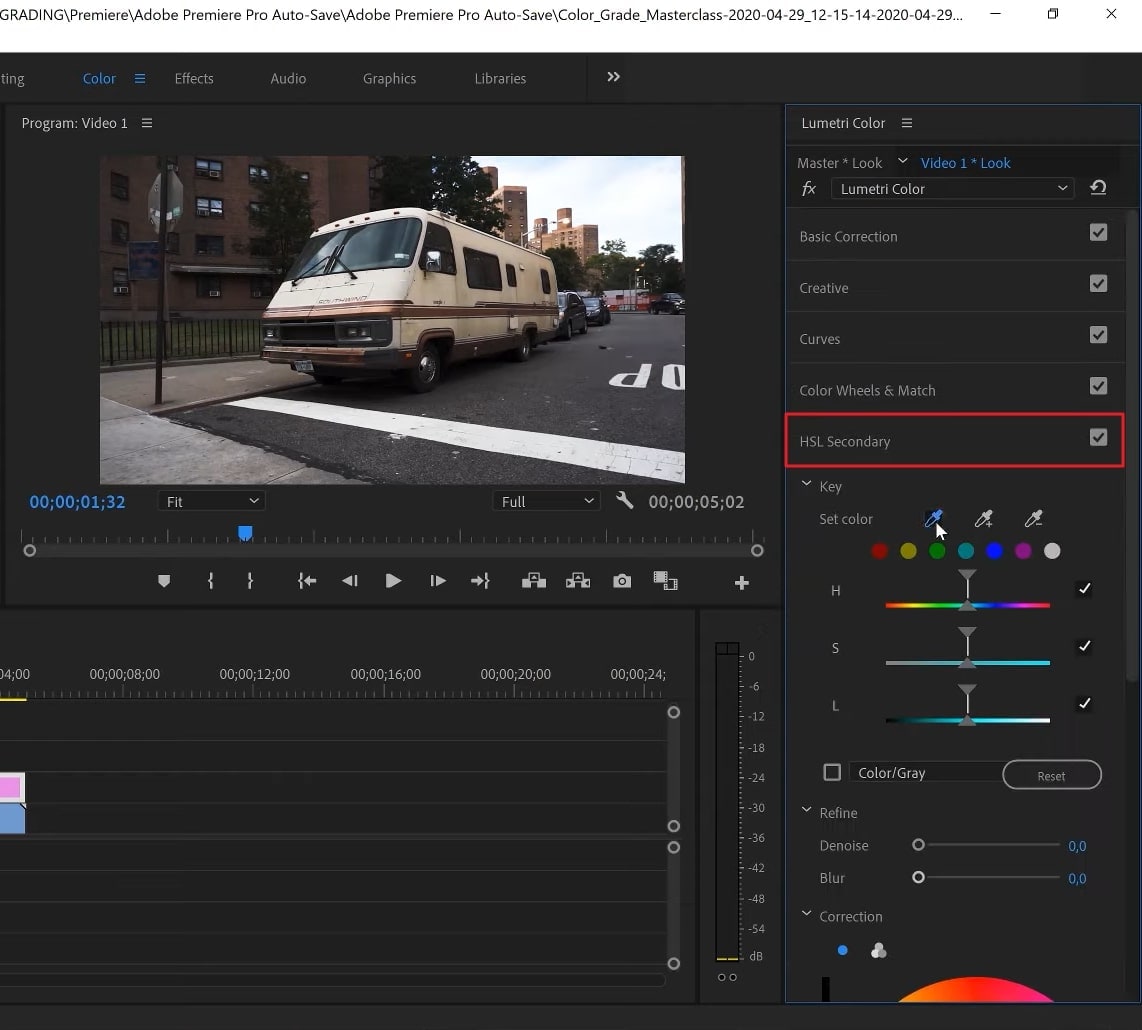
Hereafter, drag the "Lumetri Color" effect in the adjustment layer, go to the "RGB" curve, and manage it as required. Shadows, mid-tones, and highlights can be managed with this. Afterward, jump into "HSL Secondary," select the color and manage its opacity with sliders.
Step 4
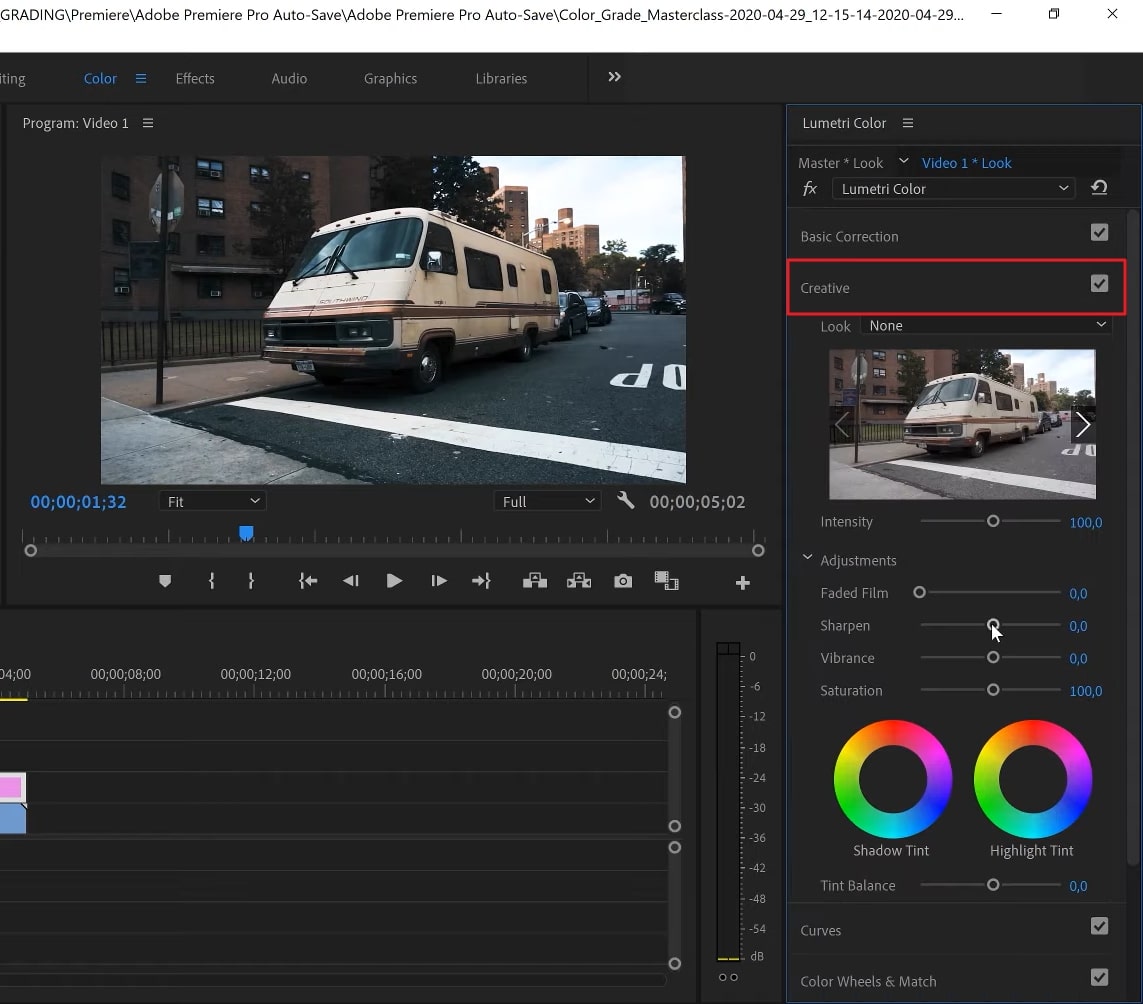
You can also denoise and blur it to give a more realistic look to the video. Go to "Hue Saturation Curves" and create clean black shadows in the video. You can do this by using the "Luma vs Sat" curve. After this, open the "Creative" tab, and you can manage sharpness and vibrance with it.
Part 3: Beginner Tips for Using Premiere Pro in 2023
With tons of decent features, Adobe Premiere Pro is something that all videographers want to master. No matter if you are a beginner-level videographer, you should be familiar with Premiere Pro and cinematic color grading Premiere Pro. The tips listed below will help you to master it easily:
- Work on Your Timeline: Initially, get a grip on working on the timeline. When you are working on a project with multiple videos, you need to review all the footage. This will help you to assemble and catalog the shots in a customized pattern. The creative timeline nesting can also help you in sequencing the clips and their usage in different areas.
- Remapping of Time and Speed: For making professional-looking and dramatic videos, you need to master this skill. Always record your videos at a higher frame rate and use the speed or duration effects. You can also change the frame information and manage the keyframe and speed ramping. It protects your files from splashing and decoupling.
- Utilize Essential Graphic Panel: The graphic panel is best for creating animations. You can use the essential graphic panel to create unique and eye-catching graphics. It will give a complex and professional look to the graphics. Moreover, you can also fine-tune the results to give them a more customized look.
- Resizing Media Files: With Premiere Pro, you can resize the media content with ease. It is the perfect solution to make videos platform friendly without compromising quality. You can automatically cut the unnecessary parts and resize and reframe the videos. Above all, you can also use Photoshop-style rulers and export videos in high resolution.
Bonus Tip: Powerful and Free AI Alternative to Adobe Premiere Pro Color Grading Feature
Premiere Pro auto color correction is very popular among professional videographers. However, it can be pretty difficult for the ones on the beginner level. For this reason, you need to use a tool that can provide a simplified solution to this problem. Luckily, Media.io - Auto Color is a tool that can fit this scenario. With this, you can make the videos more aesthetically pleasing in a limited time.
Moreover, Media.io is powered by AI, so the results are very satisfactory. Other than this, the process of working with Media.io - Auto Color is automated, so you don't have to adjust every unoriented color part of videos. It comprises a blazing-fast processing speed and has a very well-structured interface. You can work on a wide array of formats with it. This tool can also work on both videos and photos.
How to Color Correct Videos with Media.io - Auto Color Tool
Follow the straightforward instructions mentioned in this article to color-correct the videos with Media.io - Auto Color:
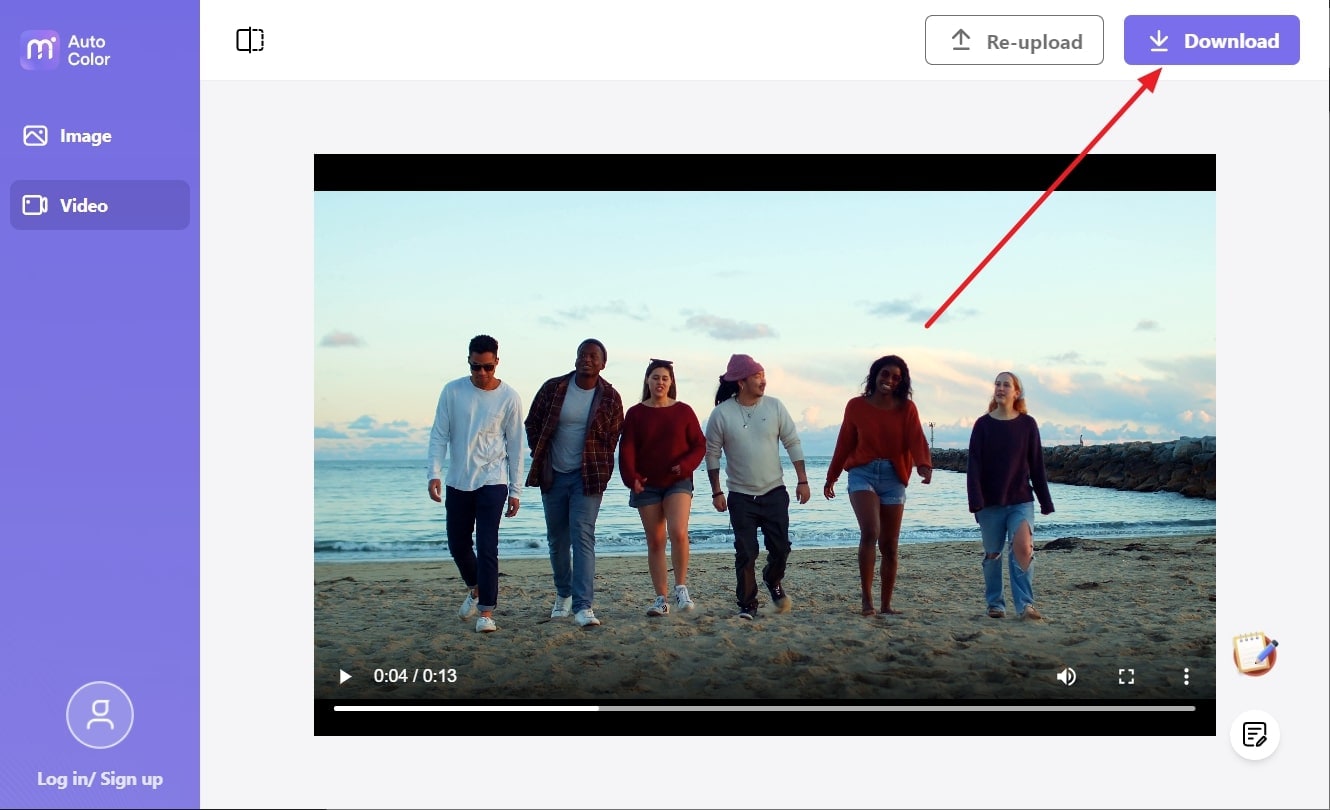
Step 1 Import Video in Media.io - Auto Color to Color Correct It
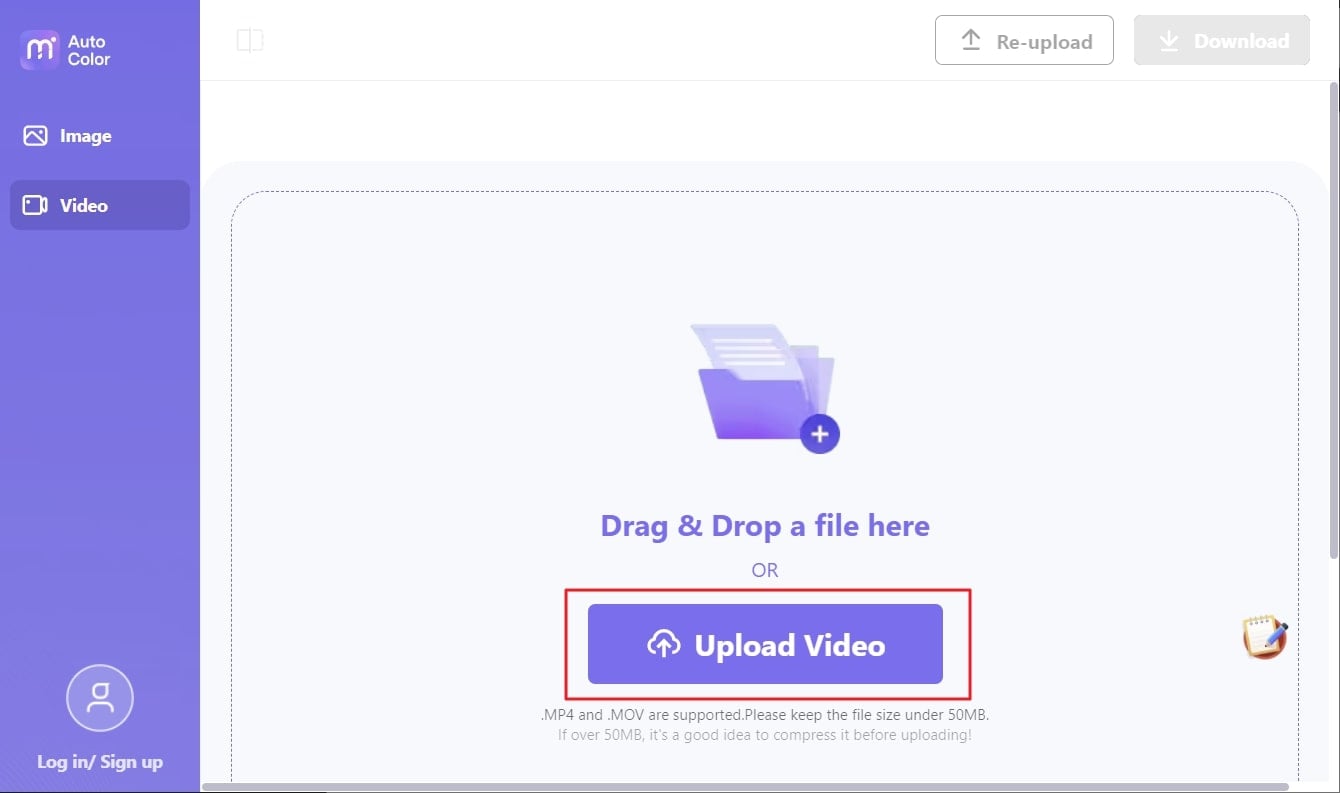
To begin, access "Media.io - Auto Color" on your browser, and from the official site, click "Upload Video Now." After this, select "Video Auto Color" and click "Upload Video." Following this, import the video of your choice and wait for a few seconds. You can also correct the images by accessing the "Image" option from the left panel.
Step 2 Save Color Corrected Video in the Device
As its process is automated, it will color-correct the video in a fully automated manner. Click on the "Compare" button to compare the old and the new video, and after this, hit the "Download" button.