Color grading helps you to add mesmerizing colors to photos. If somehow, your image has bad lightning, which is getting in your way of sharing it with the world, you can take assistance from color grading apps. Most people think that color grading in Photoshop will lead to desirable results, which is pretty true. Yet not many people know how to work with Photoshop.
Photoshop is not that much an easy-to-use tool, and many users face complications while using it. For this reason, we will tell you why you should use Photoshop and the process of cinematic color grading Photoshop. Moreover, you will also learn some tips and tricks to master Photoshop. The bonus tip discussed in this article will also provide a simplified solution for photography issues.
In this article
Part 1: Reasons Why People Prefer to Use Photoshop in Every Industry
Color correction in Photoshop is a very popular topic among photographers. People working with photos love to add highly intuitive colors in photos to attract more viewers. If you are new in the field of photography and don't know why you should use Photoshop, then this section will greatly help you. Have a look at the points listed below to learn about the higher functionality of Photoshop:
- Powerful Editing Tools
All the editing tools in Photoshop are very powerful. Whether you are a graphic designer, digital content creator, or UI/UX designer, this tool can help you with everything. Higher proficiency in Photoshop is a step toward creativity. It is a perfect tool to do professional-level editing of photos and make them optimistically impressive.
- Diversified File Type
Photoshop supports a wide array of formats for the ease of users. While working with Photoshop, you will not face any restrictions or limitations. It also helps in creating and sharing versatile files of photos. In addition to supporting multiple types of formats, you can also work on time-sensitive projects with Photoshop.
- Professional Results
This tool can turn beginners into professional photo editors. From learning photo curves to adding and adjusting colors, you can implement all types of creativity in photos with them. This tool also generates a greater sense of accomplishment and professionalism among users.
- Marketing Materials
Consistency is the key to making any business more popular and successful. With Photoshop, you can create consistency in photos without any problem. Photoshop also ensures that all the content, like emails, graphics, and campaigns, can be shared with other people in great quality for deriving high-level results.
Part 2: How to Perform Color Correction in Photoshop? The Best Easy-to-Use Understand Guide
You can make your images more captivating by doing color correction in Photoshop. With this, you can also fix pixel-based, raster, or vector graphic images. This industry-leading image manipulation software has advanced algorithms that can produce good results.
There are many innovative features in Photoshop, such as Clone Stamp, Blur, Healing Brush, and more. Feel free to follow the instructions listed here for color correction in Photoshop:
Step 1
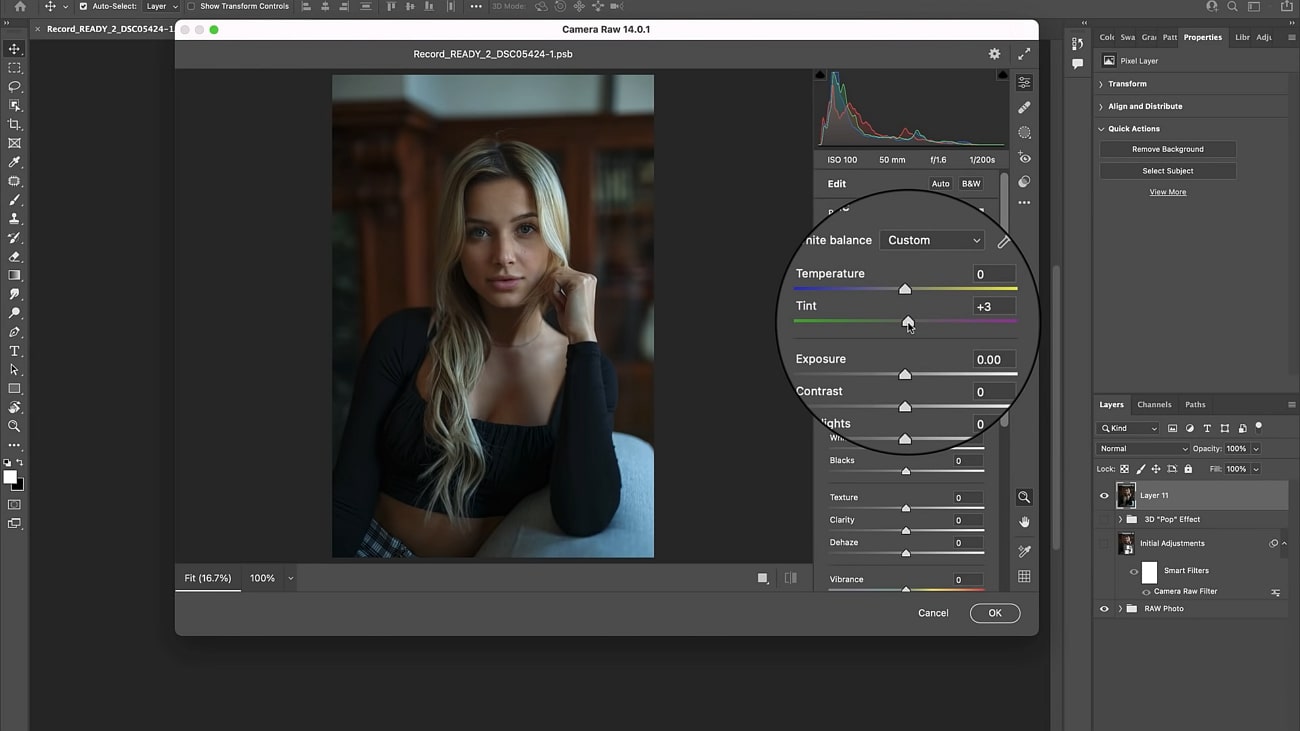
Import the image in Photoshop and create a blank layer. After this, press "Shift + Command/Control + Option/Alt + E" and click on the "Filter" tab from the above panel. From here, select "Camera Raw Filter," and from the appearing option, manage the "Tint" slider to adjust the tint. Access the 'Curves" section and select a color from options like green and red.
Step 2
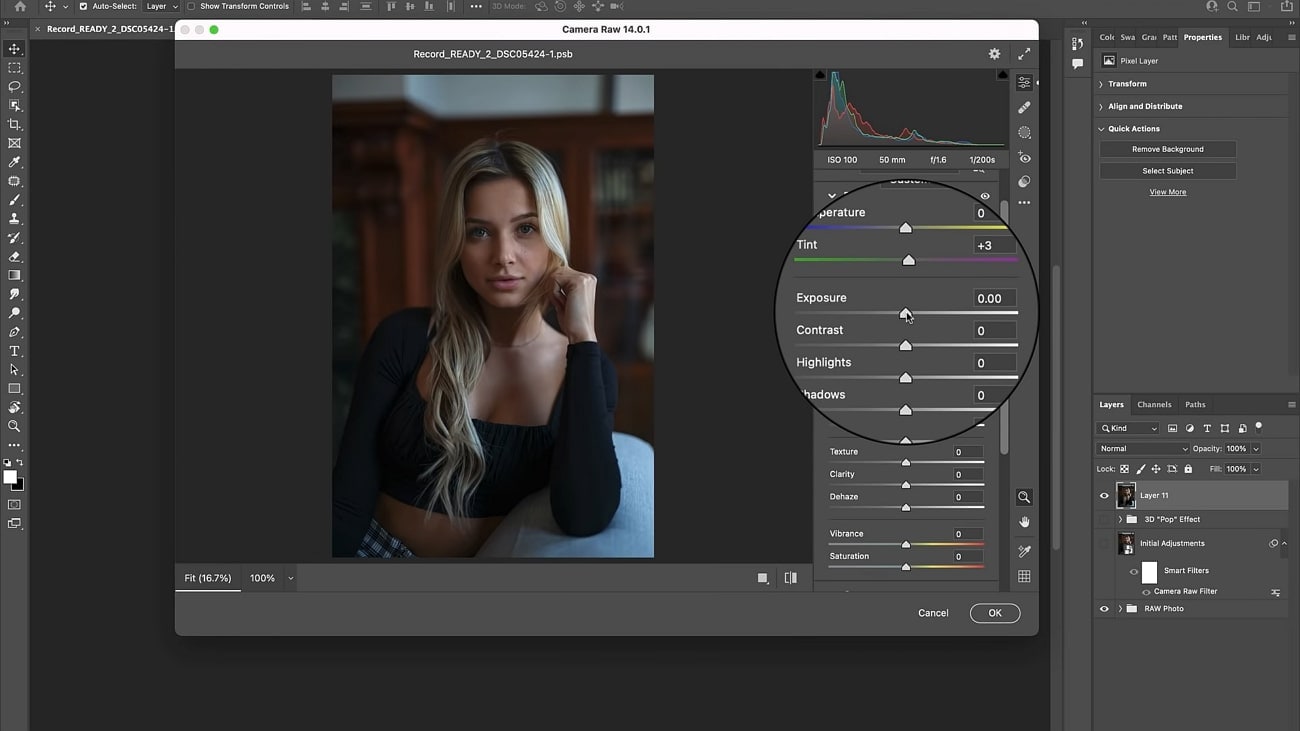
After this, click "Target Selector" and reduce or increase the colors. Select the "Basic" option to customize Exposure, Contrast, shadows, etc. After making basic adjustments, don't forget to hit "OK." Next, access the "Select" tab and choose "Subject" to highlight your object.
Now, create a "Brightness/Contrast" layer, and choose the 'Layer Mask" you have created. Press "Command/Control + I" to invert the picture and select "Soft Black Brush" to remove the white area.
Step 3
Hereafter, go to the "Feather" slider and increase it slightly. Hereafter, go to the "Feather" slider and increase it slightly. Afterward, exit the layer view and tap on "Adjustment Thumbnail." Decrease the value of "Brightness" and "Contrast" to separate the background and subject. By this, you will notice the "Subject Separation Effect" along with the color correction.
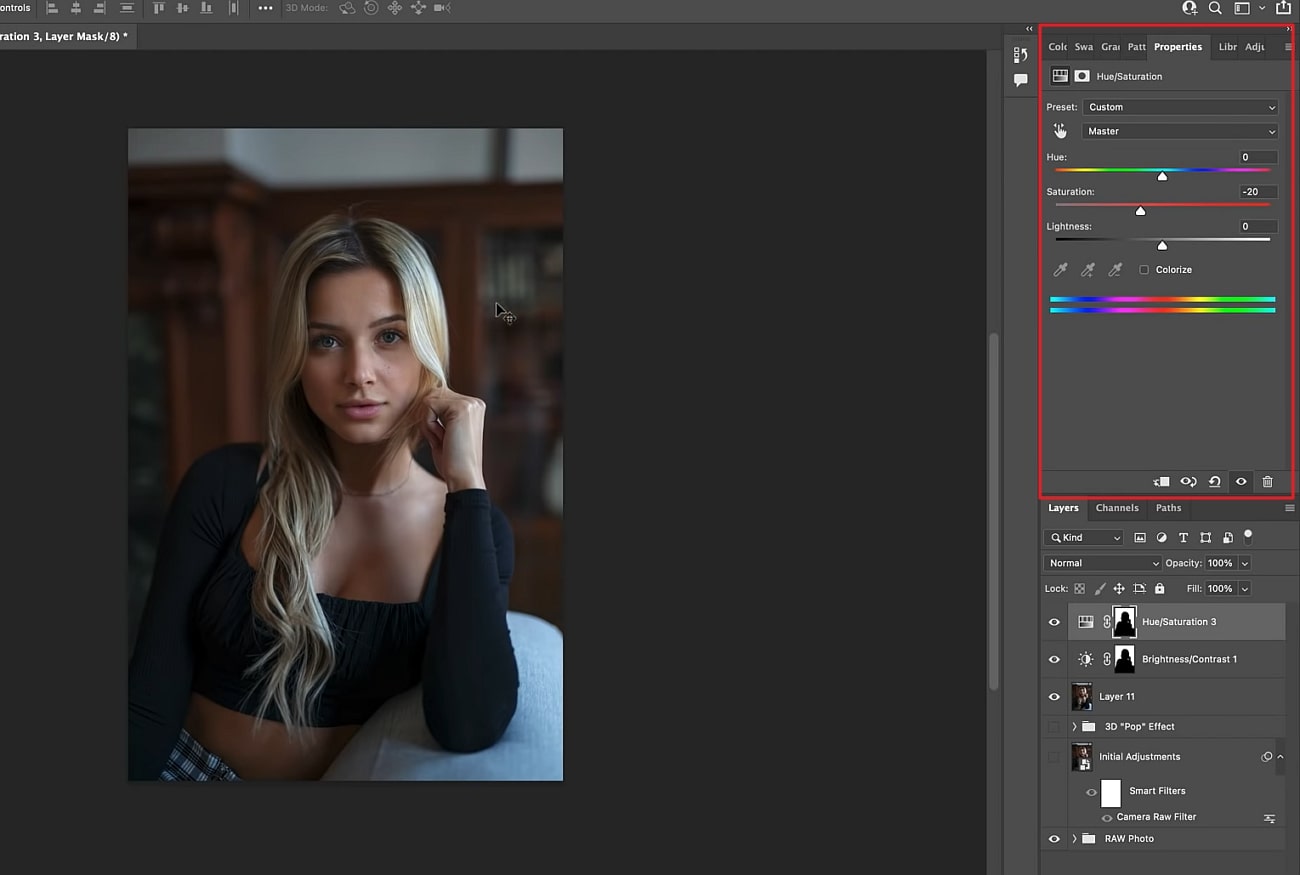
You can also work on the "Hue/Saturation" layer to manage colors. Hold the "Alt" key and drag it to the previous layer. You can increase or decrease the value of the Hue/Saturation layer as per your requirement. Furthermore, you can also create a "Curves" layer and drag and drop the "Hue/Saturation" layer over it to darken the background.
Step 4
Create a new blank layer and press "Shift + Command/Control + Option/ Alt + E" to create a stamp of all visible layers. Following this, hold "Command" and click on any of your "Layer Mask." After this, hit "Shift + Command/Control + I" to invert your image, and then hit "Control/Command+ J" to produce a copy of the subject.
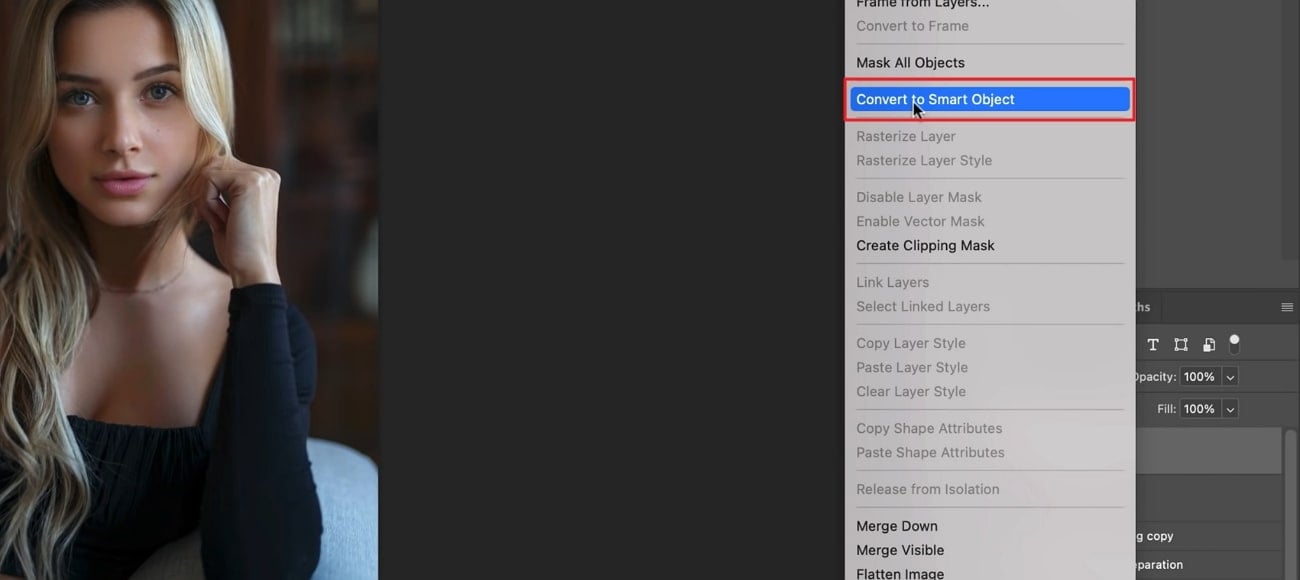
After this, right-click on the "Cutout" and select "Convert to Smart Object." Hereafter click "Filter," choose "Camera Raw Filter," and manage the color gradient as needed.
Step 5
Create a "Curve Adjustment Layer" and invert the layer mask using "Command/Control +I." Select a "Soft Brush" and use it to paint the subject. Use "handpicked," move it to the shadowy area and drag it upward to make your subject prominent.
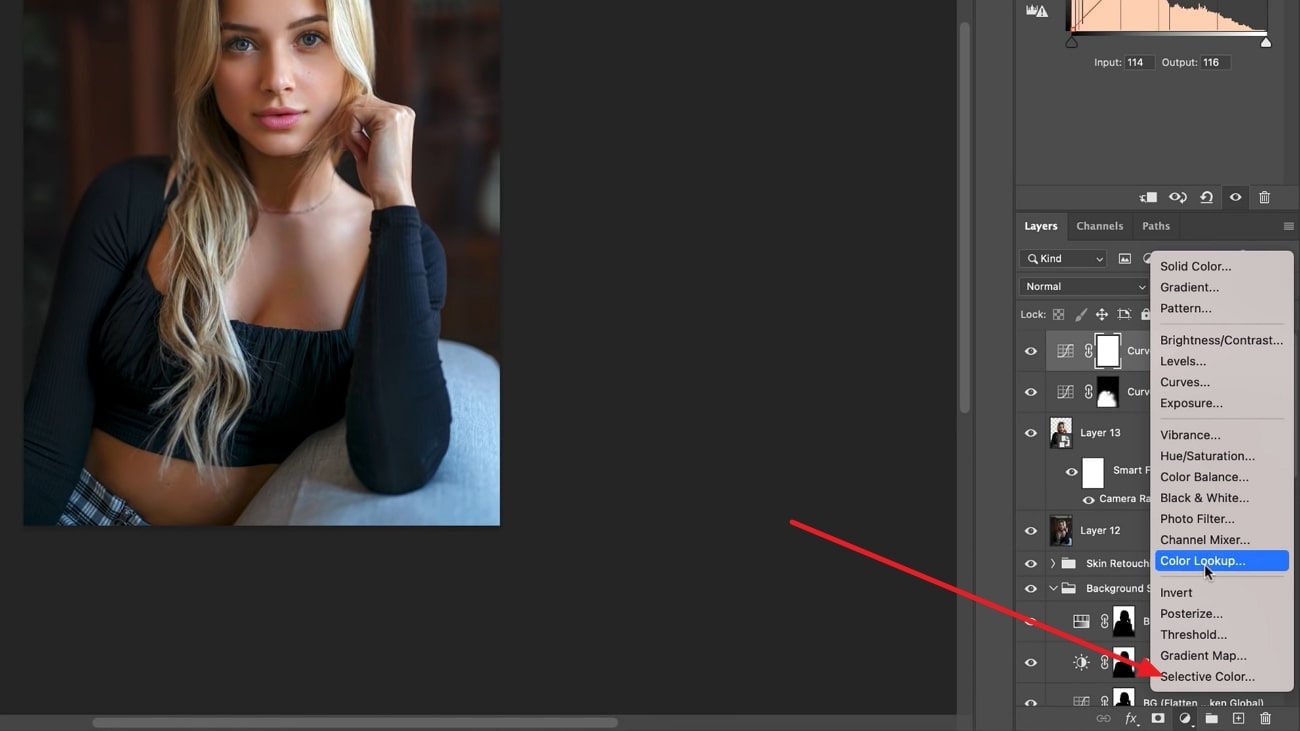
Create a "Selective Color Adjustment" layer and hold "Alt," and drag the layer mask below to the selective color adjustment layer. Hit "Command/ Control + I" to select the subject and manage the color gradient from here.
Part 3: Tips for Mastering Photoshop in Only a Few Months
You can not only change white balance Photoshop but can also boost your photography career with it. There are uncountable ways to learn Photoshop from scratch. However, if you don't know any of these tips, then don't worry. This section will teach highly reliable and implementable tips to master Photoshop. Have a look below to find these effective tips:
- Learn the Basics
Before getting into complications, you need to learn about the basics of Adobe Photoshop. The most common design side that you need to know is graphic design. Learn the concepts like alignments, negative spaces, rhythms, and other notable terms.
- Photoshop Workspaces
The entire working area of Photoshop is termed Photoshop Workspaces. From menus to other toolkits, you can find everything here. You need to get a grip on all the tools of Photoshop, and before that, you need to know their locations. It will help you to access the tools swiftly without getting confused.
- Practice One Tool at One Day
The tools in Photoshop are not limited. There are lots of things that you need to learn, and getting confused in this scenario is a common thing. For this reason, pick one tool at one time and practice it until you've mastered it. Whether you are learning Content-Aware Fill or Clone Stamp, don't jump into the next tool until you master one.
- Take Structured Courses
The internet is loaded with structured courses in Photoshop. Most of them are free, as you know that the best skill comes with learning and practice. So, take courses, and practice the tool by following the instructions. Moreover, experiment and explore the tool in your way without getting bound.
Bonus Tip: Efficient and AI-Powered Color Correction Tool for Beginners
No doubt that Photoshop is a reliable tool. You can also perform color-grading photography with it. Yet, it is not an easy-to-use tool, and you have to practice for months to learn it. Besides this, Photoshop is quite an expensive tool, so if you are going to add some colors to photos by paying dollars, it is not a good deal.
You need to use a tool that can make your photos optimized with the best color corrections without costing a fortune. A perfect tool that can help you in this scenario is Media.io - Auto Color. First of all, this tool has an automated process, so you don't have to do much to get the work done. Other than this, it is powered by artificial intelligence, so results are always high quality.
This tool also doesn't compromise the quality of the photo, even after adding aesthetic colors. Moreover, it does not have irritable size limits and can support a wide array of formats. The process of color-grading images is also straightforward in it. You can work on both video and photos with Media.io - Auto Color.
How to Color Correct Photo with Media.io - Auto Color
The steps listed below will help you regarding photo color grading:
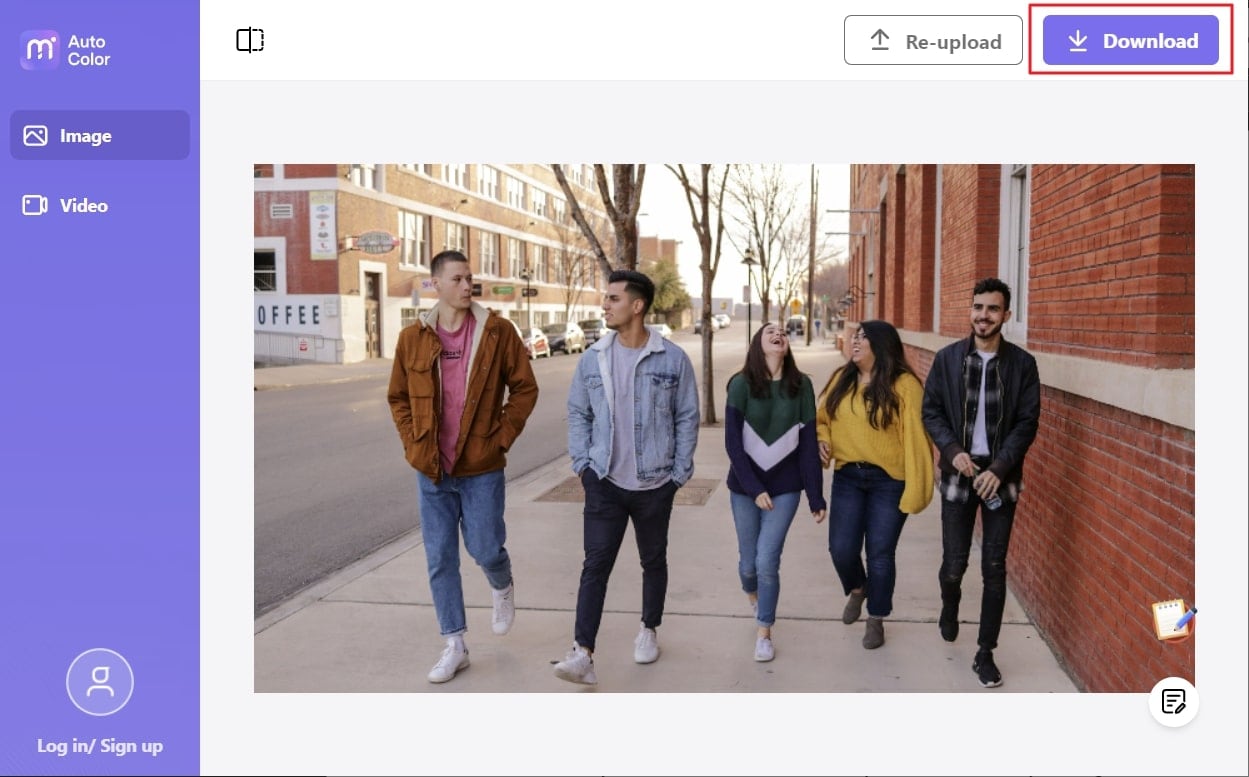
Step 1 Add Image and Color Correct it
Use your browser to access the "Media.io - Auto Color" tool, and from the main homepage, click on the "Upload Image Now" button. After this, press the "Upload Image" button and add the image of your choice.

Step 2 Save the Image in the Device
The process will run automatically, which you observe on your screen. After a few seconds, the photo with the corrected color will be available on your screen. You can select the "Compare" button to compare the old and the new image. After this, click the "Download" button and save the image on your device.