Adobe Photoshop is one of the world’s leading image editing software, including out-of-this-world AI-powered neural filters, unmatched selection tools, and a polished interface. It is the industry standard in digital imaging and is used worldwide by millions. Hence, it is natural for people to think of Adobe Photoshop when they want to edit their images.
You can easily change the color of an object or image in Photoshop, and rest assured that the quality of your image will be maintained. This article will teach you the three different ways to change the color of your image using Photoshop. An up-and-coming software, Media.io Auto Color Correct, will also be introduced to provide an alternative tool to Photoshop. And the last part will share frequently asked questions.
In this article
Part 1. How To Change the Color of Your Image Using Adobe Photoshop
There are three main ways to change the color of your image in Photoshop. This section will introduce how to change the color of your image through Hue/Saturation, Grayscale, and Filter.
Hue/Saturation
Editing your image may be more challenging than selecting a new color. Several elements in the picture contain the same color, so you may need more than just editing a specific color to achieve the effect you are looking for. That is where the Hue/Saturation adjustment tool comes in. It allows you to edit specific colors in an image with ease.
You may need to use a layer mask to restrict specific color changes but fret not, follow these steps to start changing from one color to another using the Hue/Saturation tool.
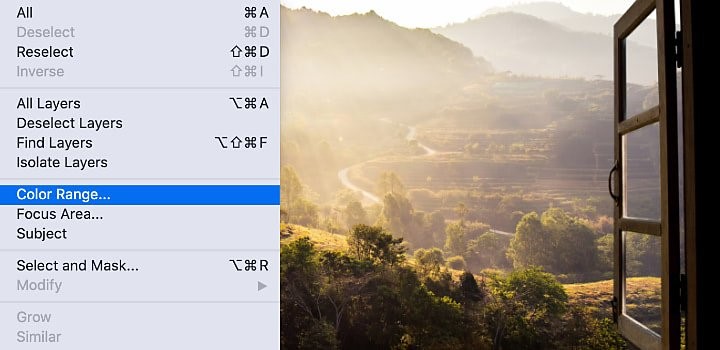
Step 1: Open Photoshop software from your computer and upload the image you want to edit. The first step is to create a layer mask. Click on the Select dropdown menu and click on Color Range.
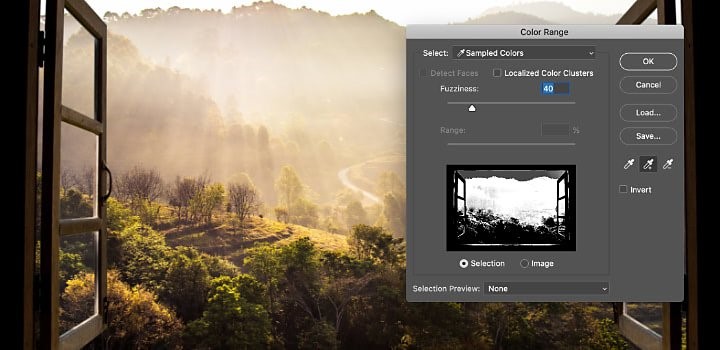
Step 2: In the Color Range window, use the eye dropper tool to sample your target color by clicking on the color you want to modify.
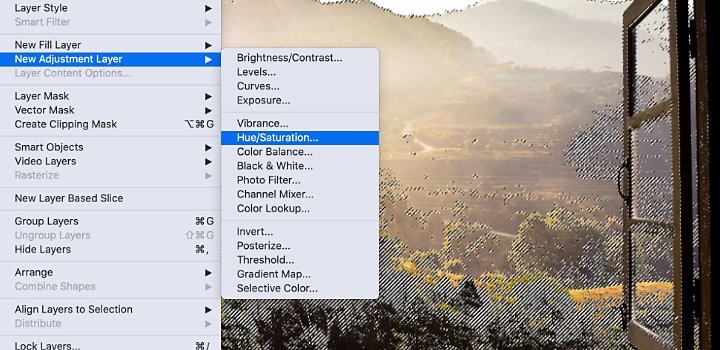
Step 3: Click on the Layer menu, select New Adjustment Layer, and then Hue/Saturation… option.
Step 4: After clicking the Hue/Saturation… option, under the Properties menu, choose the color you want to edit and adjust the Hue and Saturation slider to achieve your desired look.
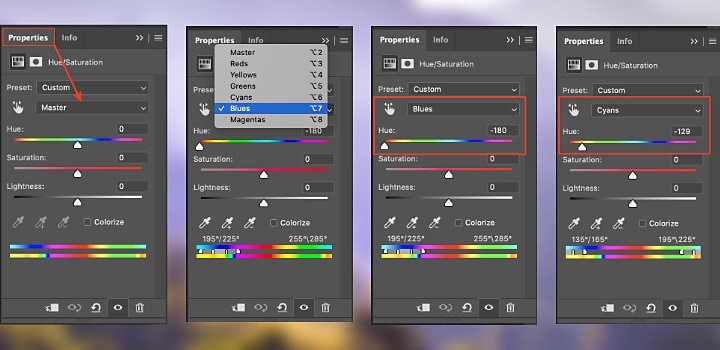
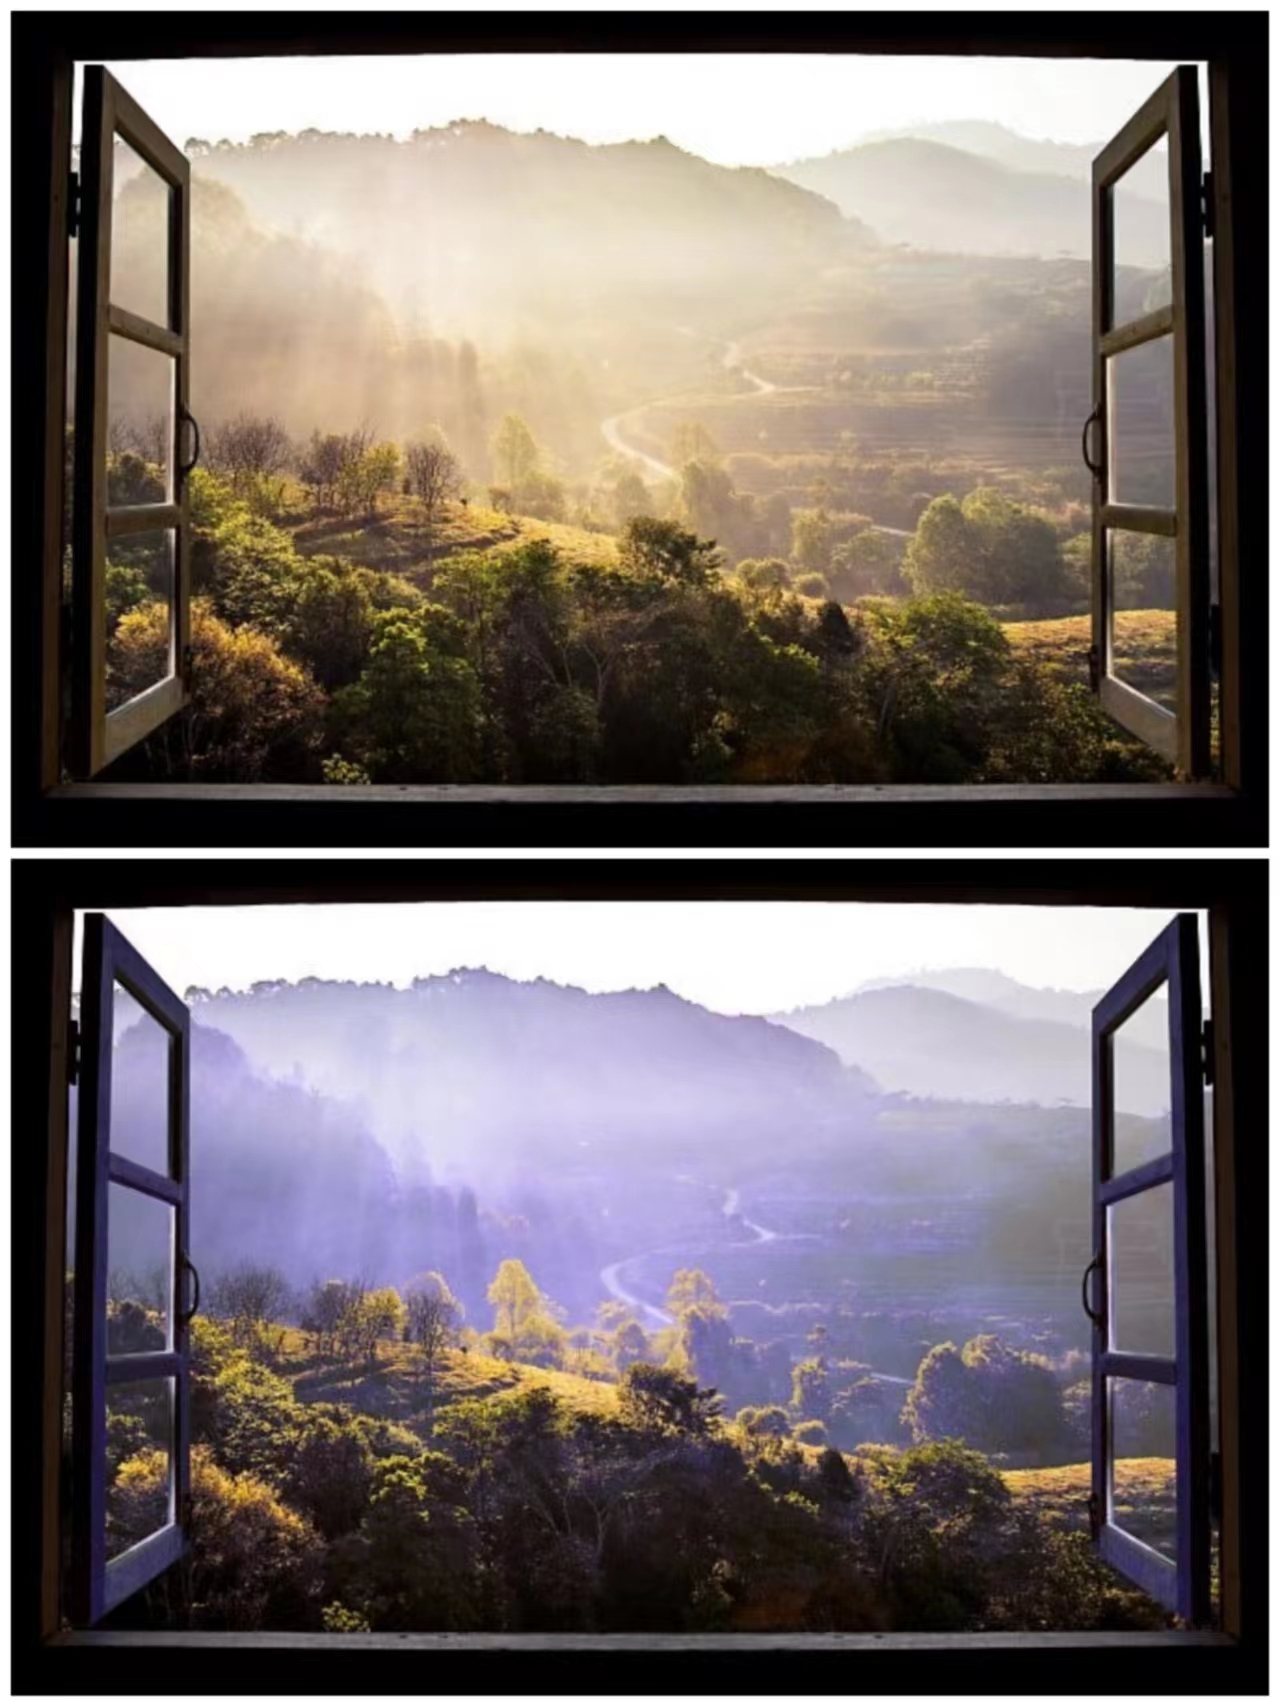
Step 5: Once you are done, click on the icon on the top right to save the edited photo. Here is an example of the change in color from yellowish-orange skies to blue-purple.
Grayscale
A popular color change for images is changing a colored photo into black and white. The strategy to change a colored picture to a black-and-white photograph is using the Grayscale tool in Photoshop. Before converting your colored image to black and white, it is recommended to do as much editing on your colored photo as converting.
It is easier to edit a colored photo than a black-and-white one. This technique minimizes file size but discards color information and can convert adjacent colors to the same shade of gray. Follow these simple steps to change your colored photo into a black-and-white picture.
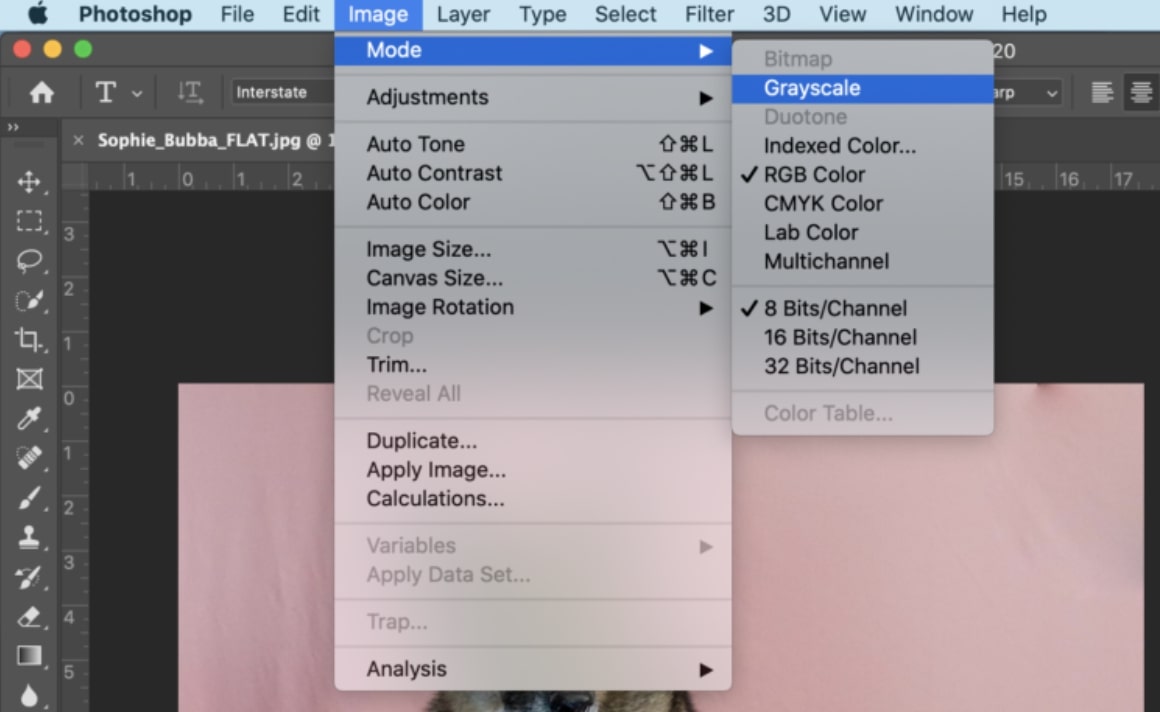
Step 1: Open Photoshop software from your computer and upload the image you want to edit. Go to the Image tab, click Mode, and select Grayscale.
Step 2: A pop-up dialogue box will appear, and click on Discard.
Note: Photoshop will convert the colors in the image to black, white, and shades of gray.

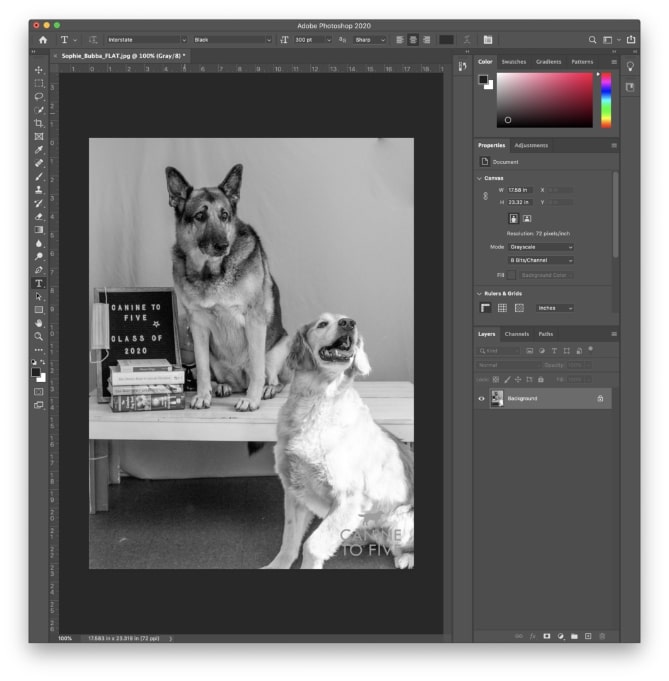
Step 3: Your picture will be converted into black and white, and you can save the image by clicking the save icon on the top right.
Filter
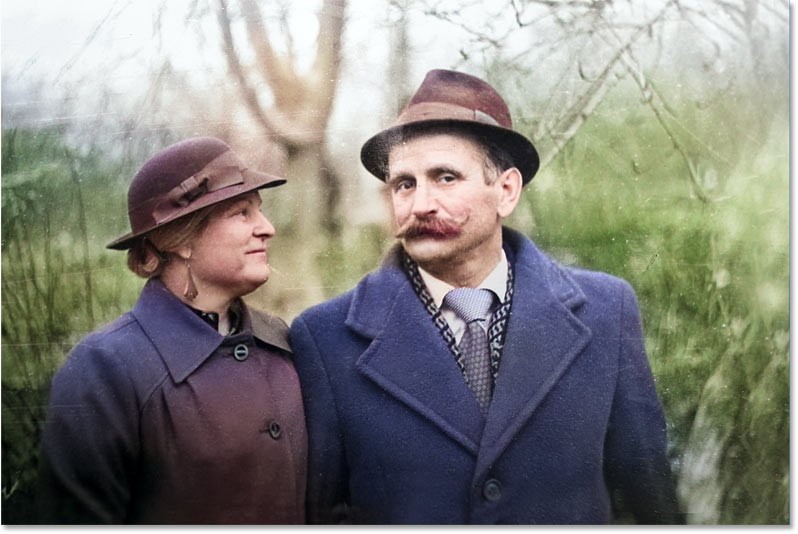
The final guide is using the Filter tool in Photoshop. This section will share how easy it is to add color to a black-and-white photo using the Colorize filter in Photoshop. Colorize was first introduced as a beta filter in 2021, but it is now an official feature in Photoshop from 2022 onwards.
The Colorize filter is one of Photoshop’s Neural Filters. It uses machine learning and Adobe’s AI to analyze your black-and-white image and automatically determine which color to use. If you are unsatisfied with the color, you can select those areas and choose your own. Follow the steps below and see how this works!
Step 1: Open Photoshop software from your computer and upload the black and white image you want to color. Go to the Image tab, followed by Mode, then select RGB Color.
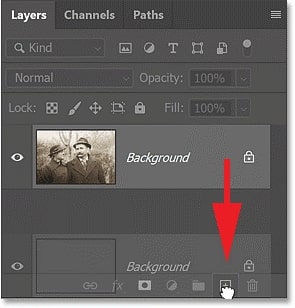
Step 2: Select the Layers panel, click on the Background layer, and drag it to the New Layer icon.
Step 3: Apply Auto Contrast on your black and white picture. Go to the Image tab and select Auto Contrast.
Step 4: Go to the Filter tab and select Neural Filters. This opens the Neural Filters workspace, where the image is on the left, and the Neural Filters panel is on the right. Click on the Colorize filter from the Neural Filters panel.

Step 5: A preview of the colored image will be shown, and you can click on the icon on the top right to save this image if you are happy with the outcome.
Part 2. Auto Color Correct by Media.io as an Alternative Method
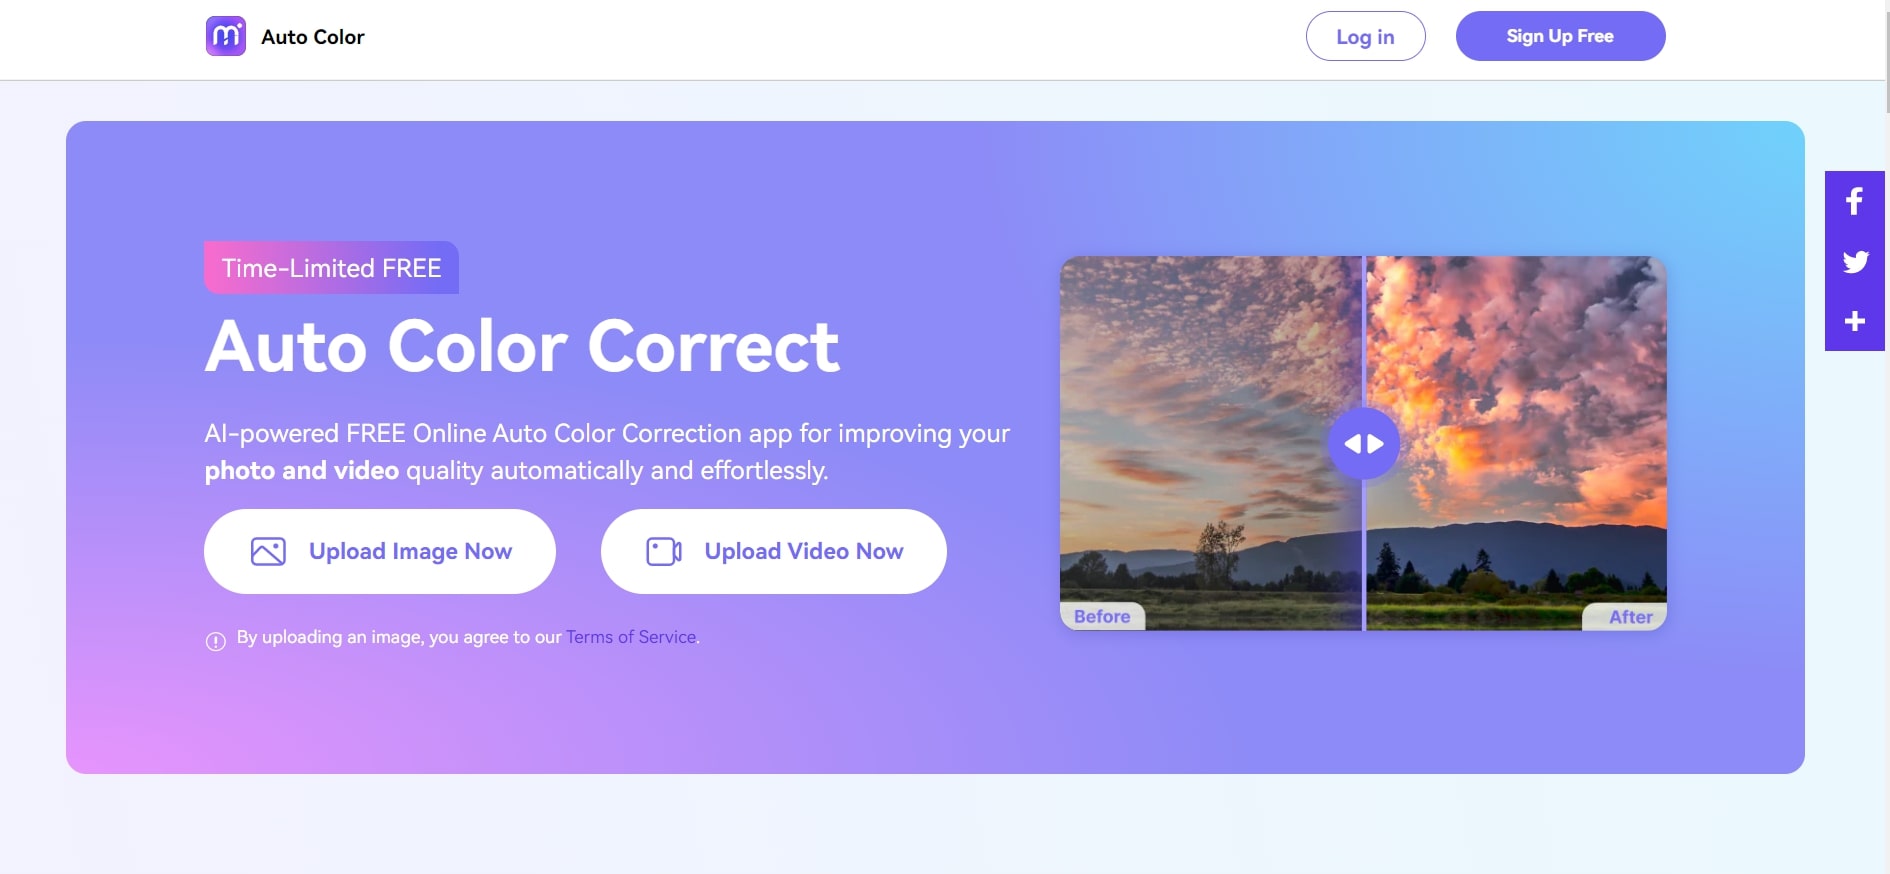
Auto Color Correct by Media.io, relatively new to the market, is a force to be reckoned with. It is one of the up-and-coming online photo editors for people who wants to create top-notch picture editing affordably. It uses an intelligent AI system to correct the image and change the color of your image to be more natural and pleasing to the eye.
Highlights of Auto Color Correct
Here are some highlights of why people enjoy using Auto Color Correct by Media.io:
- Trustworthy with a 30-day money-back guarantee
- Advanced AI system that helps to analyze photos
- User-friendly interface
- A free account providing all features and unlimited preview
Pricing
Currently, Auto Color Correct is time-limited and free. So seize the chance to use this convenient tool!
A Guide to Changing Images’ Colors Through Auto Color Correct
Here are the steps required to change the color of your image using Auto Color Correct by Media.io.
Step 1: Head to the Auto Color Correct website from the link above and launch the webpage. Upload your picture into Auto Color Correct by clicking the Upload Image.

Step 2: After uploading, the image will automatically correct the image’s color. Within seconds, your photo will have been color corrected, and the new image will be on the right.
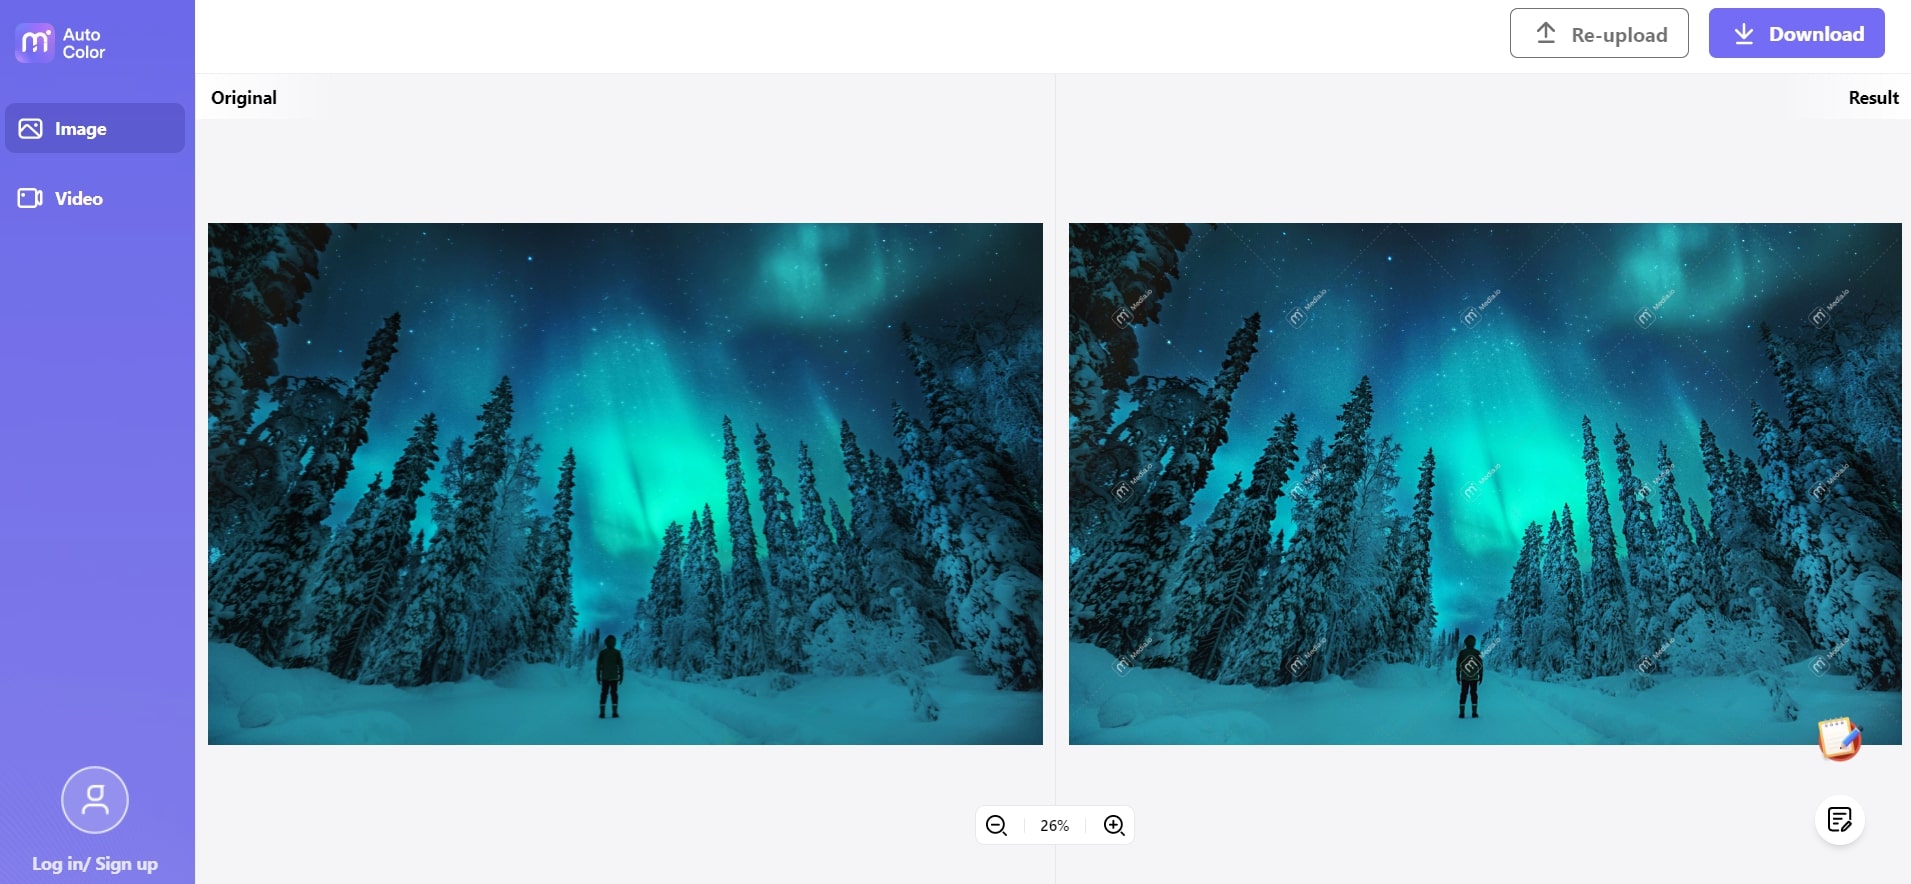
Step 3: Click Download on the top right, and your new color-corrected image will be downloaded to your computer.
Frequently Asked Questions
Find out more from these frequently asked questions related to the coloring of images.
1. How To Change the Color of an Object in Photoshop?
Changing the color of an object is a straightforward process. Sometimes, you might need to change the color of a particular thing and not affect the rest of the picture. Follow these steps to achieve it.
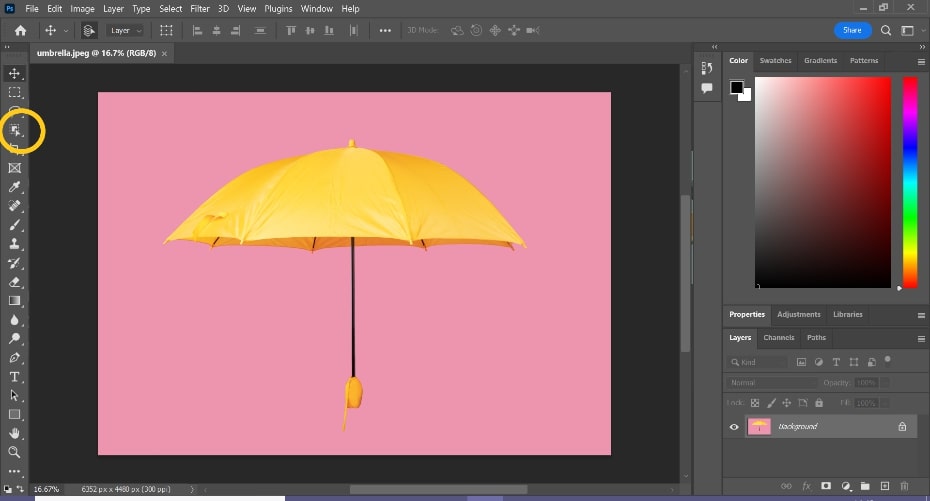
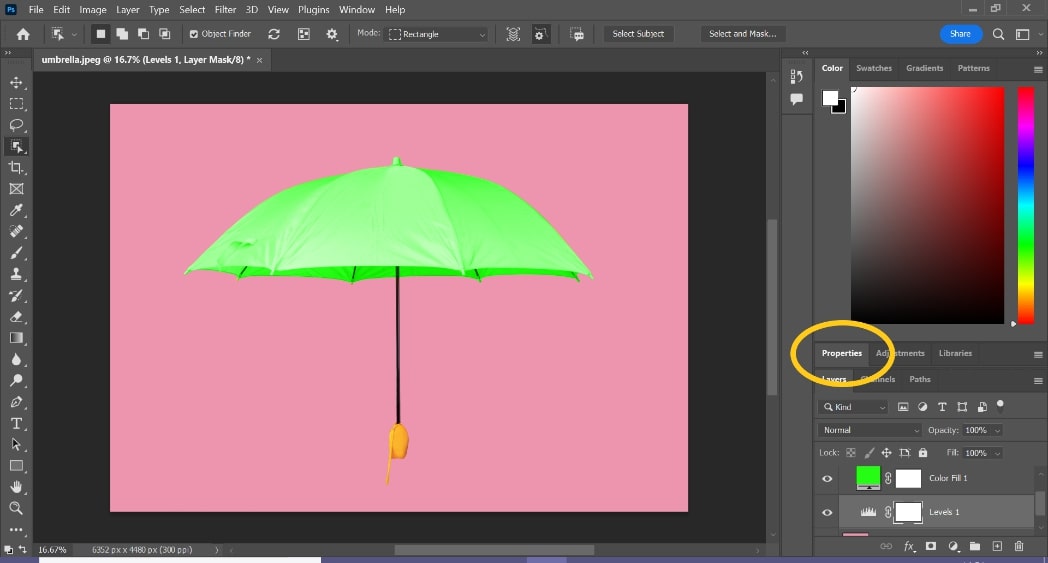
Step 1: Open your image in Photoshop and use the Object Selection tool on the left of the tool panel to select your object.
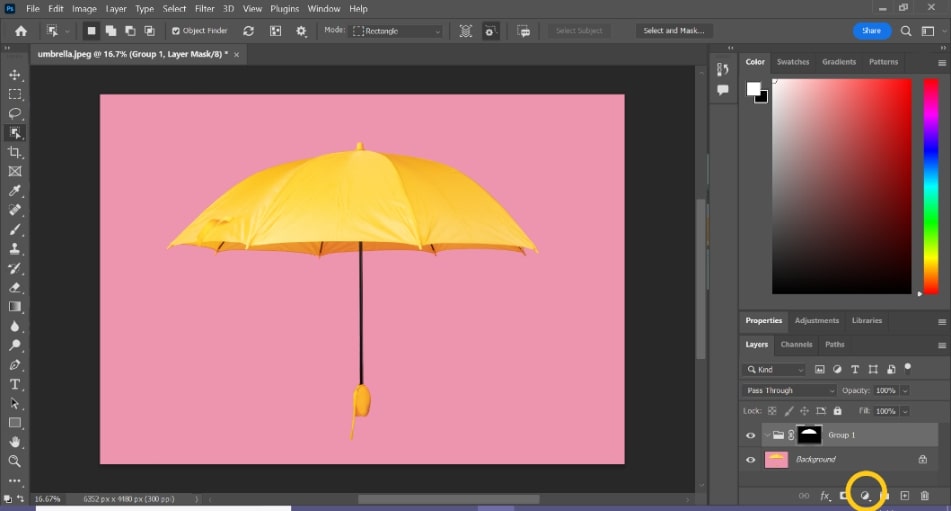
Step 2: Click on the Adjustment Layer icon at the bottom to trigger a pop-up window. Click Solid Color.
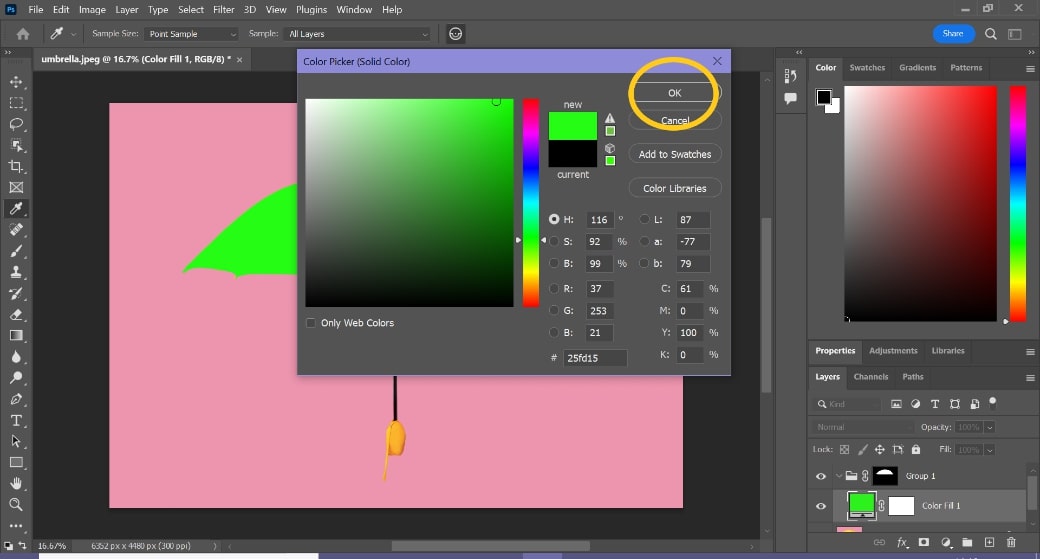
Step 3: Choose your new color and click OK.
Step 4: Click Properties and drag the slider until you are happy with the new color. Once done, click the top right icon to save your edited photo.
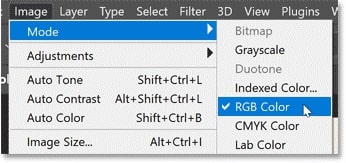
2. How To Convert Image to RGB Color Mode?
RGB color mode is one of Photoshop’s most widely used color modes. Many digital design projects and the web uses RGB color because it can be easily projected to monitors and screens. Converting an image from CMYK to RGB is a relatively simple process that can be completed in just two steps. Follow to find out more.
Step 1: Open your image in Photoshop, go to the Image tab, and click on Mode followed by RGB Color.
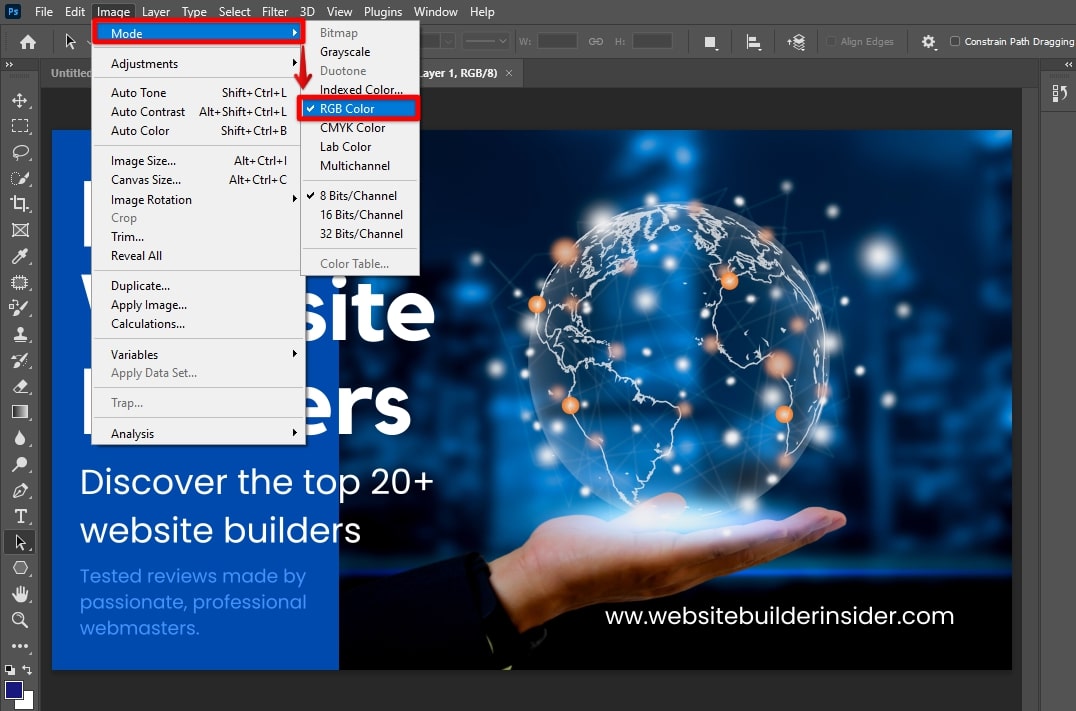
Step 2: Save your image by clicking on the top right icon.
Tip: If you are unfamiliar with RGB color mode in Photoshop, it is recommended to seek help from a professional before attempting any change. Changing to RGB color mode can significantly impact your impact, so it is essential to understand what you are doing before making a change.
3. How Do You Edit Dark Pictures?
There are several strategies to edit dark photos. You can edit dark and moody pictures using a photo editing tool and make the images pop. Correct your image’s exposure, create contrast, add textures, check the local adjustment, and lay low on the vignette feature. If you try either one of these tricks, you should be able to achieve a brighter picture than before.