

Do you want to remove noise from the audio? There are different kinds of noises that can be accidentally captured in your audio files. For example, breathing, humming, buzzing, and wind noises in your recorded audio can look unprofessional. Moreover, these noises can be annoying to the listener as they cause distraction.
In this article, we will introduce the best tools through which you can filter noise from audio instantly. For further convenience, we will also provide detailed steps for removing annoying noises from the audio files.
In this article
Part 1: How to remove reverb from audio
Does your audio clip have reverb noise in it? In this section, we will provide you with the best solution to remove reverb from audio easily.
How reverb noise is caused
Reverb noise is caused when a sound is reflected back in the outward direction. If there is a vacant room, the sound will hit a hard surface, such as a wall or ceiling, and would create a reverberation effect. Thus, when you hear a scattered and repeatedly reflected sound, it will be a form of reverb noise.
Moreover, other physical ways to create reverb noise are through echo chambers. You can also electronically produce it with audio signal processing. However, if you want to give a tutorial and your voice is reverbed, it will endorse a negative impact on the viewers.
How to avoid reverb noise in audio files
Here are some tips that can help you to avoid reverb in audio files:
- You should cover your walls and windows with curtains to reduce the number of hard surfaces. Thus, there will be fewer chances for the sound to omit multiple waves.
- You should add carpets or rugs to your floors as they can also prevent reverb noises in your audio files.
- By adding furnishing to your place, the space won’t remain vacant. Hence, it can also help decrease the chances of a reverb noise.
- You can also install acoustic panels as they provide an efficient way to prevent sound from reverberation.
How to eliminate reverb from audio using Audacity
Do you want to remove reverb from audio with ease? Audacity is a well-recognized tool that is commonly used to edit audio files efficiently. You can add various effects to your audio files to add prominent modifications.
You can change the volume, compression, pitch, tempo, and other factors instantly on this tool. Furthermore, using this tool, you can flawlessly remove the reverb effect from your audio clip. To use Audacity to remove the reverb effect, here are the steps:
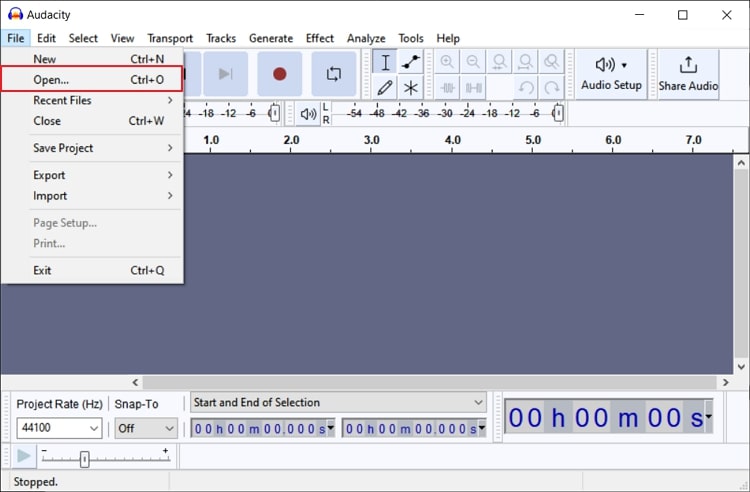
Step 1 Open Audacity and go to the “File” button.
From there, tap on the “Open” button and import your audio file having reverb background noise.
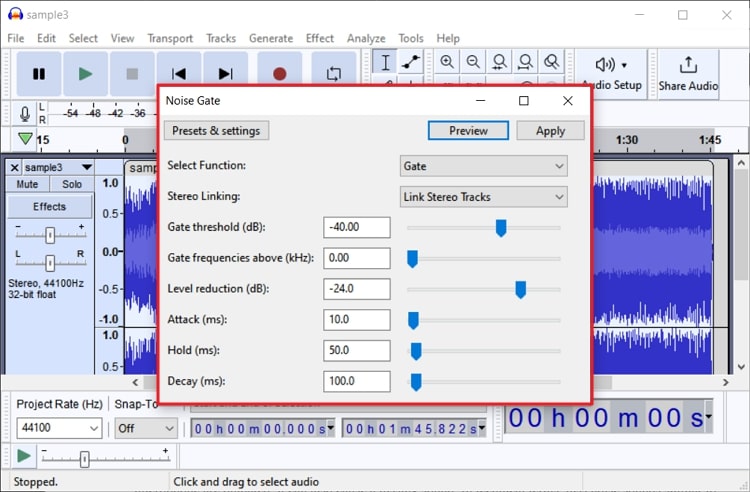
Step 2 After importing and selecting the audio file, go to the "Effects" tab and click on the "Noise Removal and Repair" option.
From the "Noise Removal and Repair" sub-menu, choose the "Noise Gate" effect.

Step 3 On the pop-up menu, you can adjust the settings, such as level reduction, gate threshold, etc.
Once done with the settings, click the “Preview” button to check if the audio is free of reverb noise. If satisfied with the results, tap on the “Apply” button.
Part 2: How to get rid of hiss from audio
Are you annoyed by the hissing sound present in your audio? This section will shed light on how to remove hiss from audio using powerful software.
How the hiss background noise is caused
Hiss noise is a high-frequency sound that is considered to be an inherent noise. This noise is measured in decibels and mostly occurs by electronic components. Moreover, if the electronic circuits in your microphone are outdated, it can also cause a hissing sound. In technical terms, hiss noise sounds similar to the blue noise.
How to avoid hiss noise in the audio
To learn how to avoid hissing in audio, check and follow the following tips while recording the audio:
- Before recording the audio clip, make sure to optimize your space. You have to close your windows and doors to avoid any external noise.
- Make sure to set the distance of your microphone at the optimum level. Ideally, you should place your microphone close to the subject.
- To avoid hissing sound effectively, you should use a microphone with a gain boost. By selecting a microphone with gain adjustments, you can greatly eradicate the chances of the hissing sound.
- If you have a large number of open microphones, it can also produce a hissing sound. You can prevent any kind of disturbance by reducing the number of open microphones.
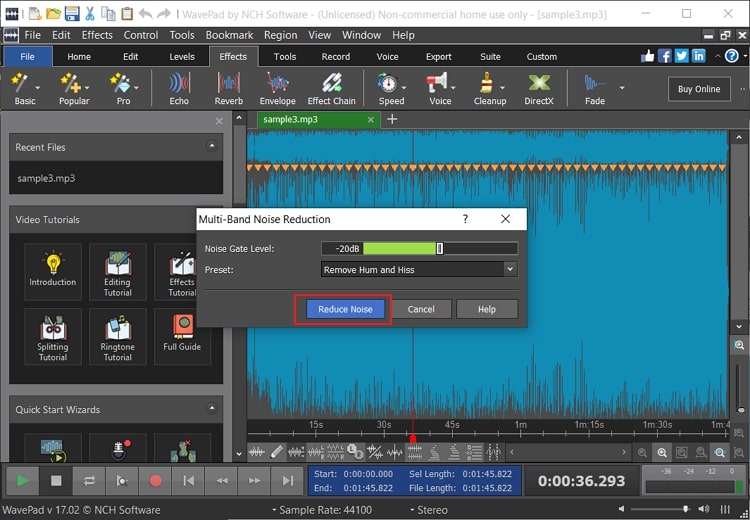
How to remove hiss from audio using WavePad
Do you want to remove the hissing sound permanently from your audio? WavePad is a powerful audio editing software that has different and unique capabilities. Using this tool, you can professionally cut, copy, merge, and trim your audio clip.
Moreover, it provides multiple audio and music effects that can make your audio clip captivating. You can also use its audio restoration tool to reduce background noise from your audio. To use WavePad to remove the hissing sound, you can see the following instructions:
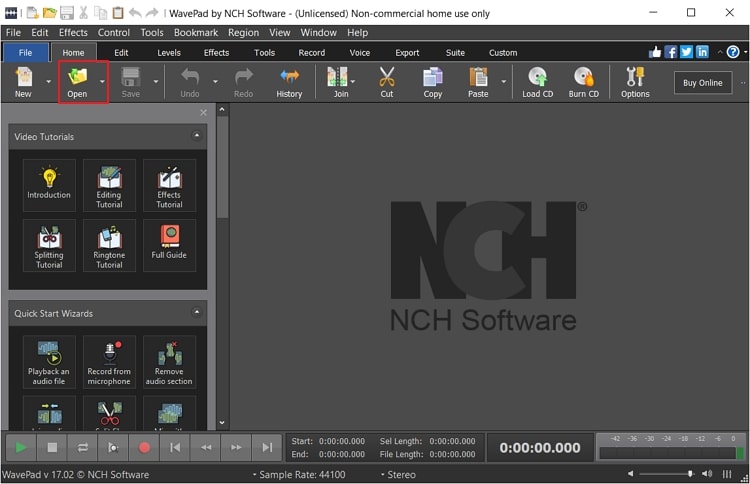
Step 1 Download and launch WavePad on your Windows PC or MacBook to begin.
After launching its interface, click the "Open" button to import the audio file.
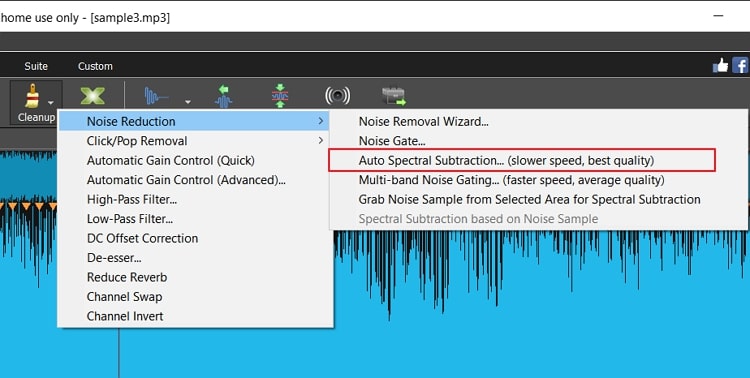
Step 2 Now navigate to the "Cleanup" tool from the "Effects" tab and choose "Noise Reduction" from the drop-down menu.
Afterward, tap on "Multi-Band Noise Reduction," which will open a small window on your screen.
Step 3 Next, select the "Remove Hum and Hiss" option as the present and adjust the noise gate level.
Once you have made all the settings, click the "Reduce Noise" button. It will eliminate the hissing sound from your audio.
Part 3: How to remove buzz from audio
Is there a buzzing sound in your audio clip? In this part of the article, we will guide you on how to remove the buzzing noise from your audio without disturbing the quality of your file.
How buzz noise is caused
Buzzing sounds can be caused due to unexpected disturbances in the speakers or headphones. When the external electrical signals get to interfere with the signal which is carrying the audio, you would hear a buzzing sound. Moreover, if the audio software you are using to record your microphone is somehow incompatible, a buzzing sound will be created.
How to avoid the buzz noise in the audio
Do you also hate hearing the buzzing sound? Here are some tips that you can apply to avoid the buzzing sound in your audio.
- There can be a problem with the cables of the microphone or system that are causing the buzz sound. Make sure to check the USB and XLR cables to avoid any audio problems.
- The compatibility of your audio software is also necessary. If there are incompatibility issues, a buzzing sound may occur.
- Faulty hardware of your system in which you are recording the audio can also cause the issue. Before recording the audio, you should ensure that there should not any hardware issues related to your system.
- You can also enhance the quality of your microphone to prevent the chances of error. Moreover, an efficient and powerful microphone would not cause any buzzing noise.
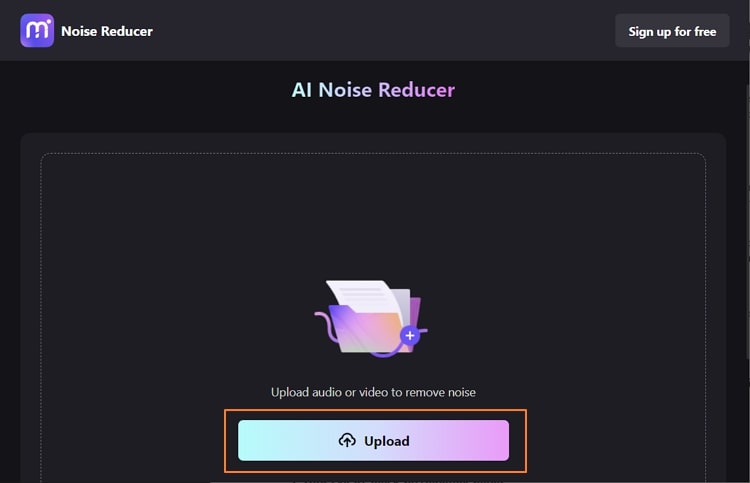
How to remove buzz from audio using Media.io
The best tool that can target the buzzing noise in your audio is Media.io. This tool has a professional AI noise reducer that can target any particular noise. You can easily upload your audio file on this tool up to 2GB file size.
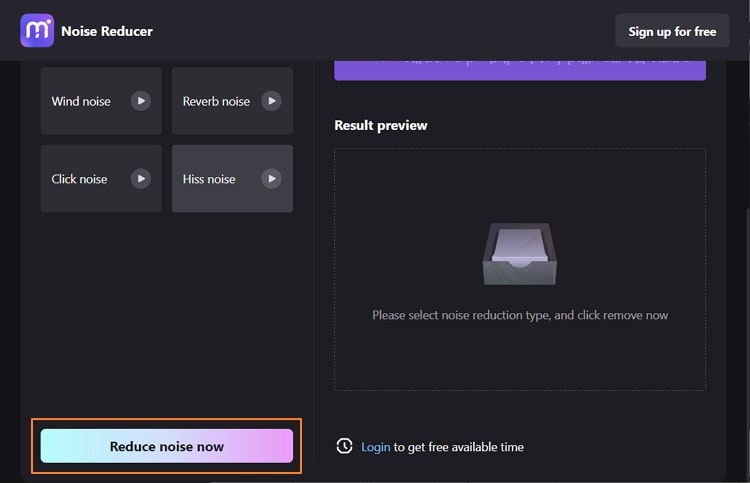
Moreover, after uploading the audio file, you can also choose the noise type that you want to target. Thus, it’s an efficient online tool that you can navigate from any web browser to clean noise from audio. Here are the instructions that you can read to remove buzz from audio through Media.io:
Step 1 Upload the media file
Access the webpage of Media.io and locate “AI Noise Reducer” from its tools. After navigating to the main page of the AI noise reducer, click on the “Upload” button.
Step 2 Select the noise type
Now import the desired audio file from your device. Once done, make sure to choose the type of noise that you want to target from the given options. Afterward, hit the “Reduce Noise Now” button to make it buzz-free.
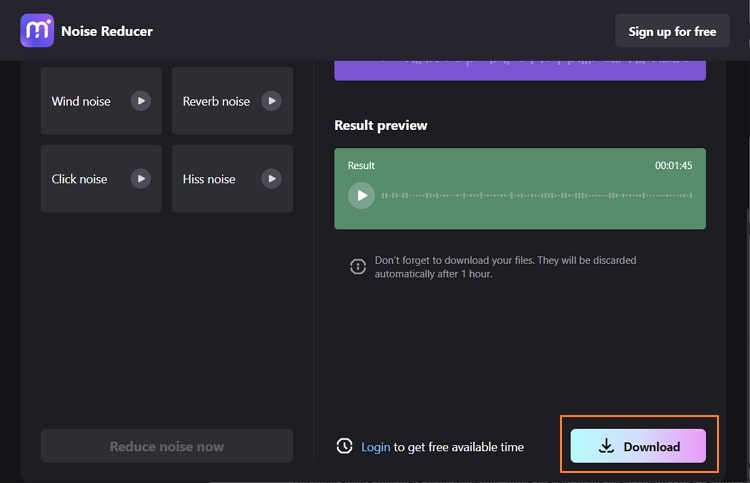
Step 3 Download the buzz-free audio
Wait for some time until the noise removal process gets completed. Afterward, preview the audio to check if the audio is free of buzz noise and click on the “Download” button.
FAQs
1. How can we block surrounding sound?
There are multiple techniques available for blocking surrounding sounds within a specific space. From creating acoustic panels to reducing noises, you can consider soundproofing your walls and doors. Blocking sound from entering a specific place is the most appropriate way to avoid unnecessary noise. Use bigger material within your room for reflecting off noise as noise reflects off hard surfaces.
2. How does a noise filter work?
The use of a noise filter is quite simple and effective. This particular entity allows specific frequencies to pass through it. While it removes the frequencies not required within the signal, it filters out the perfect ones and gives a noise-free result. These filters are generally utilized within communication signal lines, as they can be very helpful in blocking noises.