By adding a watermark in the photos, you can prevent it from unauthorized usage. It also helps in brand recognition and work promotion. The most recognized platform to make a watermark to insert any image in Photoshop. However, if you don't know how to make a watermark in Photoshop, it can be problematic. For this reason, we are here to save you from going through the hectic procedure.
In this context, we will guide you on how to create a watermark in Photoshop. Other than this, you will also discover the type of watermark you should select and why it is important. Not only adding, but this article will also guide you about removing the watermark.
In this article
Part 1: Why Should You Use a Watermark in Your Photos
Before getting into the procedure of making a watermark in Photoshop, it is essential to know its usability. A watermark in a photo server is every potential benefit. To understand what these benefits are and why it's necessary to use a watermark, look here:
Copyright and Brand Promotion
With a watermark, you can establish a sense of ownership and can also claim the copyright. A visible watermark in the photos indicates that you are the content owner, and no one can use it without your permission. Moreover, it also helps you brand and promote your product and services. You can also increase the brand recognition value with this.
Unauthorized Deterring and Attribution
A well-made watermark can act as a deterrent agent against all unauthorized usage of photos. This can also discourage casual infringers, which is a very important thing. You can also show your content in the professional attributes with this. Watermarks also help as a professional identity symbol.
Quality and Sharing
Anyone can share their work on social media. Yet, with the help of a watermark, you can show the users that it's your official work. In addition, it also optimizes the performance of the captured photos on social media in a professional manner. The quality and overall appearance of the watermark also create positive expressions among users.
Client Protection and Consistency
When you provide the previews of your images before the final delivery, then it can help prevent unauthorized usage. This also helps ensure clients can view the images but don't make unofficial prints. The consistency of the visual styles is also a benefit of using a watermark. Any image can also be recognized as professional work with this.
Aesthetics and Authenticity
In certain contexts, you can add a touch of aesthetics and elegance with watermarks. It also helps to sell the limited-edition work with professionalism. You can also give a sense of confidence to buyers that they are buying the original content. It can also attract aesthetic lovers to your photos.
Part 2: How to Select the Type of Watermark You Should Use in Your Pictures
If you are new to photo editing and watermarking, you have no idea what type of watermark will be best for you. A person can always learn to make their content more outclass by knowing the basics. For this reason, here are some of the factors that will guide you in the selection of a watermark:
Visuals of Watermark
Before anything else, you need to know that the visibility of the watermark you are going to select depends on your preferences. Many photographers like the subtle watermark, while other loves the soft visuals. So, it would be best to consider the aesthetics because it will impact the user’s experience.
Branding Tool
A good watermark also serves as a significant branding tool. It is essential to incorporate your company logo and name in the watermark. This will also add consistency to all your images.
Location of the Watermark
This is a very important factor because it can impact the all over appearance of your images. You need to select a specific area that ensures that the watermark is not lowering the attractiveness of your photos.
Opacity and Transparency
If the intensity of the watermark is very rout, then it can impact the image in a wrong way. Thus, make your you manage the opacity and transparency of the image in such a manner that it will be noticeable yet not robust.
Design and Adjustments
Consider designing multiple versions of the watermark to be tailored with different types of images. Moreover, invest some time in searching for the best design for the domain you are going to work with. This will also add a sense of professionalism along with artistic touch.
Part 3: How to Create a Watermark in Photoshop
Adobe Photoshop is one of the optimized solutions for creating modernized and customized watermarks. With this, you can create robust and soft-looking watermarks to make images more professional. Photoshop is one of the incredibly powered photo editing platforms worldwide. There are diversified intelligent tools in it that can maximize your photo's efficiency in no time.
Besides this, it offers layer-based nondestructive editing, which helps to make your photos more attractive. It also provides a rich set of typography and drawing tools that can be used to create watermarks in Photoshop. You can also experience content-aware edits with the exclusive tools of Photoshop.
Key Features of Photoshop
- To design and deliver the perfect customer experience, you can take assistance from Adobe Sensei. You can organize, assist, and engage customers along with optimized delivery timelines.
- The Face-Aware Liquify of Adobe Photoshop can detect facial features in an automated manner. You can then modify facial characteristics such as eyes, lips, and nose to create funny photos.
- If you add more drama in simple images, consider using the Sky Replacement features of Adobe. Through this, you can change the sky in starry, stormy, or sunny weather.
- To refine all the areas of the photos, there is no better feature than Content-Aware Fill. It can help you to achieve optimized and refined results.
What is the Procedure for Creating a Watermark with Photoshop
To protect your photos after uploading them online, you need to add a watermark on them. Now that you are aware of the feature of Adobe Photoshop, you must be wondering about the process of creating a watermark with Photoshop. By following the understated instruction, you can create watermarks with ease:
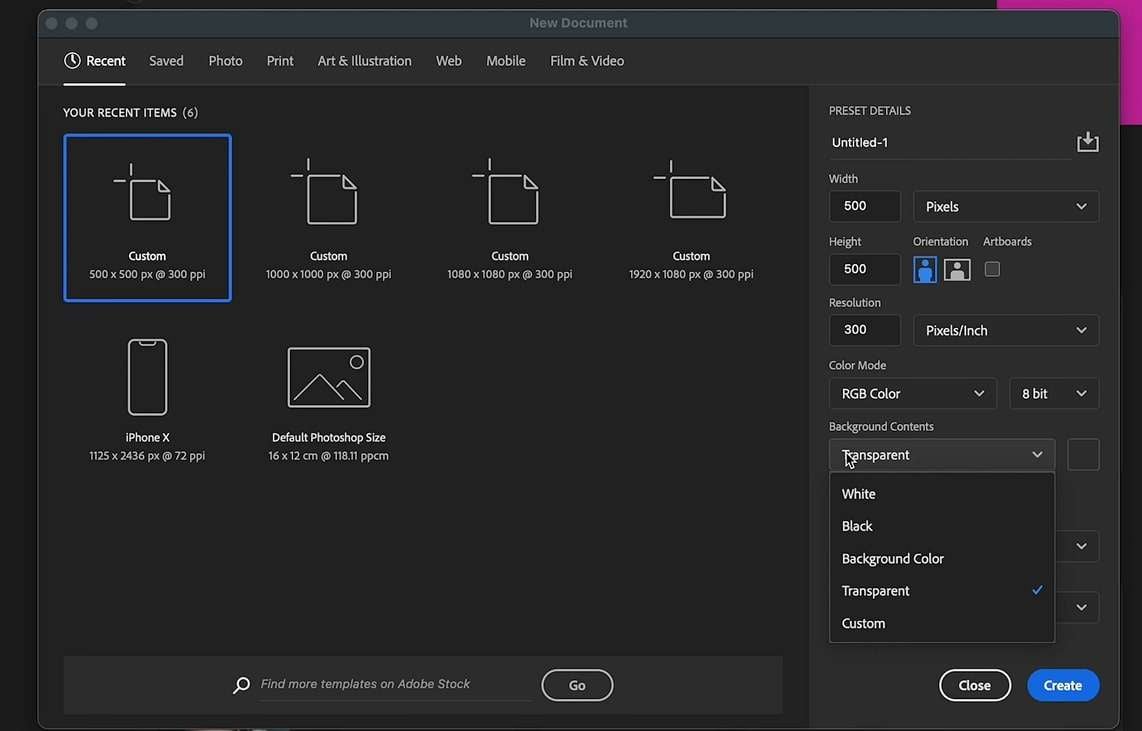
Step 1
Open Photoshop and go to the "File" tab, and select "New". From the prompt window, select the 500 Pixel “Width” and “Height” and modify the “Resolution” at 300. Go to “Color Mode” and change it to “RGB Color, 8 bits", and from "Background Contents" select "Transparent".
Step 2
Click "Create" and you will get a little square on the new screen. Select the "Text" icon from the left panel and tap on the empty canvas. Afterward, type your watermark text and change its “Fonts” and “Size” from the above panel.

Step 3
To proceed, right-click on the "Layer" and hit the "Rasterize Type". Next, press the "Command/Control + T" and move it to the center of the "Canvas". Hereafter, press "Enter" and import your "Logo" into Photoshop.

Step 4
You can adjust the location of both logo and text as per your choice. To overlay the logo on text, drag the "Logo Layer" over "Text Later" and change its opacity, such as 25%. Following this, go to the "View" tab, and from the drop-down menu, click on the "Pattern Preview" option.

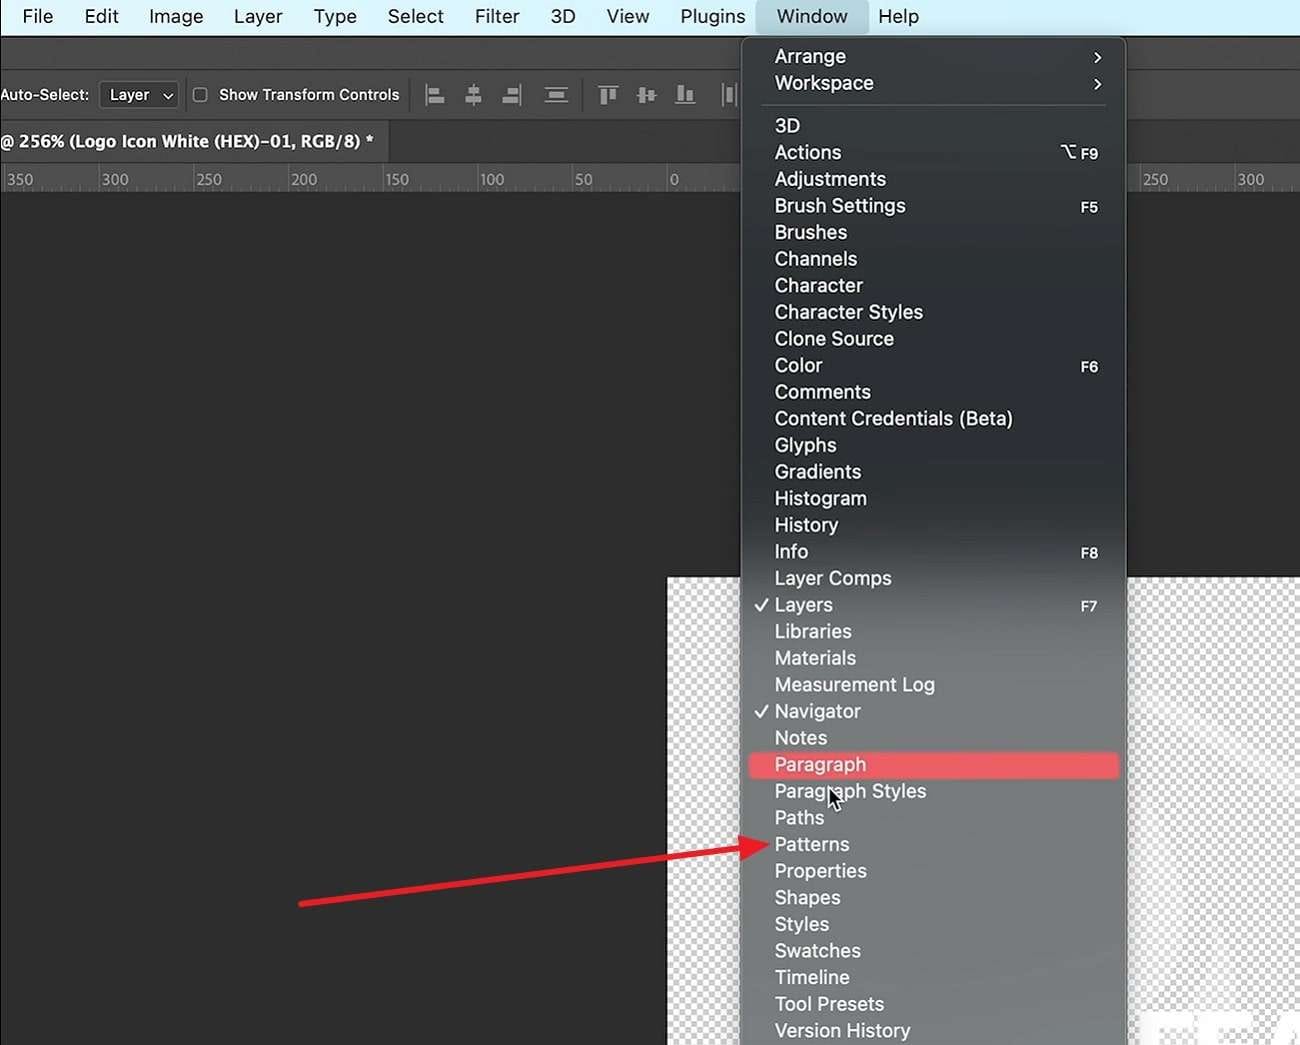
Step 5
After checking the pattern, turn it off and select the "Window" menu. From here, select the "Patterns" option and click the "Pattern Name" icon. You can change the name of the pattern as per your suitability.
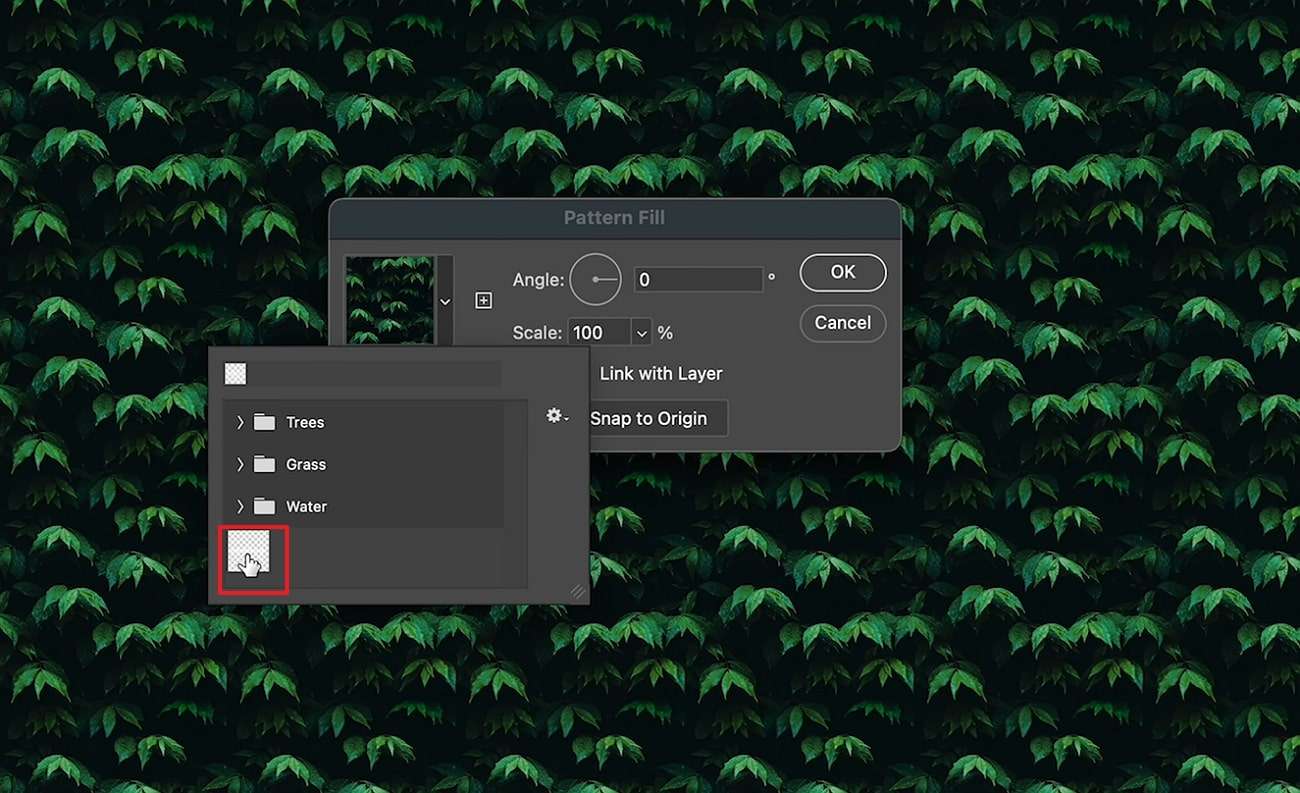
Step 6
Next, press "OK" and once the pattern is enabled, open your respective photo with Photoshop. Select the “Adjustment Layer” icon and hit the “Pattern” option. Go to "Drop Down" and select the recently made "Watermark". From "Scale" you can manage its "Size" "Angle" and tap the "OK" button. Go to the right panel and choose "Opacity" and then manage it.
Bonus Tip: How to Remove Unwanted Watermarks From a Photo
Sometimes, you need to sell your photography work on paid websites that demand you to remove the watermarks from the photos for the easiest accessibility. It is completely right because you will be selling your photos to other people online. Yet, if any of your images got a watermark, you need to remove it, and for this, you have to use a watermark remover. The premium-grade tool that can help you with this is AniEraser.
This top-quality tool has all the capabilities to remove watermarks without impacting the image quality. One of the best things, you can also use this tool on both mobile and desktop devices. When you purchase one license of AniEraser, it lets you use it on all devices without any restrictions. This is also compatible with several image formats, which also saves you from lots of problems.
Key Features of AniEraser
- If you get any pimple or spot on your face in the image, you can remove it with precision using AniEraser.
- This tool lets you remove unwanted objects from the picture, such as garbage, rock, birds, and strangers.
- Not only one, but you can also remove multiple unwanted objects from the photos simultaneously with this.
How Can You Remove Watermark from Photos with AniEraser
If you wish to remove watermarks from the images without any problem, feel free to follow the instructions listed below:
Step1Launch AniEraser and Remove Watermark
Open your browser and search for AniEraser to initiate the process. Access the AniEraser website and select the "Upload Video or Photo" button. Next, hit the "Upload" button and the photo having a watermark.

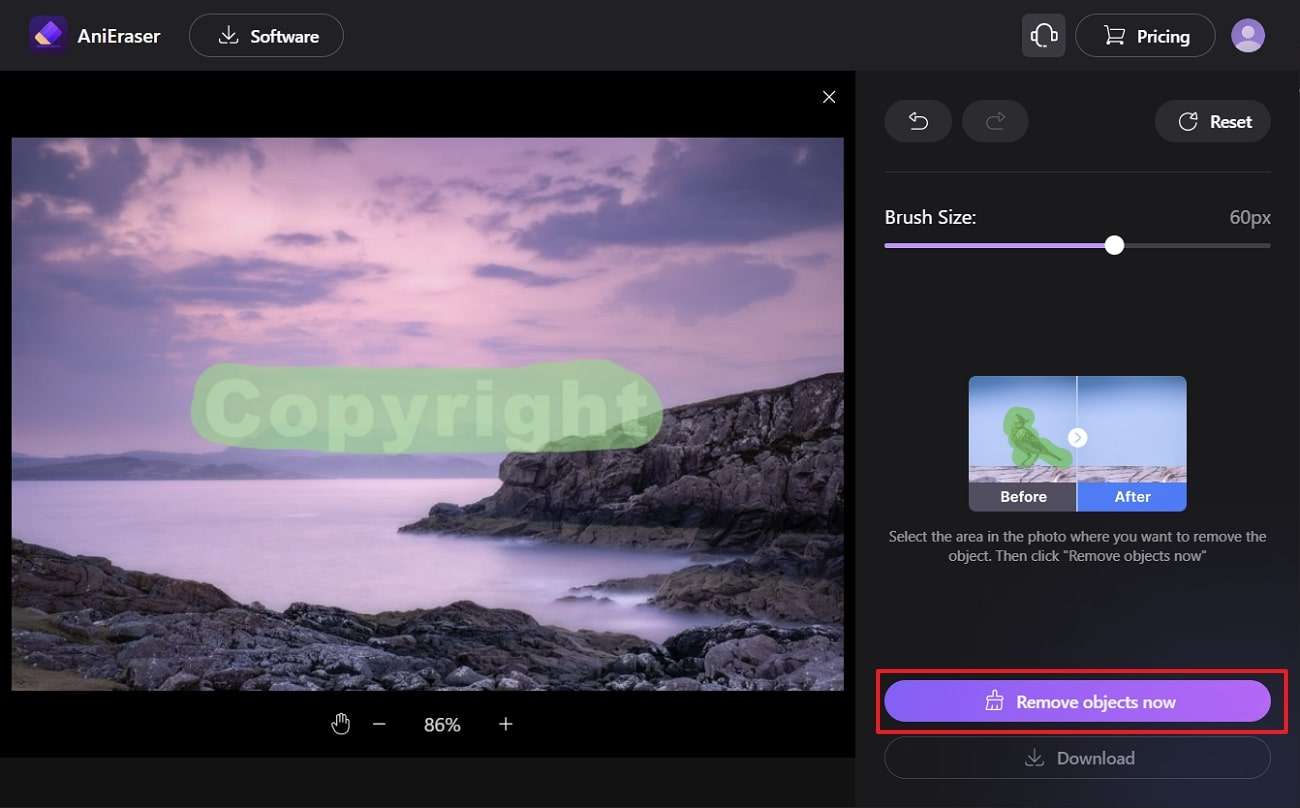
Step2 Remove Watermark from Photo
Once the photo is uploaded, go to the "Brush Size" slider and customize the brush size. Next, highlight the watermark in the picture and click the "Remove Objects Now" button. Wait a few moments and check the results to see the accuracy. If you are satisfied with the results, hit the “Download” button.