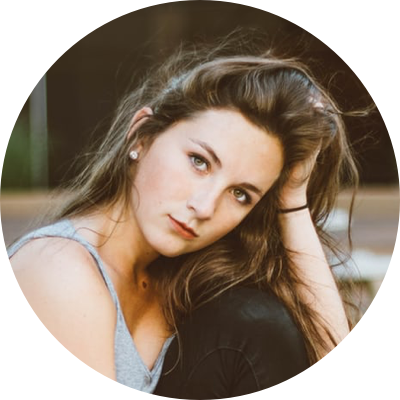

Colors can express feeling, tone, and mood in a photograph, and small changes can impact the overall impression of an image. In photography, adjusting color involves changing hue, saturation, and brightness. Color adjustment in a photo is important if you want to create a visually pleasing, aesthetic, and exact representation of the theme while also creating the desired tone and atmosphere.
When searching for an effective tool for adjusting color in digital images, Adobe Photoshop is the go-to choice. One of the best photo-editing tools, which saves your pre-set color settings. It offers advanced color adjustment features applied in separated layers to provide professional results on an image while the original is kept intact. Many photographers, artists, and graphic designers favor Photoshop due to its advanced color adjustment tools and flexible layout.
In this article
Part 1: Understanding Fundamental Knowledge Before Color Correction
Understanding the fundamental concept of these before color correction will help you adjust colors in your digital images in the most effective way.
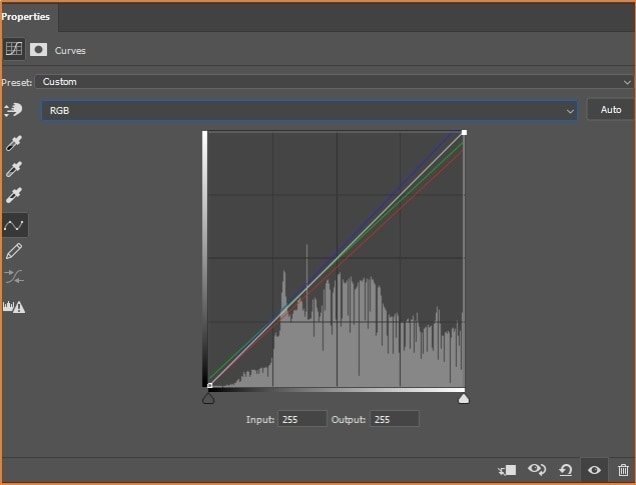
Color Curves
The color curve tool can alter various tonal ranges on an image and adjust the colors that are displayed in digital images to get the desired results. By modifying a graph that displays the spread of tones throughout the color spectrum, the color curve tool enables users to change the color grading and color contrasts in a photograph.
Overall, these Photoshop color correction tools give users many choices for modifying the colors in their pictures to get the desired effect. Combining these tools allows users to create highly customized and professional color changes for their images.
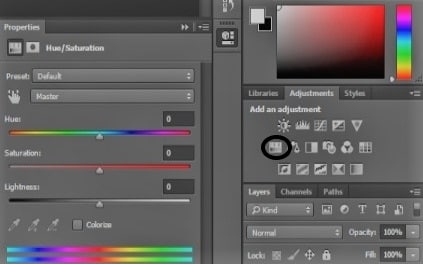
Hue and Saturation
A frequently used tool is the hue and saturation tool, which lets users change the hue, saturation, and brightness of various colors on an image by changing the colors in the image. For instance, to produce an image that is more aesthetically pleasing, complementary colors (like orange and blue) can be changed.
While the Saturation slider modifies the strength or vibrancy of the colors, the Hue slider modifies the general tone or color of the image. On the other hand, the Lightness slider alters how brilliant or dark the colors are.
Making precise color changes with this tool, like desaturating a certain color space or changing the hue of a single color in the image, is especially helpful. Users of Adobe Photoshop can change the hue, saturation, and lightness of specific colors using Hue and Saturation.
White balance
The white balance tool corrects an image's color balance by removing any color shadows brought on by the lighting. It corrects color casts caused by various lighting settings, such as the inside lighting's yellow-orange tint. It is essential to understand the effects of the temperature and adjustment of different lighting conditions on an image's color.
To change the white balance in Photoshop, go to the Image option and select Adjustments > Color Balance. The Temperature and Tint sliders in the Color Balance dialogue box enable you to alter the image's temperature and color. Also, users can adjust the white balance depending on a neutral color, such as white or gray, using the eyedropper tool in the Levels dialogue box.
Color balance
The color balance tool helps you change the general color balance of an image by adjusting the colors such as blue, green, and red. It is essential to understand the multiple color channels that interact to produce the end-color image before using this tool.
By changing the balance between colors, the Color Balance tool in Adobe Photoshop enables users to change the color balance of an image. Go to the Picture tab and choose Adjustments > Color Balance in Photoshop to use the color balance in the dialogue box.
The red increases when the scale moves to the right. When the scale moves to the left, the amount of magenta grows, and the green increases as it moves to the right. The quantity of yellow increases as the slider moves to the left, and the blue increases as it moves to the right.
Part II. How to Adjust Your Image Color using Photoshop?
- Change the hue and saturation of image.
A step-by-step guide to using a Hue/Saturation adjustment layer to modify the hue, saturation, and brightness of the colors in an image.
Adjust the Hue:
- Add a layer for adjustments. Choose one of these:
- Select Layer > New Adjustment Layer > Hue/Saturation from the navigation bar. In the New Layer box, click OK.
- Click the Hue/Saturation tab in the Adjustments window.
- Hue/Saturation is another option under "Image > Adjustments."
However, bear in mind that this technique discards image information and directly modifies the image layer.
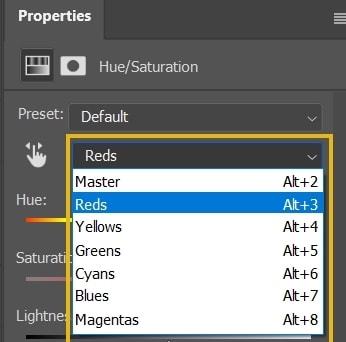
- Choose from the following choices in the Properties panel:
A Hue/Saturation setting can be selected from the Preset option.
- With the On-Image Adjustment Tool's right-side menu:
- To adjust all colors instantly, select Master.
- To alter the color range, see Specify the variety of colors adjusted using Hue/Saturation. Select one of the other standard color ranges mentioned for the color you wish to alter.
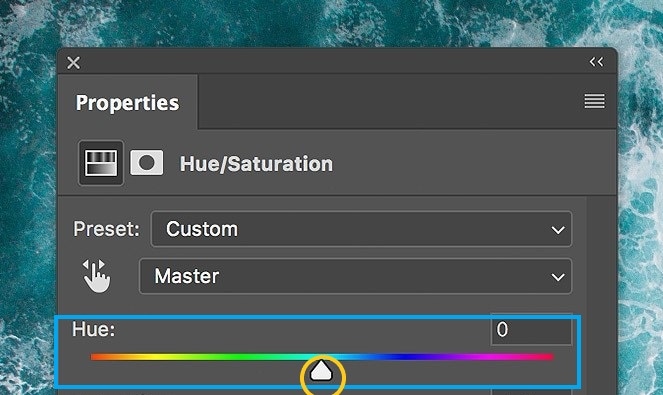
- Do one of the following to alter the hue:
- Type a value or move the Hue slider until you are pleased with the color adjustments.
The figures shown in the box represent the number of rotations around a color wheel from the pixel's original color. Rotation is indicated either clockwise or anticlockwise by a positive or negative number. The values can be between -180 and +180.
- Choose the On-Image Adjustment option:
- Then, to change the Hue value, Ctrl-click (on Windows) or Command-click (on Mac OS) and drag it left or right to change and modify the value of Hue.
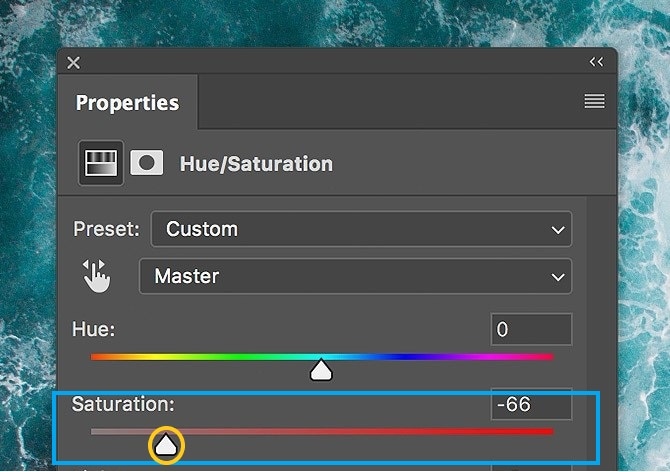
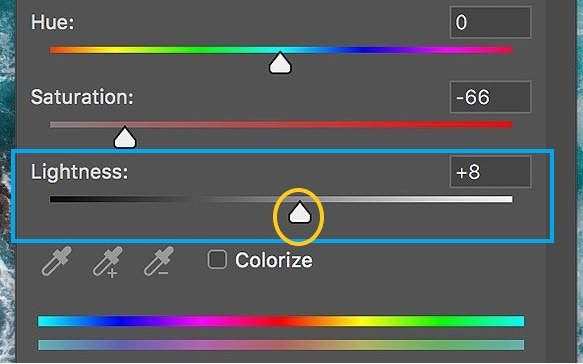
Adjust the Saturation
- Any of the following actions will change the saturation:
- Put in a value or move the Saturation slider to the left to reduce the saturation or to the right to increase the saturation. Between -100 (% of desaturation, duller hues) and +100 are possible values (% of saturation increase).
- Choose the On-Image adjustment tool, then select an image color.
- To change the saturation of the color scale that contains the clicked pixel, drag the right or left in the picture.
- For Light Adjustment:
- Put a value in or move the scale to the left to make a color darker (add black to it) or to the right to make a color lighter (add white to it). The values vary between -100(% dark) and +100 (% white). Click the reset option in the Properties window at the bottom to reverse/undo a Hue/Saturation preset.
Between the two color bands are the adjustment sliders and the matching color wheel in degrees.
- The hue is set by the inner vertical sliders.
- The outer triangle buttons indicate where the adjustments "fall off" on a color spectrum.
- Change white balance
A step-by-step guide to changing white balance:
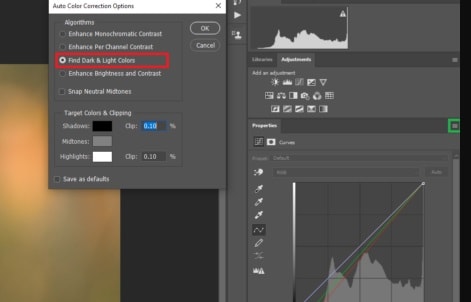
You can use Photoshop to automatically correct a photo's white balance by following these steps:
- Apply a layer of Curves adjustment.
- Click the Properties tab's right border (marked green).
- The Auto Color Correction Options box will appear after selecting Auto Options from the menu.
- Choose from the window's "Find Light & Dark Shades" menu (marked red).
- Click OK.
Instructions for White Balance Correction When Applying Curves
- Applying curves can directly change the white balance for more precision and control.
- Make a Curves adjustment layer.
- A drop-down menu will appear where you can select RGB (the usual), Red, Green, or Blue.
- Choose the Red first. (Blue is reduced when increasing red)
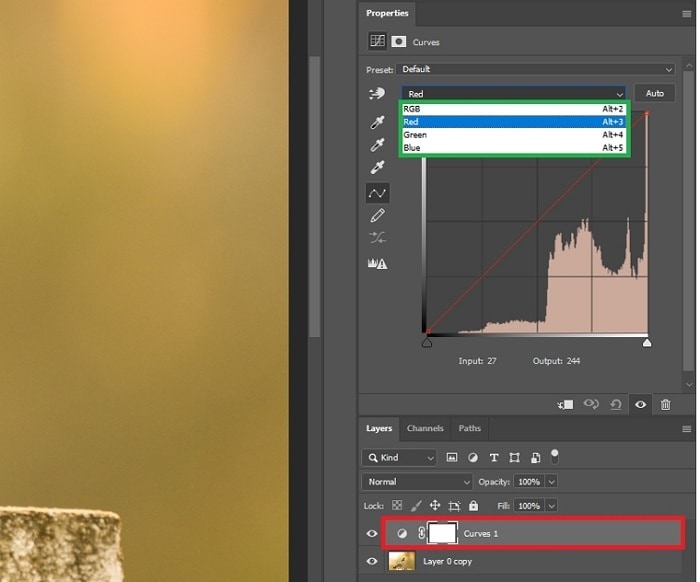
- Drag the red line from the right upper border a little bit downward to lessen the reds until the reds have a warmer contrast.
- The greens have increased when the warmer tone is in control. To fix this, take down the green lines, too.
- The tone of the image is still mildly warm. The insertion of a little blue will set the tone.
- The image presents a natural state. There is no cast on the whites in the top left area. If you select RGB, the adjustment layer's properties are as follows:
- Adjust Color Balance
From any of the following, you can reach the option:
- Click the Color Balance button in the Adjustments window.
- Select Color Balance under Layer > New Correction Layer.
- In the New Layer text window, click OK.
- Click the Create New Fill or Adjustment Layer button in the Layers window.
- Choose Color Balance from the choices in the context menu.
- The Image option > Adjustments > Color Balance is also available.
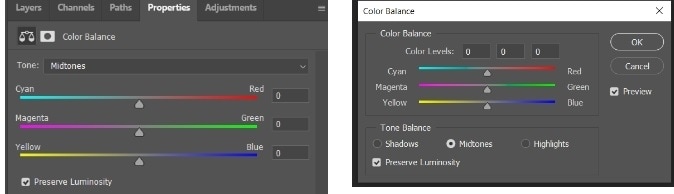
However, because this technique discards image information and makes harmful changes to the image layer, you cannot retrieve the original picture. To choose the tonal range in which you want to concentrate your edits, select one of the Tone Balance options—Shadows, Mid-tones, or Highlights—in the Properties window that appears.
To stop the brightness levels from altering while the hue is changed, choose Preserve Luminosity. This setting is on by default to preserve the general tonal balance of your image.
Drag the Yellow/Blue, Magenta/Green, or Red/Cyan divider in the direction of the color you want to add and away from the color you want to take away. These figures may fall between -100 and +100. While adjusting the settings, you can see the changes on the image in real-time.
To open the editing options, select the image. Select filters to add depth and design under the Filters tab. Switch up the manner by pressing the Shuffle.
- Select Photo Filter under Layer > New Adjustment Layer in the New Layer dialogue box, then click OK.
- Applying a color filter or picking a default filter:
- Filter: To use a preset filter, choose the Filter option and a preset from the list that appears.
- Color: Choose the Color option to create a unique filter.
- Use the Density slider to change the quantity of color in the image.
- To stop the luminosity levels from altering, choose Preserve Luminosity.
- To see your image's changes, enable Preview. To adjust, click OK. To close the Photo Filter window, click Cancel.
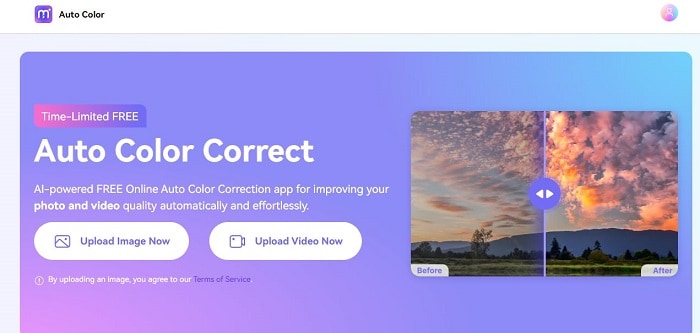
Media.io - Auto Color Correct Your Image for Free!
Using Media.io, you can make color adjustments to your images and videos to make them appear more natural and realistic. Use the effective web tool Media.io to enhance your pictures and videos without spending any money. Additionally, you could use Media.io to add noise or blur to your movies and pictures as unique effects. Both expert and novice users can take advantage of its many features.
The capability to change an image's hue, saturation, and brightness is one of these characteristics. Users of the website can also change the hue of an image by choosing a color from a selection. The ability to trim, resize, and rotate a photo are just a few of the additional features available through Media.io.
The important features of Media.io are:
- The main benefits of Media.io include its ability to convert files and make them simple and act as an image hue changer for your videos.
- You can transfer your videos to any file type, including MOV, AVI, MP4, and more.
- Using Media.io's built-in color adjustmenttool, you can also change hue of your movies.
- You can simply change the brightness, contrast, and saturation of your video images using Media.io.
- Additional color effects, like sepia or black and white, can be added or removed.
- The conversion process for your movies only takes a few minutes with Media.io.
FAQ: What is the difference between White balance and Color balance?
| White Balance | Color Balance |
| Describes adjusting the colors in an image so that white regions look neutral and free of any color cast. | It refers to changing the general color range of an image. |
| Adjusts for differences in the color tone of various light sources, which can make white images look yellowish, blue, or reddish in photos. | |
| Emphasizes clearing color casts from white regions of an image | Achieves the desired color balance by adjusting the proportions of the three main colors—red, green, and blue. |
| Subtle impact on the image's general color balance because adjusting the White balance can change the hue of the image's other colors. | It is used to set a specific atmosphere or to correct camera or lighting-related color errors. |
| Commonly changed by directly choosing the color temperature or by selecting one of the pre-set choices (such as daylight, tungsten, fluorescent, etc.). | Directly affects the image's general color balance. |
| Usually changed by using sliders that let you change the intensity of every primary hue. |