Similar to the logo itself, its placement on your letterhead, website, blog, and others is also very important. So, if you want to resize a logo by increasing or decreasing its size, there are several tools and programs available. To help you resize logo without losing quality, listed below are the popular tools.
Part 1. Resize A Logo Online Free By Pixel or Percentage
To resize your logos online we recommend Wondershare Online UniConverter as a decent program that works from your browser without any need for software installation. The program allows you to resize files in PNG, JPG, BMP, and GIF formats. The size can be selected based on percentage or the size in terms of height and width. Using Online UniConverter, a maximum of 5 files up to 5MB each can be added and processed at a time. After the resizing process, you can save the file to the computer or the Dropbox. The program is available for Windows and Mac systems.
Steps on how to resize a logo using Online UniConverter
Step 1: Open Image Resize on your system and to add the logo click on the + icon.
Step 2: Choose the height and the width of the required image or select the percentage change in comparison to the actual image.
Step 3: Hit on the Start button will start resizing the added files.
Part 2. Steps to Crop and Resize An Image to Logo Size Using Photoshop
Photoshop is a professional editing tool that comes with a wide range of functions and features for all types of users. So if you have images in the popular format that you want to crop and resize to be used as a logo, Photoshop is just the right tool to use. Cropping in photoshop will enable you to select the part of the image that you want to use as a logo and resizing will help you to get the desired logo size.
Steps on how to crop and resize a logo without losing quality using Photoshop
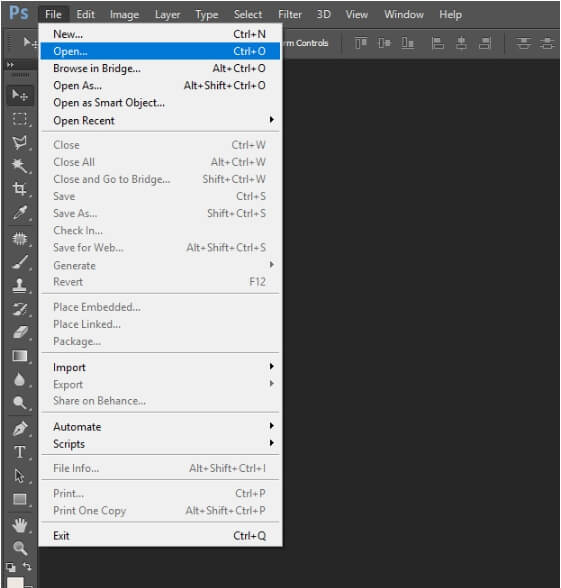
Step 1: Run the Photoshop app on your system and click on File > Open to locate and add the image to be processed.

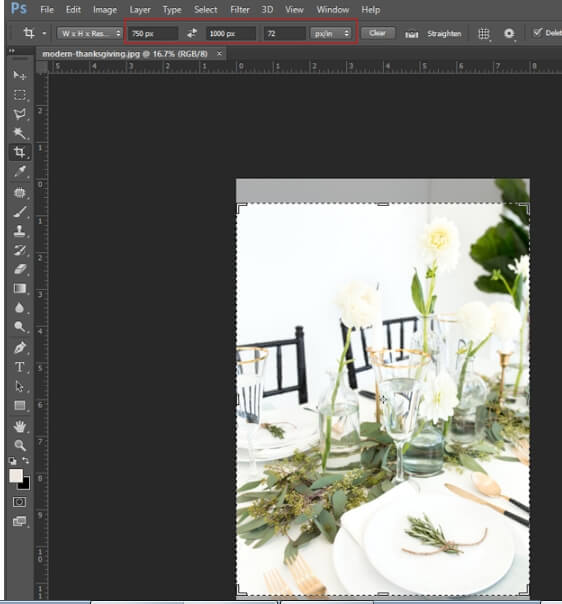
Step 2: Next, from the Toolbar, select the crop tool. Alternatively, you can also use Image > Crop from the top menu bar. The crop boundaries will now appear that you can select and drag to choose the area to be used as a blog.

Step 3: From the top menu bar, again open Image > Image Size. From the pop-up window, select the file size as well as the resolution. The file can also be changed from the Toolbar. To retain the aspect ratio, enable the Constrain Proportions option.

Step 4: Finally, after the image is cropped and resized, open File > Save As to select the file name, location, and the format in which you want to save the logo.
With these few simple steps, you can resize image to logo size using Photoshop.

