ChatGPT
 Perplexity
 Gemini
 Claude
 Grok
Grok
Working on audio files can be challenging if not using the best sound enhancer for PC. Many tools can show compatibility with Windows and Mac computers, but compatibility is not the only thing you should see. From the user interface to supported file formats, everything should be noticed before using an audio enhancer.
It can be problematic if you don't know which audio enhancer is best for which platform. To eliminate this problematic scenario, this article will discuss the best volume enhancer PC. From key features to pricing, you can learn everything about them here. Moreover, you will also learn about the best online sound enhancer in this article.
In this article
Part 1: Overview of the Best Audio Enhancer for Windows 10/11
Windows 11/10 is popular for its enjoyable features and better performance. It also shows improved stability and security for the users. In this section, you will discover the best audio enhancer for Windows 10/11. So, let's dive into the details of these sound enhancers without any further delay:
1. FxSound
This free sound enhancer Windows 10/11 can streamline your workflow efficiency for your ease. Whether you are working on video games or acapella, this tool can help you. You can also work on the audio-saturated situations with a higher bitrate with FxSound. Moreover, you can experience a richer, clearer, and smoother sound experience with this tech-savvy tool.
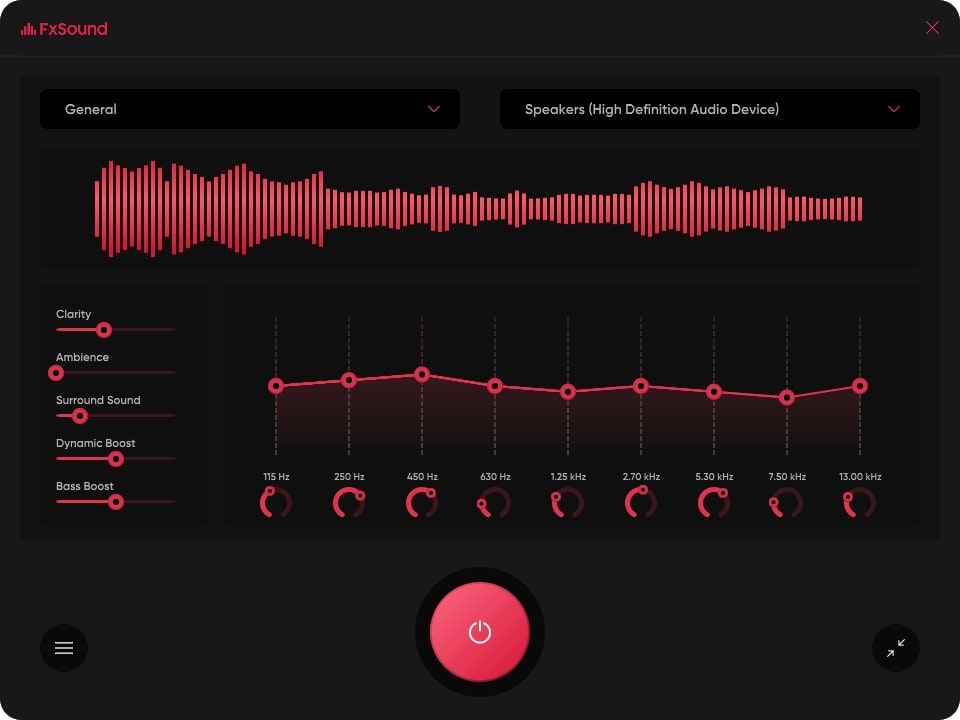
Key Features of FxSound
- FxSound gives you the best possible audio output and passes through with targeted EQ that can also adjust the compressed areas of the track.
- You can use bass and equalizer on the lower ends of the audio for more clarity, punch, and deep sound. Moreover, it boosts the audio without any distortion.
- The visualizer of FxSound allows you to feel your music file in a new way and adjust it along with a 20-band equalizer.
Pricing Plan
- Free
2. DeskFX Audio Enhancer
With this Windows audio enhancer, you can customize your audio files without doing much. You can also apply audio effects to the files in real time. It also has graphic, parametric, and graphic equalizers, which can help you adjust the frequencies. There are also many commercial effects that can improve the white noises and reduce background noises.
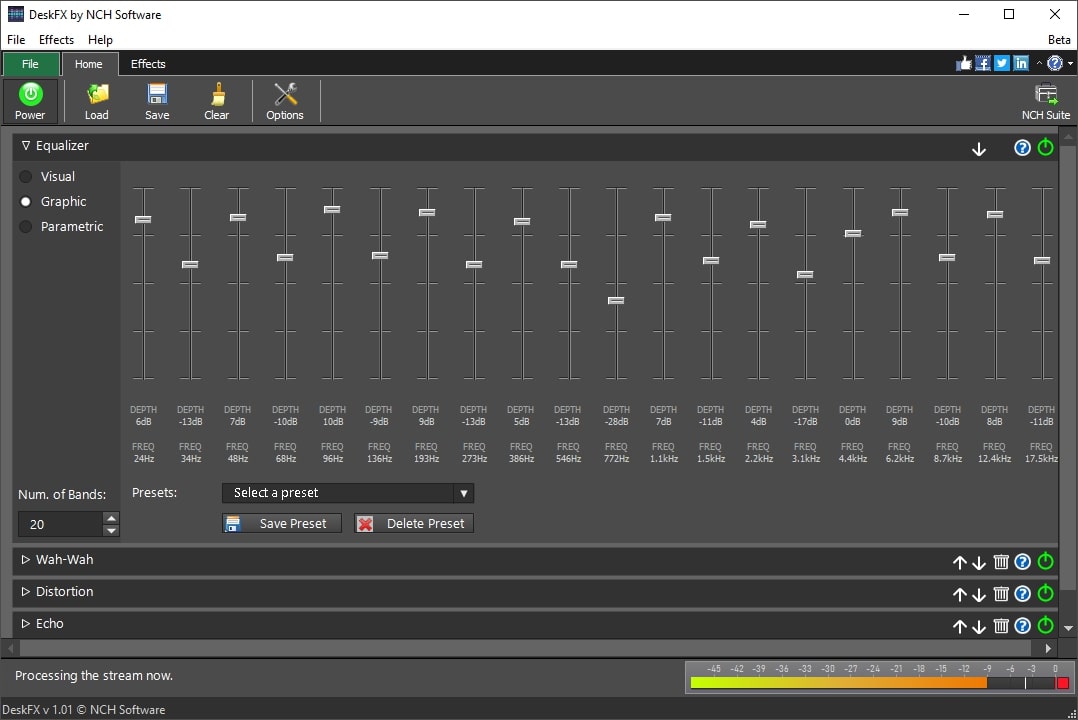
Key Features of DeskFX Audio Enhancer
- Moreover, it has many effects, like amplified reverb, chorus, and wah-wah, which can make your audio files more engaging.
- You can boost the audio without distortion and can also switch between the equalizer modes. It allows you to equalize in up to 20 bands.
- This tool also allows you to manipulate speakers and suppress all irritable noises with high-pass filters.
Pricing Plans
| DeskFX Audio Enhancer - Commercial License | $40 |
| DeskFX Audio Enhancer - Personal License | $35 |
| DeskFX Audio Enhancer - Commercial License Quarterly Plan | $1.66/month |
3. Boom 3D
Boom 3D is a unique volume enhancer PC that can work on your audio without messing with its other properties. With this, you can experience 3D sound with any speaker and headphones. Moreover, it has innovative sound staging algorithms which can transform your way of listening. It can also extract the audio components and adds spatial effects to create an extremely realistic listening experience.

Key Features of Boom 3D
- It has different equalizer presets, such as flat, hip-hop, and electronic. These preset calibrate the audio and make sure that the frequency is modulated.
- You can also adjust all types of volume with this tool, such as alerts of Google Chrome, Netflix, and more. You can also manage the audio output with this tool.
- The speaker booster of Boom 3D has an advanced audio player which lets you create playlists and import your favorite songs.
Pricing Plan
| For Windows User | $49.99 |
Part 2: Overview of the Best Audio Enhancer for Mac
Mac is one of the most popular devices all over the world. You can also optimize your audio sound quality and enhance it as per your preference with some reliable tools. The sound enhancer Mac that can help you regarding this issue is listed here:
1. Boom2
This award-winning sound enhancer Mac allows you to customize your audio per your requirements. With this, you can experience extraordinary control over your audio. From high decibels to basses, you can control every bit of your sound with it. Moreover, it also has a night mode which can reduce the pitching of harsher sounds without making any distortion.
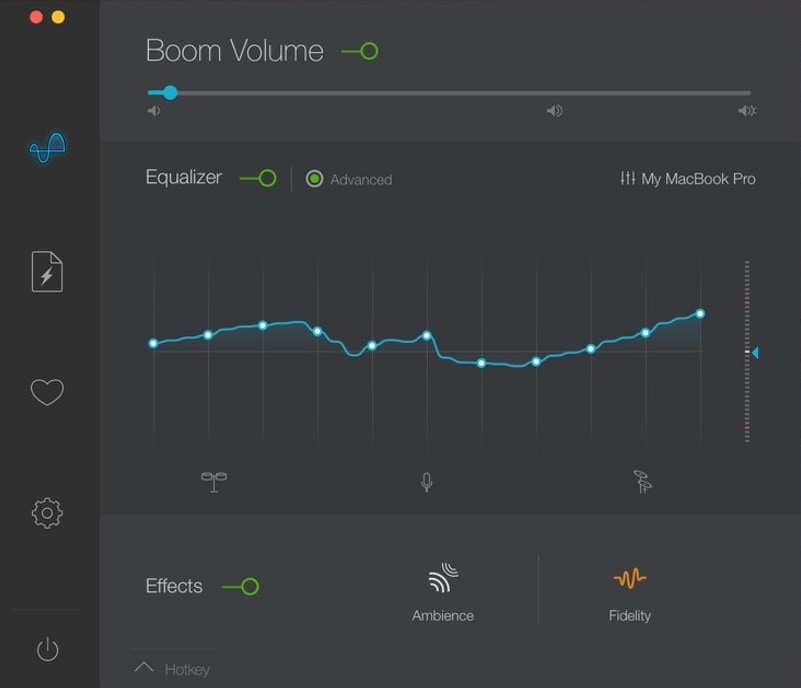
Key Features of Boom2
- It has a 31-band equalizer and a 20dB range by which you can personalize every frequency for the most realistic audio experience.
- The fidelity effects of Boom2 boost the weak frequencies, which increases the overall quality of a track with perfect pitches.
- You can intensify the stereo soundscapes with the spatial effects and make finer adjustments with the pitch effect.
Pricing Plans
| 6 Month | $13.1 |
| 1 Year | $18.5 |
| Lifetime | $43.6 |
2. eqMac
With eqMac PC audio enhancer, you can equalize the audio in a professional manner. This tool can adjust the main frequencies, such as bass, high and mid, with static bandwidth. You can also change the reference points of 10 frequency bands with it. Moreover, it can also work on decimal precision along with its real-time spectrum analyzer. It is like a one-stop solution to audio problems.
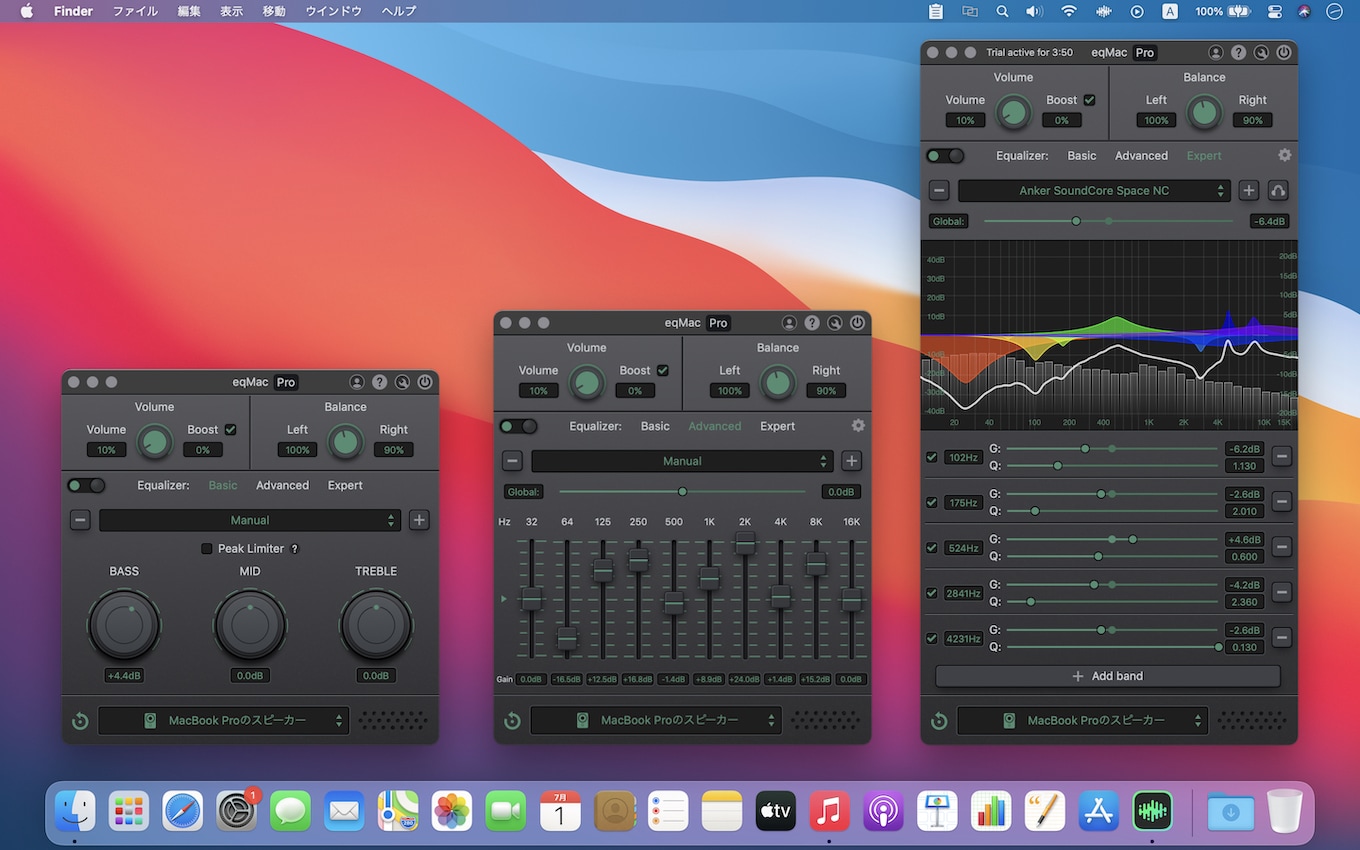
Key Features of eqMac
- It offers full AutoEQ integrations by which you can also manage the sound quality of your headphones.
- This tool has diversified filters like peaking, high/low shelf, and more which can make your sound more interactive.
- With its volume adjuster, you can easily adjust the sound alerts and app sound.
Pricing Plans
| Pro Subscription | $3/month |
| Pro Lifetime | $40 |
3. SpeakerAMP: Booster & Equalizer
This volume enhancer PC has a 31-band equalizer that can escalate your listening experience quickly. You can also boost the volume with more than 10x booster and have a 3D sound experience. Other than this, it can also amplify the sound for amplifier lovers. This tool also offers a built-in audio player, so you don't have difficulty listening to your favorite tracks.
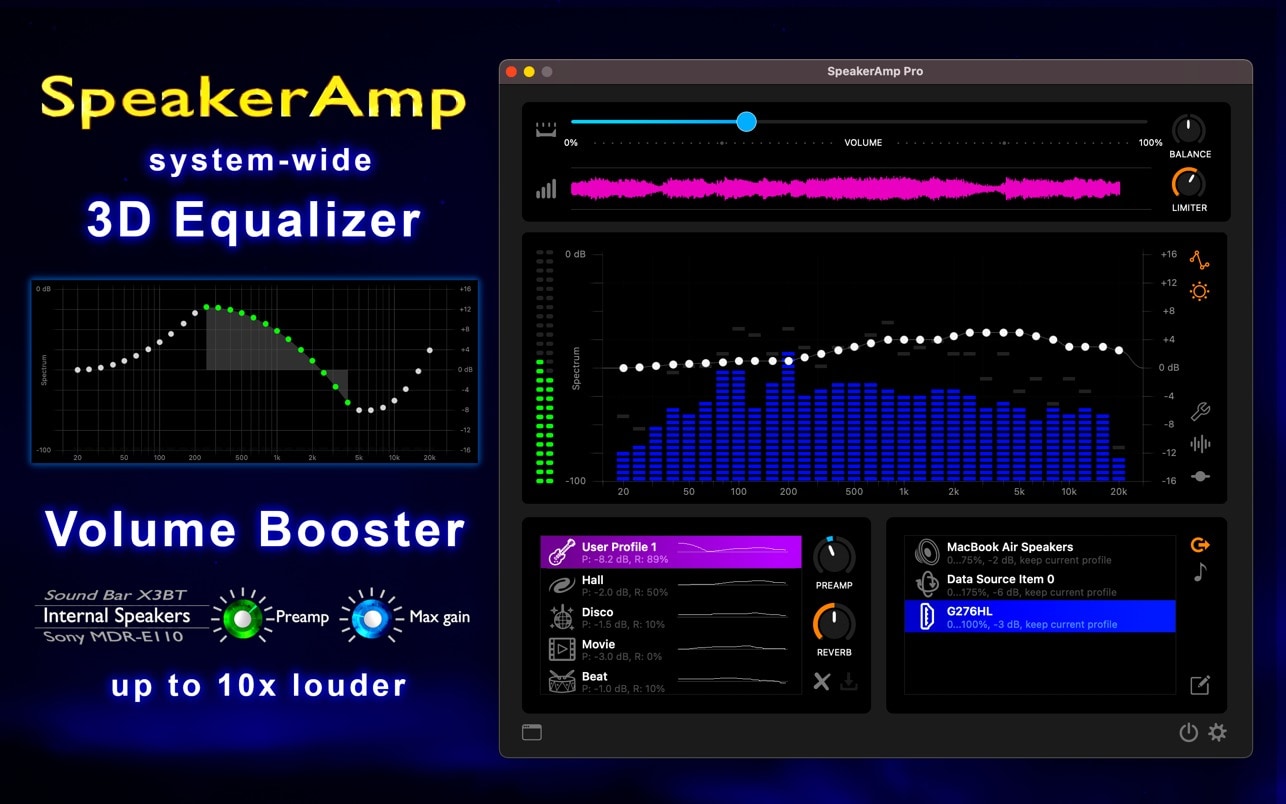
Key Features of SpeakerAMP: Booster & Equalizer
- It has 20 channel spectrum analyzers and a 10-channel equalizer which is more than enough to give a professional outlook to audio tracks.
- This tool offers two adjustable ranges for amplifiers, and it can support joint stereo and mono stereo.
- SpeakerAMP: Booster & Equalizer has a visually tunable limiter and an audio histogram.
Pricing Plan
| SpeakerAmp PRO | $9.99 |
Part 3: Tips to Manually Control the Noises for Enhancing the Sound
Do you want to control the noises manually so you don't have to work with Mac or Windows audio enhancer? In this section, you can find some implementable tips to cater to this issue:
- Use High-Quality Devices: A microphone is basically the main device that can help you control unwanted noises. With a high-quality microphone, you can record good sounds. Moreover, some microphones have pop filters which can also eliminate propulsive sounds.
- Monitor Sound Level: Working with a visualizer which can show your pitches is an effective way to keep track of your voice. It is very effective for voiceovers because it can also eliminate higher pitches. The unwanted noises cannot be amplified if you are monitoring your sound levels.
- Use Sound Filters: Many digital tools offer the automated procedure of sound cancellation. If you work with such software, you won't see any irritating sound in your audio tracks. They also work like an audio gate.
- Quiet Environment: If you are going to record podcase or some voiceovers, always work in quiet places. With a quiet place, you can interpret your sound better without any distortion. Moreover, choose a room with carpets because it can prevent the echoing of noises.
Part 4: Best Online Sound Enhancer for recorded Videos and Audios
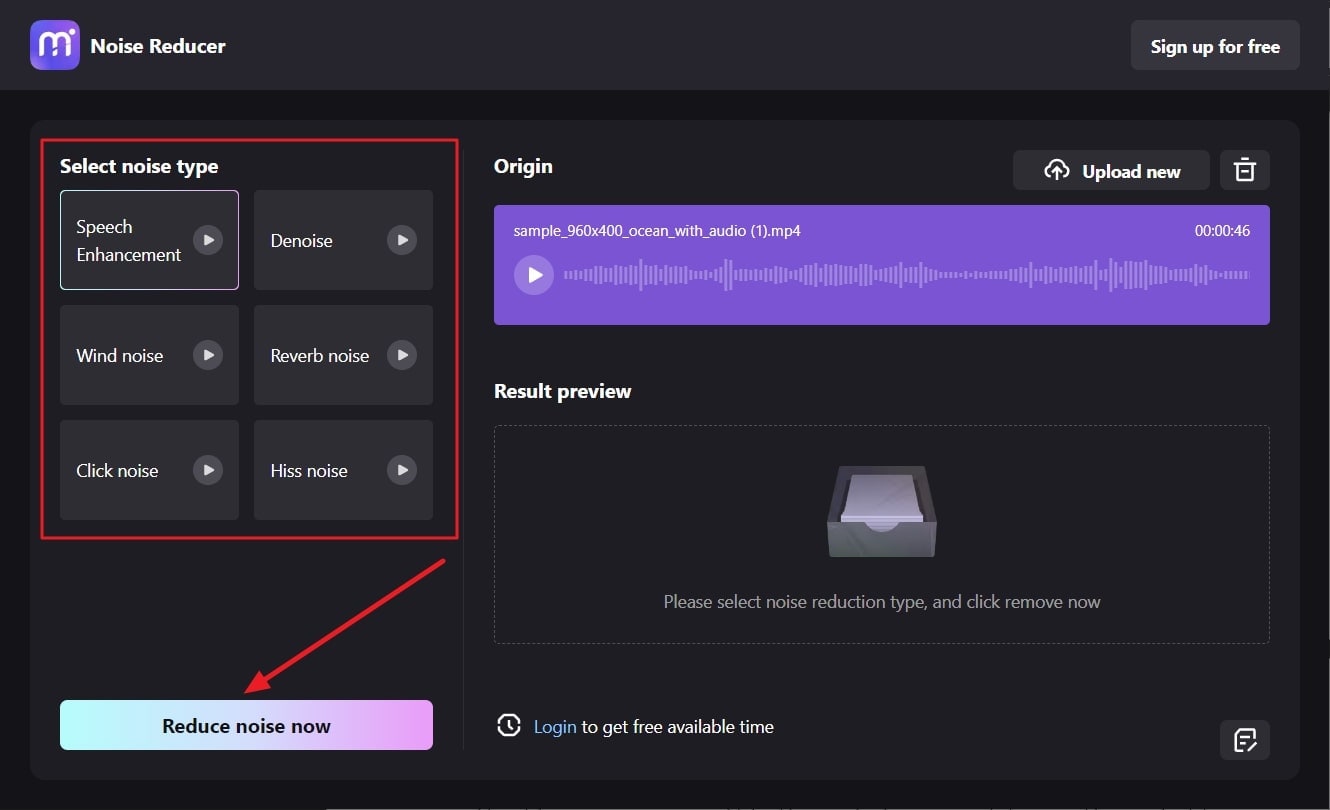
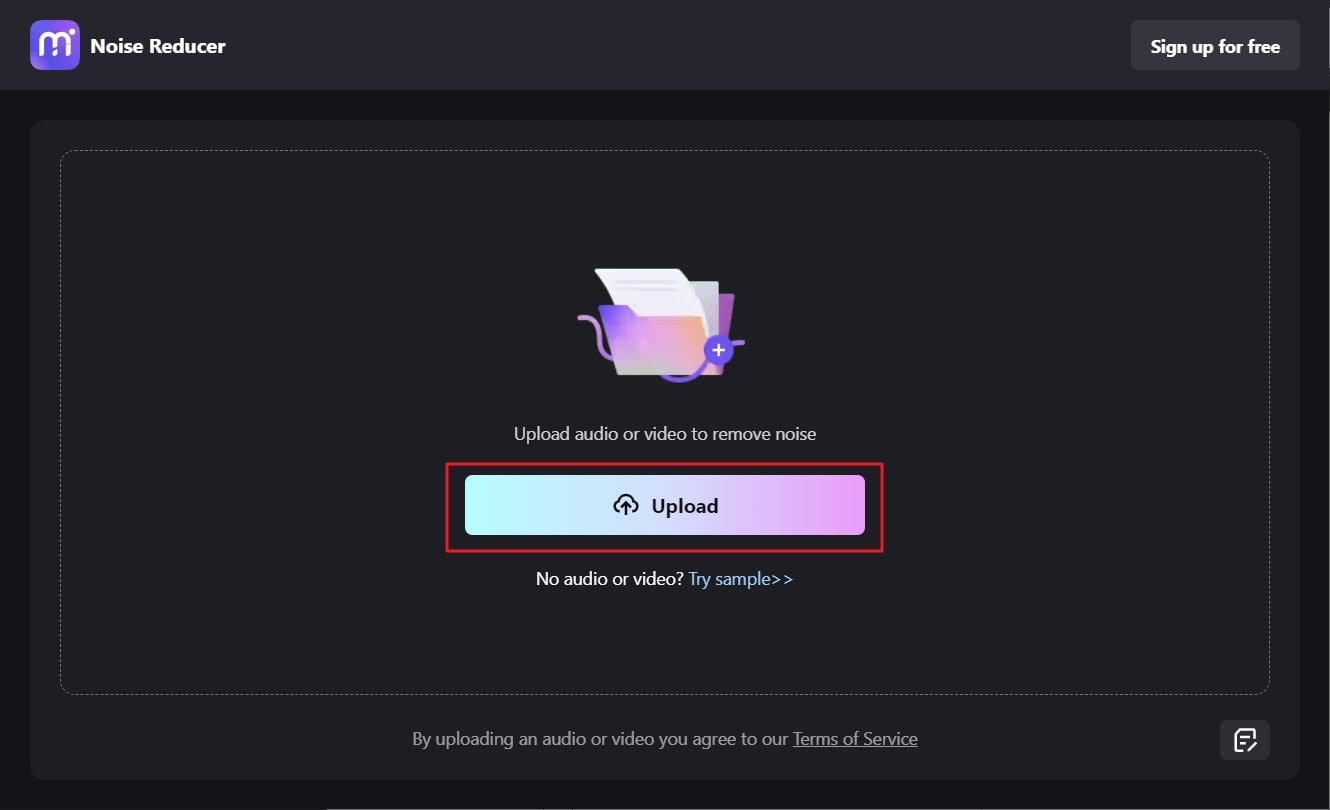
PC audio enhancers can take up lots of space on your device. Thus, if you don't want to compromise your device's storage, consider working with an online audio enhancer. The best tool that can help you in this scenario is Media.io - Noise Reducer. With this exclusive tool, you can make your audio more optimized.
One of the best things about this tool is that it is free and can work with audio and video files. Besides this, it has end-to-end encryption, so you can even work with your personal data. You can optimize, reverb, wind, hiss, and other noise problems with it. Follow the steps listed here to enhance the sound quality with Media.io - Noise reducer:
Step 1 Access Media.io - Noise reducer and Add File
Initially, open the "Media.io - Noise Reducer" tool on your browser and select "Get Started For Free" from the main interface. After this, click on the "Upload" button and add the video or audio of your choice.
Step 2 Enhance the Audio of the File
Once the file is uploaded, choose the type of background noise present in your file and press the "Reduce Noise Now" button. From the "Result Preview" section, click on the "Play" icon. After checking the results, click the "Download" button and save the background noise free on your device.