Included with the Microsoft Office bundle, PowerPoint, in addition to creating animated presentations, is also capable of recording your computer screen without installing any third-party screen casting program.
In this article, you will learn how to use MS PowerPoint for screen casting, and then save the recorded video as a separate file on your computer instead of embedding it into one of the slides in your presentation.
By the time you have finished reading this article, you will have a fair idea about how Microsoft PowerPoint’s advanced features. It can be exploited to use the program as a screen casting app to create professional-looking videos that can be edited in any third-party, more sophisticated, and dedicated video editing tool.
Part 1. Record Your Screen in Microsoft PowerPoint
a. What Is Microsoft PowerPoint
Microsoft PowerPoint is a program that comes along with Microsoft Office suite and allows you to create basic and advanced animations and professional presentations that can be used to explain a product, workflow of an organization, processing of an application, etc.
With the built-in animation effects, transition presets, and the ability to customize their timing as per your needs, MS PowerPoint can now be used as a complete animation program for simple and complex presentations for both official and educational purposes.
b. How to Use Microsoft PowerPoint to Record Screen
Recording your computer screen using Microsoft PowerPoint is pretty simple, and you can follow the simple steps given below to do:
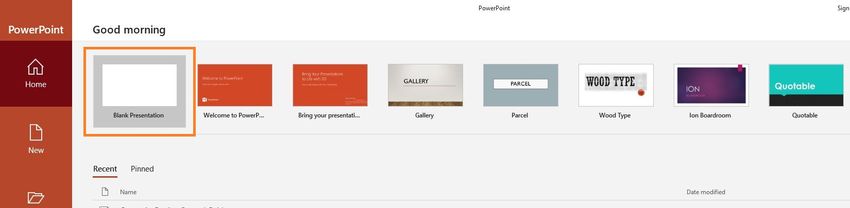
Step 1. Launch Microsoft PowerPoint and Open a Blank Presentation
Use the shortcut icon to launch Microsoft PowerPoint, and click Blank Presentation from the right window. If you are already working on a presentation and want to embed a screen cast video to one of its slides, you can skip this step and jump to Step 2.
Step 2. Start Built-in Screen Recorder
Go to the Insert ribbon from the top, click the Screen Recording button from the Media section at the right.

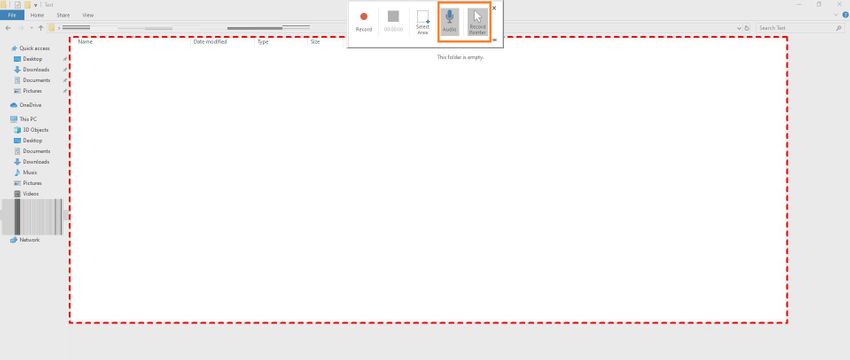
Step 3. Select the Recording Area and (Optionally) Configure Audio and Mouse Pointer Capturing
Drag the cursor over the area you want to record during screencasting. Also, click to deselect the Audio and Record Pointer buttons from the Screen Recording panel that appears at the top of the window. This prevents Microsoft PowerPoint from recording the audio and mouse pointer movements while screencasting your computer screen, respectively.
By default, both Audio and Record Pointer buttons are selected, which means that the screen recorder is configured to record both audio and the mouse movements.
Step 4. Start Screen Recording
Click the Record button from the Screen Recording panel at the top to begin recording the area of your computer screen that you selected earlier. Alternatively, you can press the Windows + SHIFT + R keys together on the keyboard to start the recording.
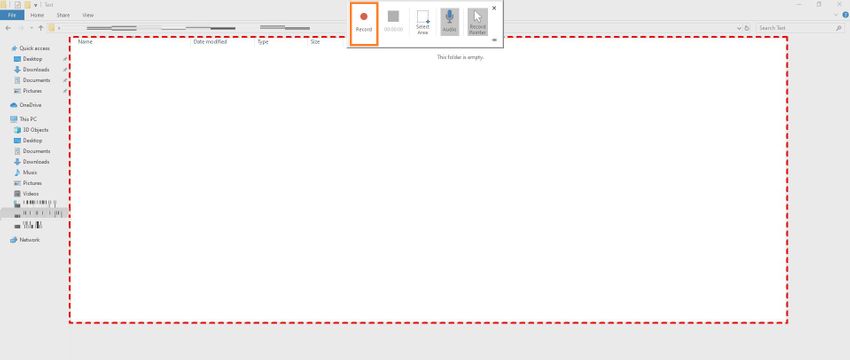
Note: A countdown from 3 to 0 begins as soon as you press the Record button or use the shortcut key to record the screen. This is to advise you to prepare yourself as every action after the countdown is over will be recorded.
Quick Tip: You should avoid unnecessary mouse jumps or unwanted pointer movements to keep the entire video as brief as you possibly can to save the file size small. That said, it is always a good idea to practice the actions you are about to screencast before you begin the recording. This would help you record the activities with precision.
Step 5. Stop the Recording
Once you are done screencasting, move the mouse pointer to the top, and click the Stop button from the Screen Recording panel (or press the Windows + SHIFT + Q keys on the keyboard) to stop recording the screen.
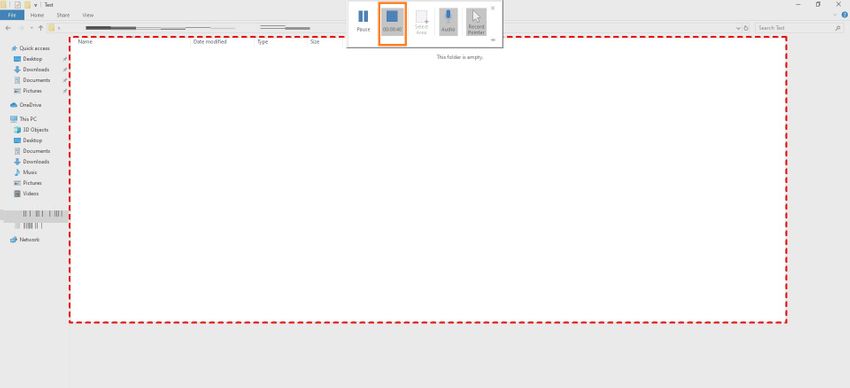
Quick Tip: It is advisable to stop the recording using the shortcut keys instead of moving the mouse pointer to the top. Since the screencasting session records all your activities, even the act of stopping the recording is captured in the video until the recording finally stops.
As soon as the screen recording stops, the captured video is automatically embedded in the currently selected slide of your PowerPoint presentation. If this is what you are looking for, you can go ahead and adjust the size of the clip using the side handles.
On the other hand, if you want to save the captured footage as a separate file, you can move to the next part of this article.
Part 2. Save Your Screen Recording As a Separate File from PowerPoint
If you don’t want to embed the recorded video to your PowerPoint presentation, the program gives you an option to save the footage as a separate media file on your local hard drive. The steps are given below explain how this can be done most straightforwardly:
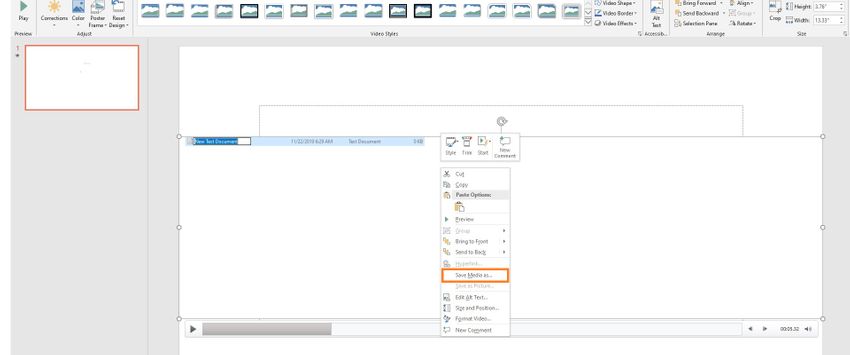
Step 1. Go to the Save Media as Box
Right-click the recorded video that is automatically embedded to the current slide of your PowerPoint presentation, and click Save Media as from the context menu that appears next.
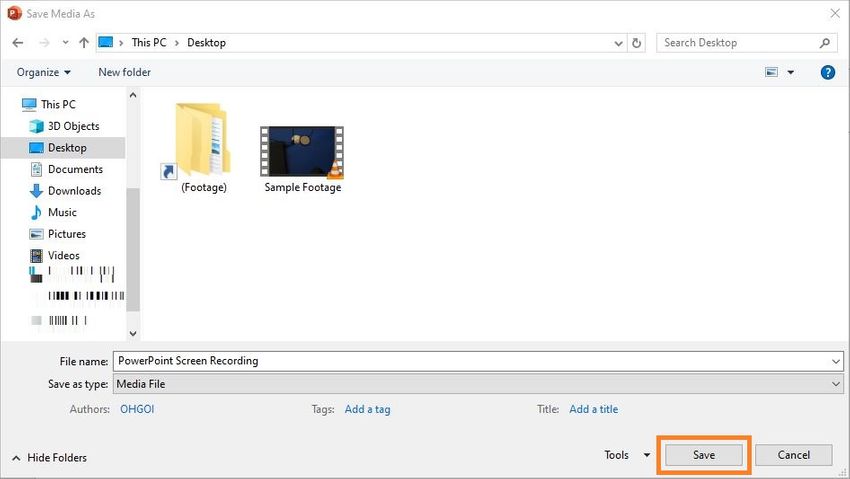
Step 2. Save the Video as a Separate File
Type a name for the recorded video in the File name field of the Save Media as box, browse for and locate the folder you want to save the video file to, and click Save from the bottom-right corner.
By default, the video is saved as an MP4 file. This file can then be imported to any third-party video editing program for further manipulations.
Summary
There are several free and paid third-party screencasting programs available in the market. Many of them even offer built-in editor that you can use to trim, resize, or annotate the recorded videos without using any other, probably expensive video editing application.
However, if you record your computer screen occasionally, and that too merely to create brief How-Tos for your colleagues, staff members, or trainees, there is no point downloading and/or investing in any dedicated screen recording application, especially when you can get the same output by using a built-in tool of a claim (Microsoft PowerPoint) that already resides in your PC.
Wondershare UniConverter allows people to record their screen easily in high-quality. People also could edit and convert their video files in UniConverter. Simple structures to create a special video. For more details about Wondershare UniConverter, please check the below or download it for free to try it by yourself.
- · Screen Recorder: Record all desktop activities with a voice in high-quality.
- · There were more than 1000+ file formats that could select.
- · UniConverter has editor, compressor, and converter features.
- · UniConverter supports people to upload , process, and download multiple files at one time.
- · You could either download UniConverter in Windows or Mac.