

Use the iPhone's Live Photos function to make your photos seem more lively. Many people have used it since it was released on the iPhone 6s in 2015. On the other side, Live Photos are only compatible with iPhones. So, when you share live photos on other phones, they become static pictures.
With the release of iOS13, you can now convert Live Photos to videos. You may use your Live Photos to make animated shots that preserve sound and action on any device. However, if you're wondering how to convert Live Photo to Video on iPhone, you'll find it out in this article. Let's get started!
In this article
Part 1: What is Live Photo?
The iPhone camera has a Live Photos function that allows you to add motion to your photos. Instead of capturing a single picture, a Live Photo records a three-second image. When you use Live Photos, your iPhone records what occurs in the 1.5 seconds leading up to and immediately after the time you press the shutter button.
A Live Photo is taken in the same manner as a standard photo. When using Live Photos, you may even produce spectacular long-exposure photographs. Plus, it's possible to modify and share your Live Photo from the iPhone's photo album.
Part 2: How to Save a Live Photo as a Video in iOS 13/iOS 14/iOS 15
Live photos record three seconds of footage, including one and a half seconds before and after the camera clicks. Press and hold the live picture to see the whole process. You'd assume this was a video, but it's a High-Efficiency Picture File (HEIF) format; the file chooses one still as the main image dynamically.
And what if you choose to send the whole set of moving images to a device that is not a smartphone. You must first transform a live photo into a video to do this. With iOS 13 in 2019, Apple made this transition even simpler by eliminating the need for shortcuts or other applications. Follow these instructions to understand the built-in way to turn a live photo into video.
Step 1: Open the Photos application on your iPhone. Navigate to the live photo you wish to save as a video. The live photos will be shown as LIVE.
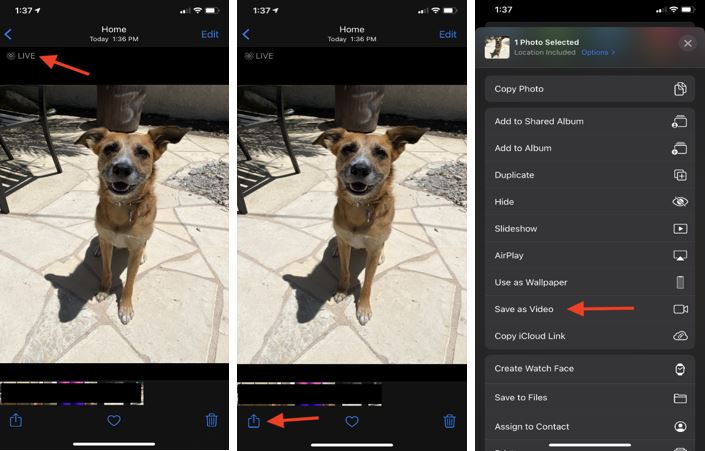
Step 2: Click on the Share button in the bottom left-hand corner of the screen, scroll down until you reach the Save as Video option and click on that option.
Step 3: In the Photos app, go back to the Recents or Albums section and scroll down to the video converted from live photos.
Note: It is possible to distribute the video anywhere you want and transform it to a.GIF format.
Part 3: How to Convert Live Photo to Video for Users Running iOS 13 Earlier Version
Sharing a Live Photo with relatives and friends is a popular trend. When it comes to sharing high-quality videos, Live Photos aren't always the best option. While sharing Live Photos, the clip is rendered into a still picture. But, you can save a Live Photo as a movie on your iPhone even if you have iOS 13 or earlier versions.
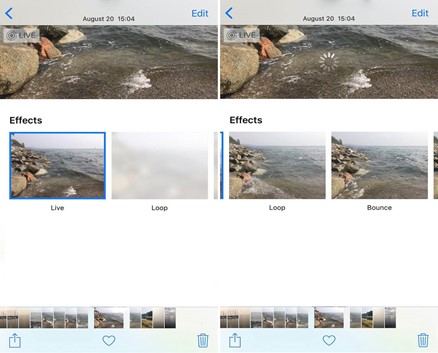
The idea is to transform your live photo into a video with special effects. Loop and Bounce effects can turn the live photos into videos. In the Photos app, these features are built-in. Two new video effects have been added to the Live Photos iOS 11. Using Loop, you may play a Live Photo indefinitely. Bounce allows you to play back and forth between two different versions of a Live Photo. Both the Loop and Bounce effects can be used to produce a continuous video. However, the videos made by Loop and Bounce effects do not have sound.
To make live photos into video, follow the steps below:
Step 1: Launch the Photos app. Navigate to the live photo you wish to save as a video.
Note: You'll know it's a live picture if you see LIVE with an image of a circular pattern in the top left-hand corner.
Step 2: Swipe up to see the Loop and Bounce effects. Click on the one you want to apply.
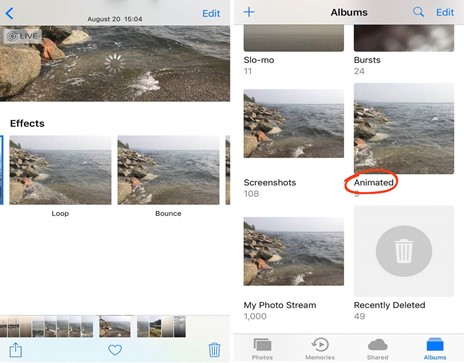
Step 3: Wait for the effect to apply to your Live Photo. Once applied, the video will be saved to the Animated folder in your Photos app. So, go to the Animated folder to find the video.
Part 4: How to turn a Live Photo into a video with Shortcuts
A Live Photo can be converted to a video or GIF using the Shortcuts app, part of iOS since iOS 13. In case of a security concern, Apple automatically disables any shortcuts accessible for download from third-party sources.
The iPhone warns you that Shortcut's security features won't allow you to execute an untrusted shortcut if you attempt to do so. However, you can activate untrusted shortcuts to get past this. However, the Untrusted Shortcuts option has been removed from iOS 15. It's advisable to experiment with non-Apple shortcuts and see whether they function on iOS 15 or not. And if you get an alert, follow the on-screen to create a shortcut.
To convert live photo to video using Shortcuts, follow the step below:
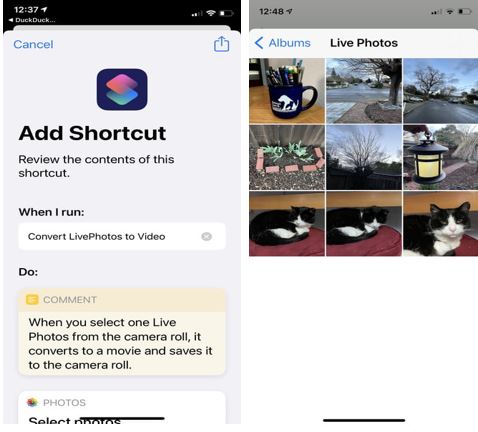
Step 1: Launch Settings on your iPhone. Scroll down until you find the Shortcuts option. Click on it and toggle Allow Untrusted Shortcuts and click Allow to enable it.
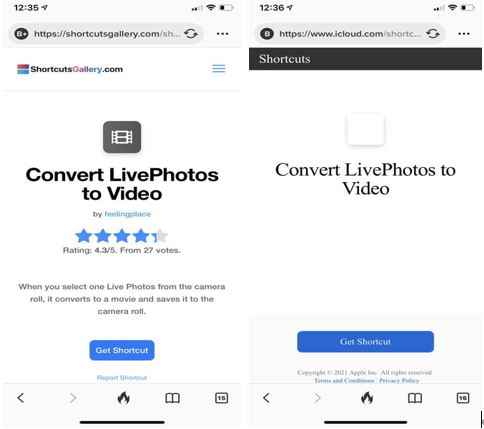
Step 2: Click here to get the Convert LivePhotos to Video shortcut for your iPhone. Then, select Get Shortcut and tap Add Untrusted Shortcut on the next screen.
Step 3: Press on My Shortcuts within the Shortcuts app. And then select the Convert LivePhotos to Video option. It will request permission to view your photos. Select OK and then select the Live Photos album and choose the live photo you wish to convert. Enable the Shortcut to send you updates by tapping OK. The Live Photo will be saved automatically as a video in the Photos app. You will receive a notification confirming this.
Part 5: Best App to Convert Live Photo to Video
It's also possible to utilize third-party applications from the App Store to convert Live Photos into videos. If you want the best video to live photo converter or vice versa, Lively - Photos to GIFs application available on App Store is your best bet.
The Lively app provides a straightforward method of saving your Live Photos as video content. While the app is entirely free to use, it leaves a Lively watermark in the lower right corner of any saved GIFs. To delete the watermark from all GIFs, you must make a one-time $2.99 purchase from the website. However, the watermark will not be applied to video files.
To save the live photo as a video using the Lively app, follow the instructions below:
Step 1: Download and install the Lively app from your App Store. After you've installed the application, launch it on your iPhone.
Step 2: Now, access your Camera roll through the Lively app, and select the live photo you wish to convert into a video.
Step 3: After uploading the live photo in your Lively app, select Movie from the above menu.
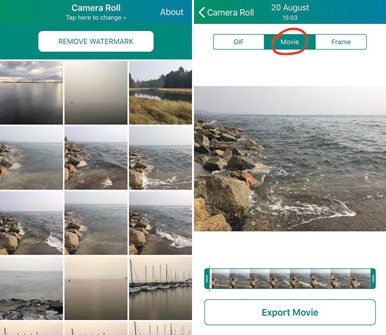
Note: Before you save the video, you can apply a few minor changes to make it better. The video's progress reel can be seen at the bottom of the page. By sliding the start and end bars, you can adjust the duration of the video to your liking.
Step 4: Now, click on Export Movie to export the edited live photo. A new window will appear at the bottom; click on Save to save the live photo as a video.

Conclusion
Capturing live photos is fun until you have to share them with someone, and it transforms into a still picture. However, you can seamlessly convert Live Photo to Video on iPhone using the methods discussed in this article. Start sharing your live photo with friends and family without any hassle. Good luck!


