
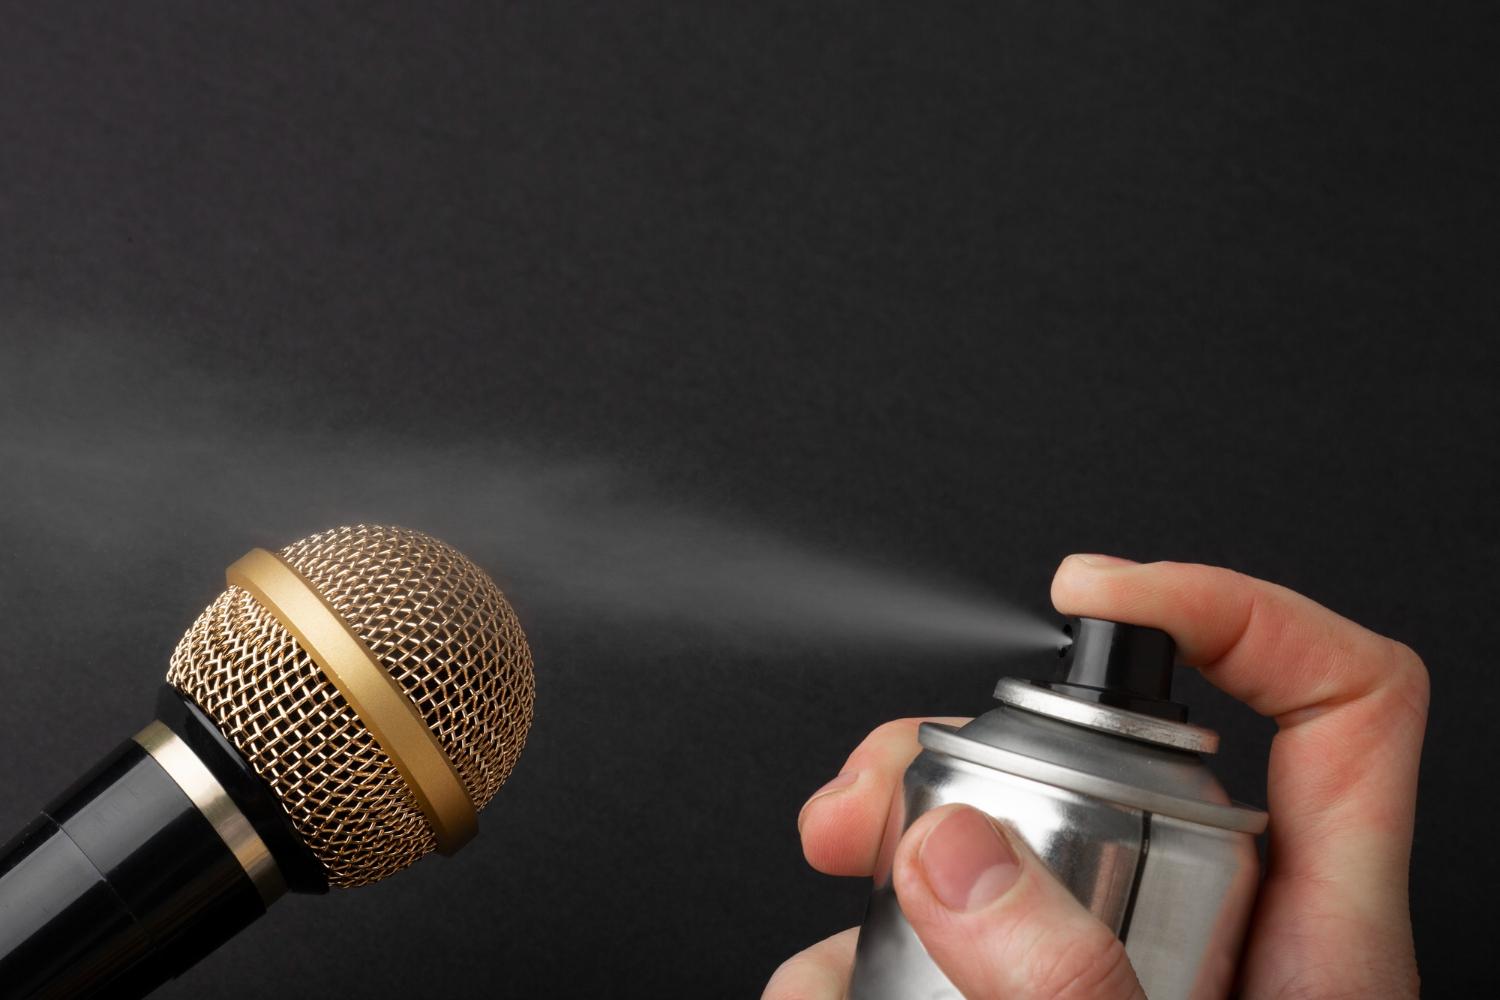
If you've ever recorded video outdoors, you know how easily wind can ruin an otherwise great shot. What sounds fine in the moment can turn into distracting low-end rumble or harsh gust noise once you start editing.
Wind noise is one of the most challenging audio issues to fix in post-production. Unlike steady hiss or electrical hum, wind creates unpredictable, low-frequency bursts that constantly shift in intensity. That's why many editors search for how to remove wind from audio in Premiere Pro before considering third-party tools.
The good news is that Premiere Pro can reduce light to moderate wind noise—especially low-frequency rumble and consistent airflow.
In this guide, you'll learn how wind noise occurs, step-by-step how to reduce wind noise in Premiere Pro, and when it makes sense to use alternative tools for better results.
In this article
How Does Wind Noise Occur?
Wind noise happens when moving air directly hits the microphone capsule. Instead of capturing normal sound waves, the mic reacts to sudden air pressure changes. This creates deep rumble, popping sounds, and sometimes distortion that makes the audio hard to understand.
Key Characteristics of Wind Noise:
- It mainly affects low frequencies, often overlapping with speech.
- It changes constantly instead of staying steady.
- Strong gusts can overload the microphone and cause permanent distortion.
Because wind noise is unpredictable and low-frequency heavy, standard noise-reduction tools don't always work well—especially in outdoor recordings. Over-processing can also reduce voice clarity along with the wind.
That said, Premiere Pro can still help reduce mild to moderate wind noise if used carefully.
How to Remove Wind Noise in Premiere Pro?
There are several methods to reduce wind noise in Premiere Pro. Check out this comparison table that explains all the top methods.
| Method | Best for | Limitations |
| Essential Sound Panel | Light, steady wind noise in dialogue clips where speech is still clearly dominant and the microphone wasn't overloaded. | Struggles with strong gusts, sudden wind bursts, or recordings where wind overlaps heavily with speech. |
| High-Pass Filter | Removing low-frequency wind rumble and airflow noise that sits below the main speech range. Especially effective as a first-pass cleanup for outdoor dialogue and on-camera microphones. | Cannot fix mid- or high-frequency wind noise and will hollow out voices if the cutoff is set too high. |
| Parametric EQ | Targeted cleanup when wind noise concentrates in specific frequency areas. Useful for fine-tuning after basic noise reduction or high-pass filtering. | Requires experience and careful listening. Aggressive EQ cuts can damage vocal tone, reduce intelligibility, or make dialogue sound unnatural if over-applied. |
Remove Wind Noise in Premiere Pro Using the Essential Sound Panel
The Essential Sound panel is usually the first stop for wind reduction in Premiere Pro. It works well in light wind, where the dialogue is still dominant. However, when the recording breaks down, for example, with sudden but hard gusts of wind, or any kind of mic overload, then you might have some issues.
Once you open Premiere Pro and import the audio clip with wind issues, follow the steps below:
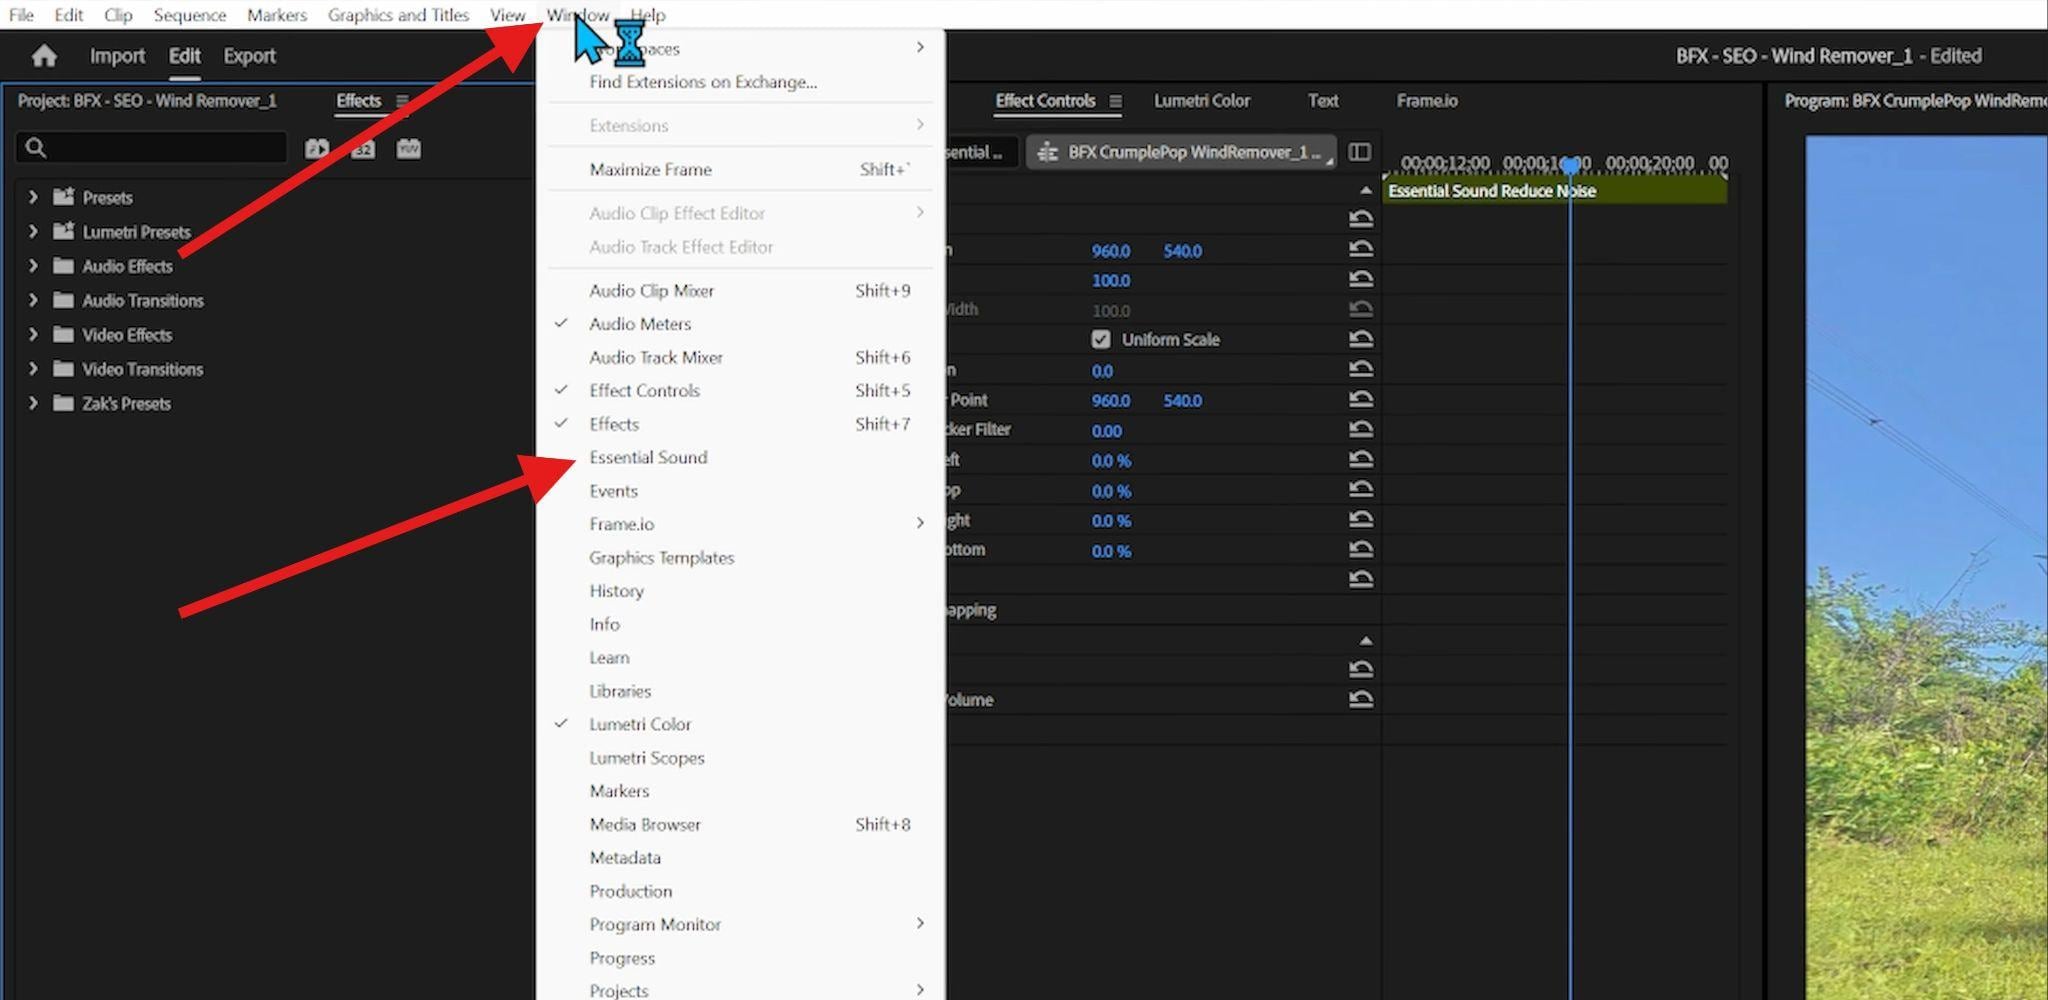
- To activate the Essential Sound Panel, click on Window > Essential Sound.
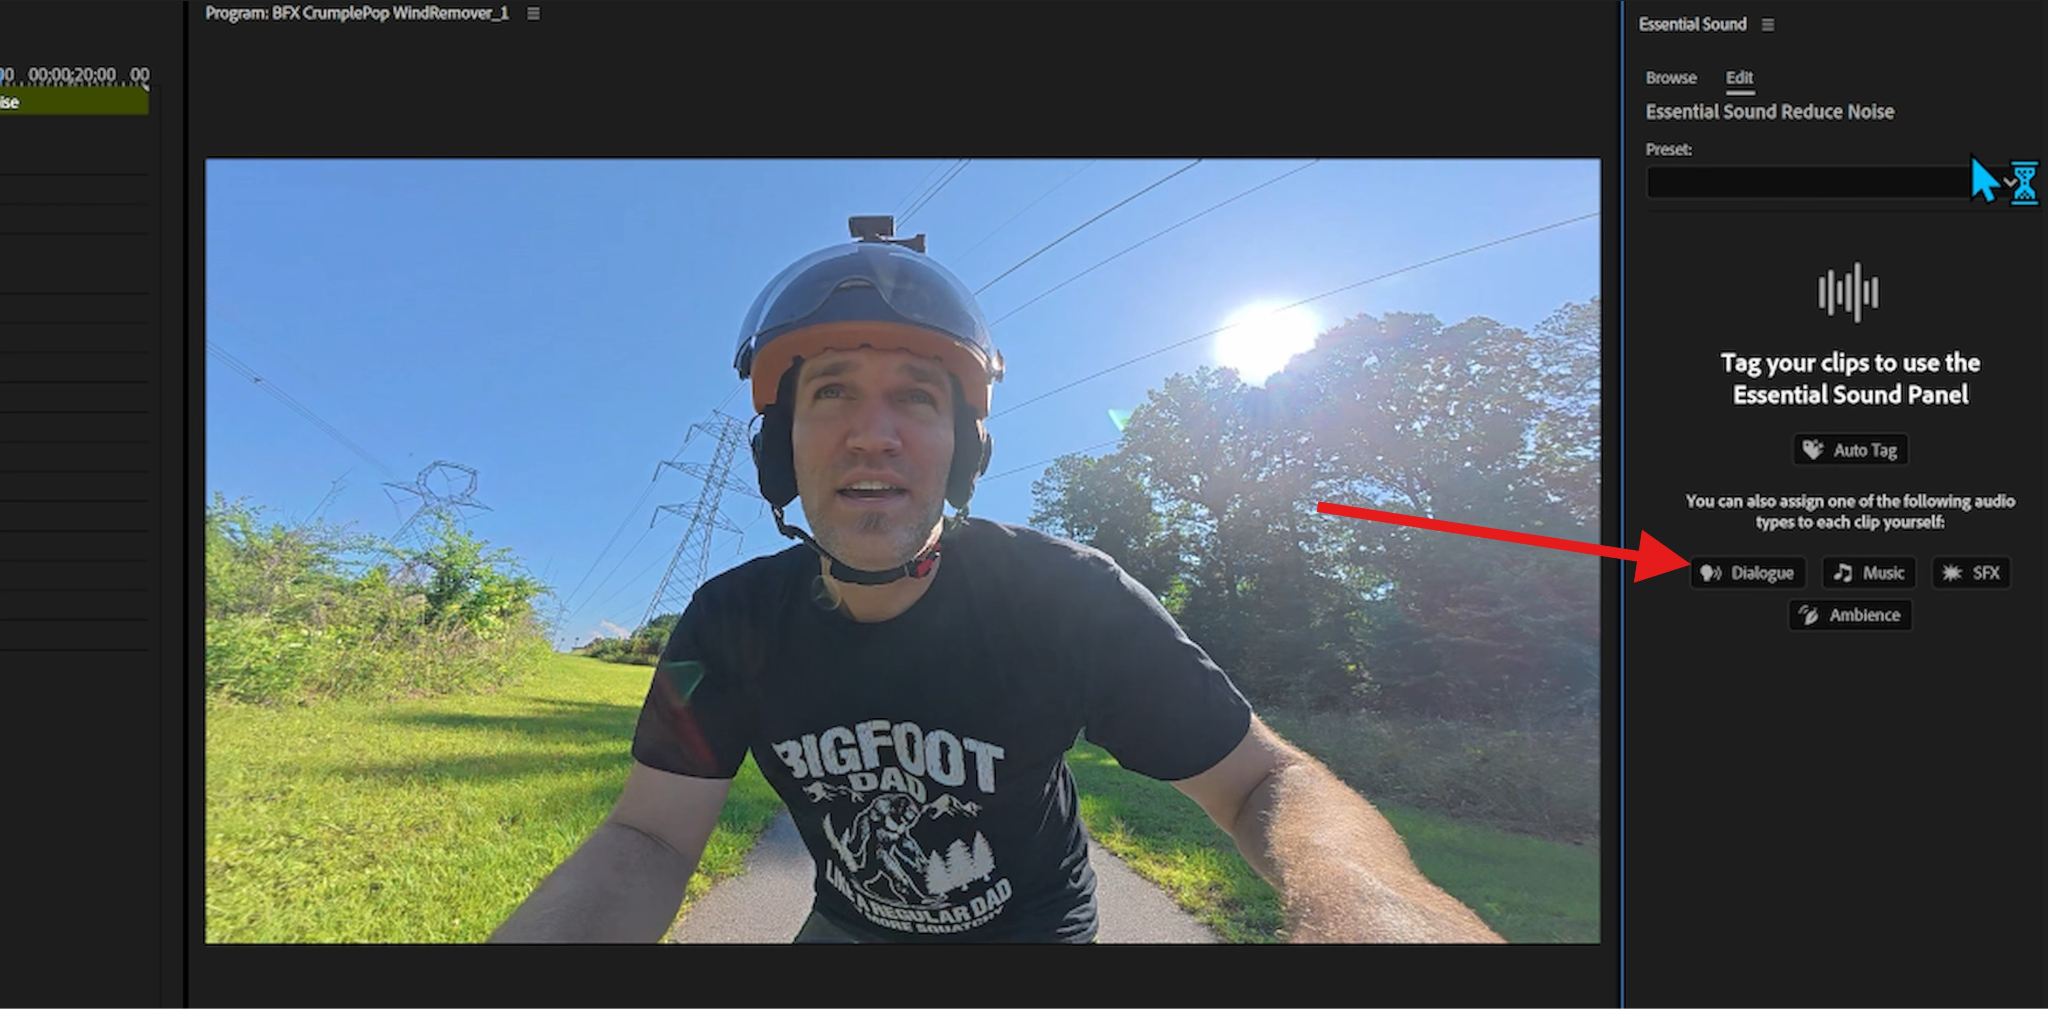
- Click on the audio file in the editing timeline. You will then see four tagging options, but you will most certainly go with the Dialogue tag.
- You can now experiment with different sound improvement options to reduce wind noise in Premiere Pro. First, click on Enhance Speech, then click on Enhance, and finally adjust the slider to your liking. You can do this with the other options, but Repair and Clarity will probably work best for this type of task.
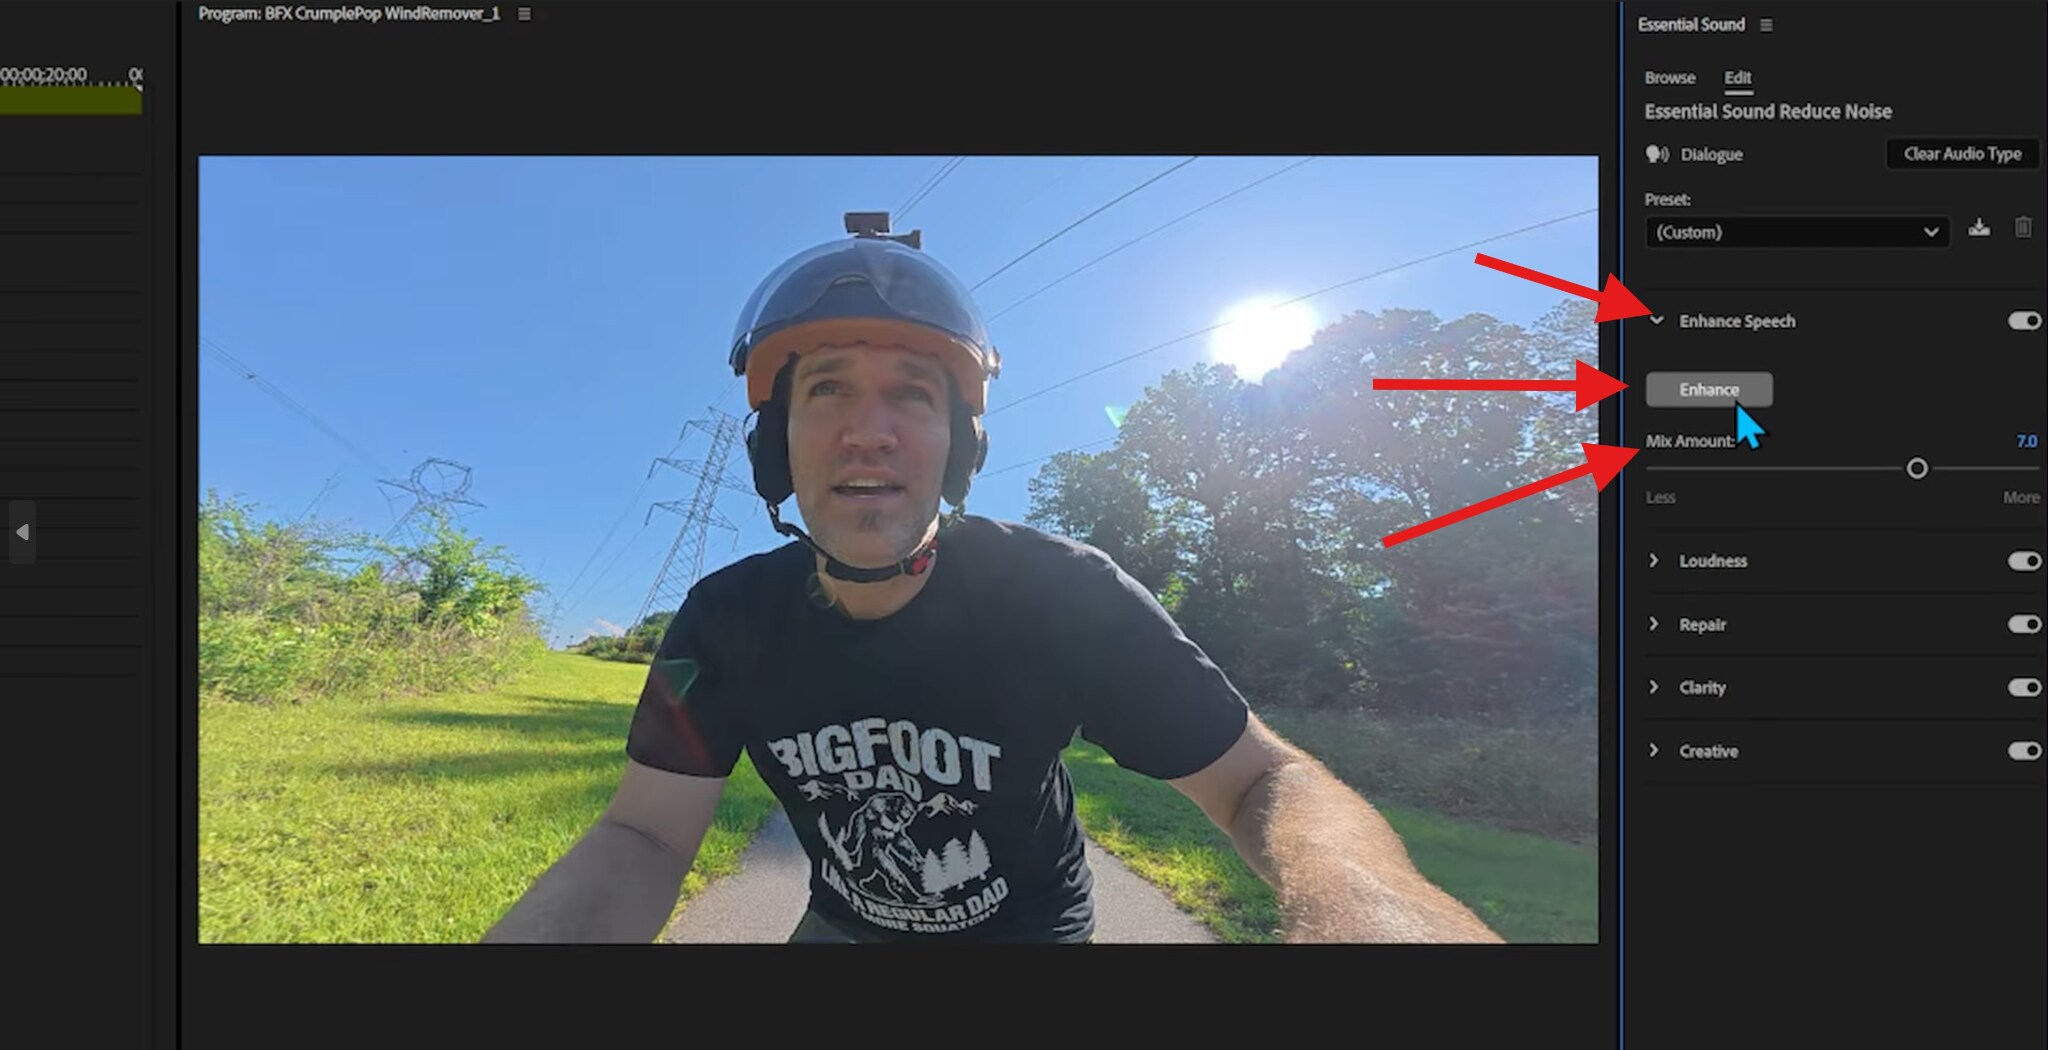
This should resolve the issue well enough.
Wind Reduction in Premiere Pro Using High-Pass Filters
In addition to using the essential panel to reduce wind noise in Premiere Pro, you can also use a high-pass filter as it eliminates all frequencies below a chosen cutoff point. This reduces wind rumble while preserving most speech frequencies. But, before we learn how to do this, let's establish the typical cutoff ranges.
- For dialogue, it's between 80 and 120 Hz.
- Interviews are often between 70 and 100 Hz.
- Action camera audio can be tricky because it can sometimes go higher or lower, depending on the recording equipment.
The truth is that there's no universal setting. You will need to adjust as you listen carefully. Cutting too aggressively will remove the warmth and fullness of the voice, along with the wind.
Anyway, here's how to do it.
- Go to Effects > Filter and EQ > Highpass. Then drag the high-pass filter onto the audio in the editing timeline.
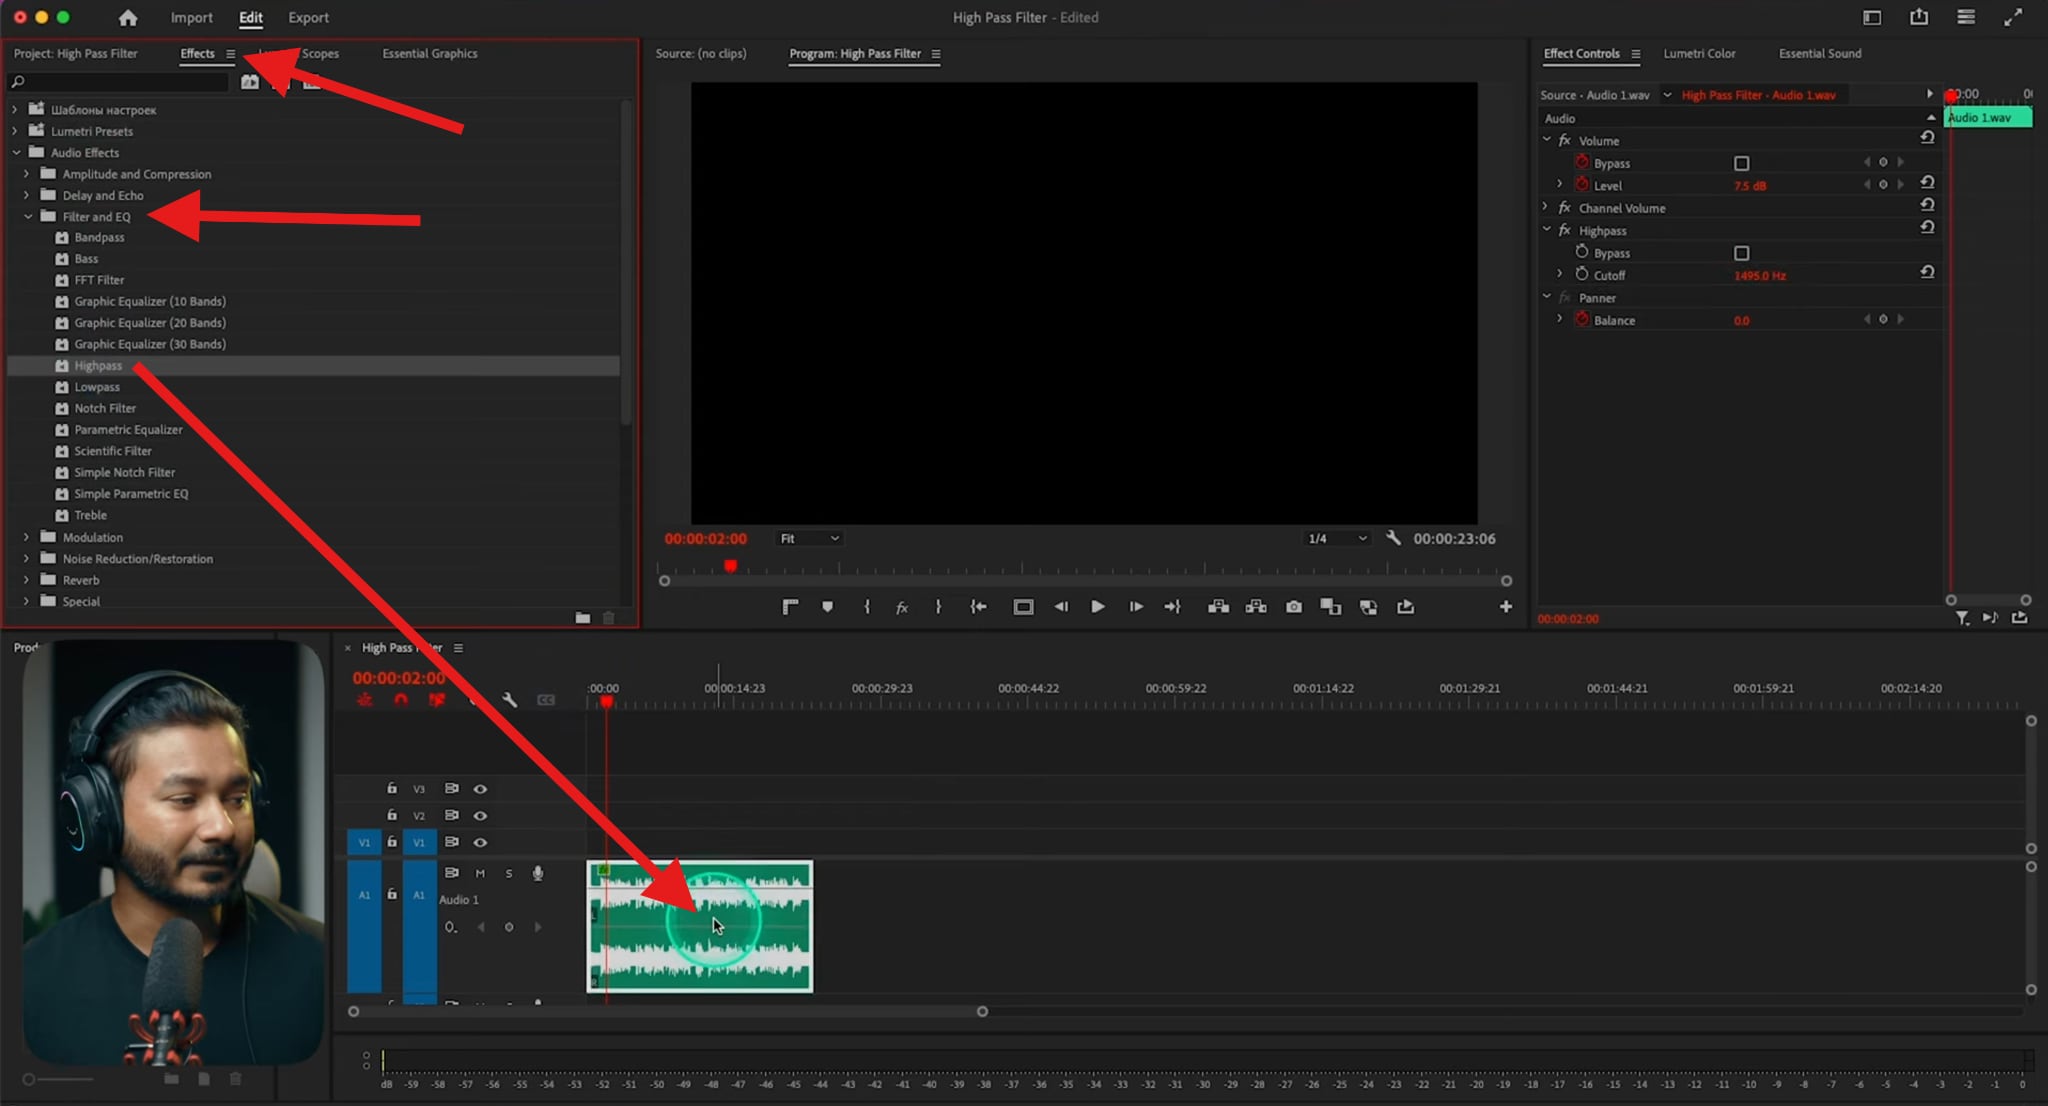
- Now, go to Effect Controls and find your Highpass filter there. You can now adjust he Cutoff frequency based on your specific sound file.
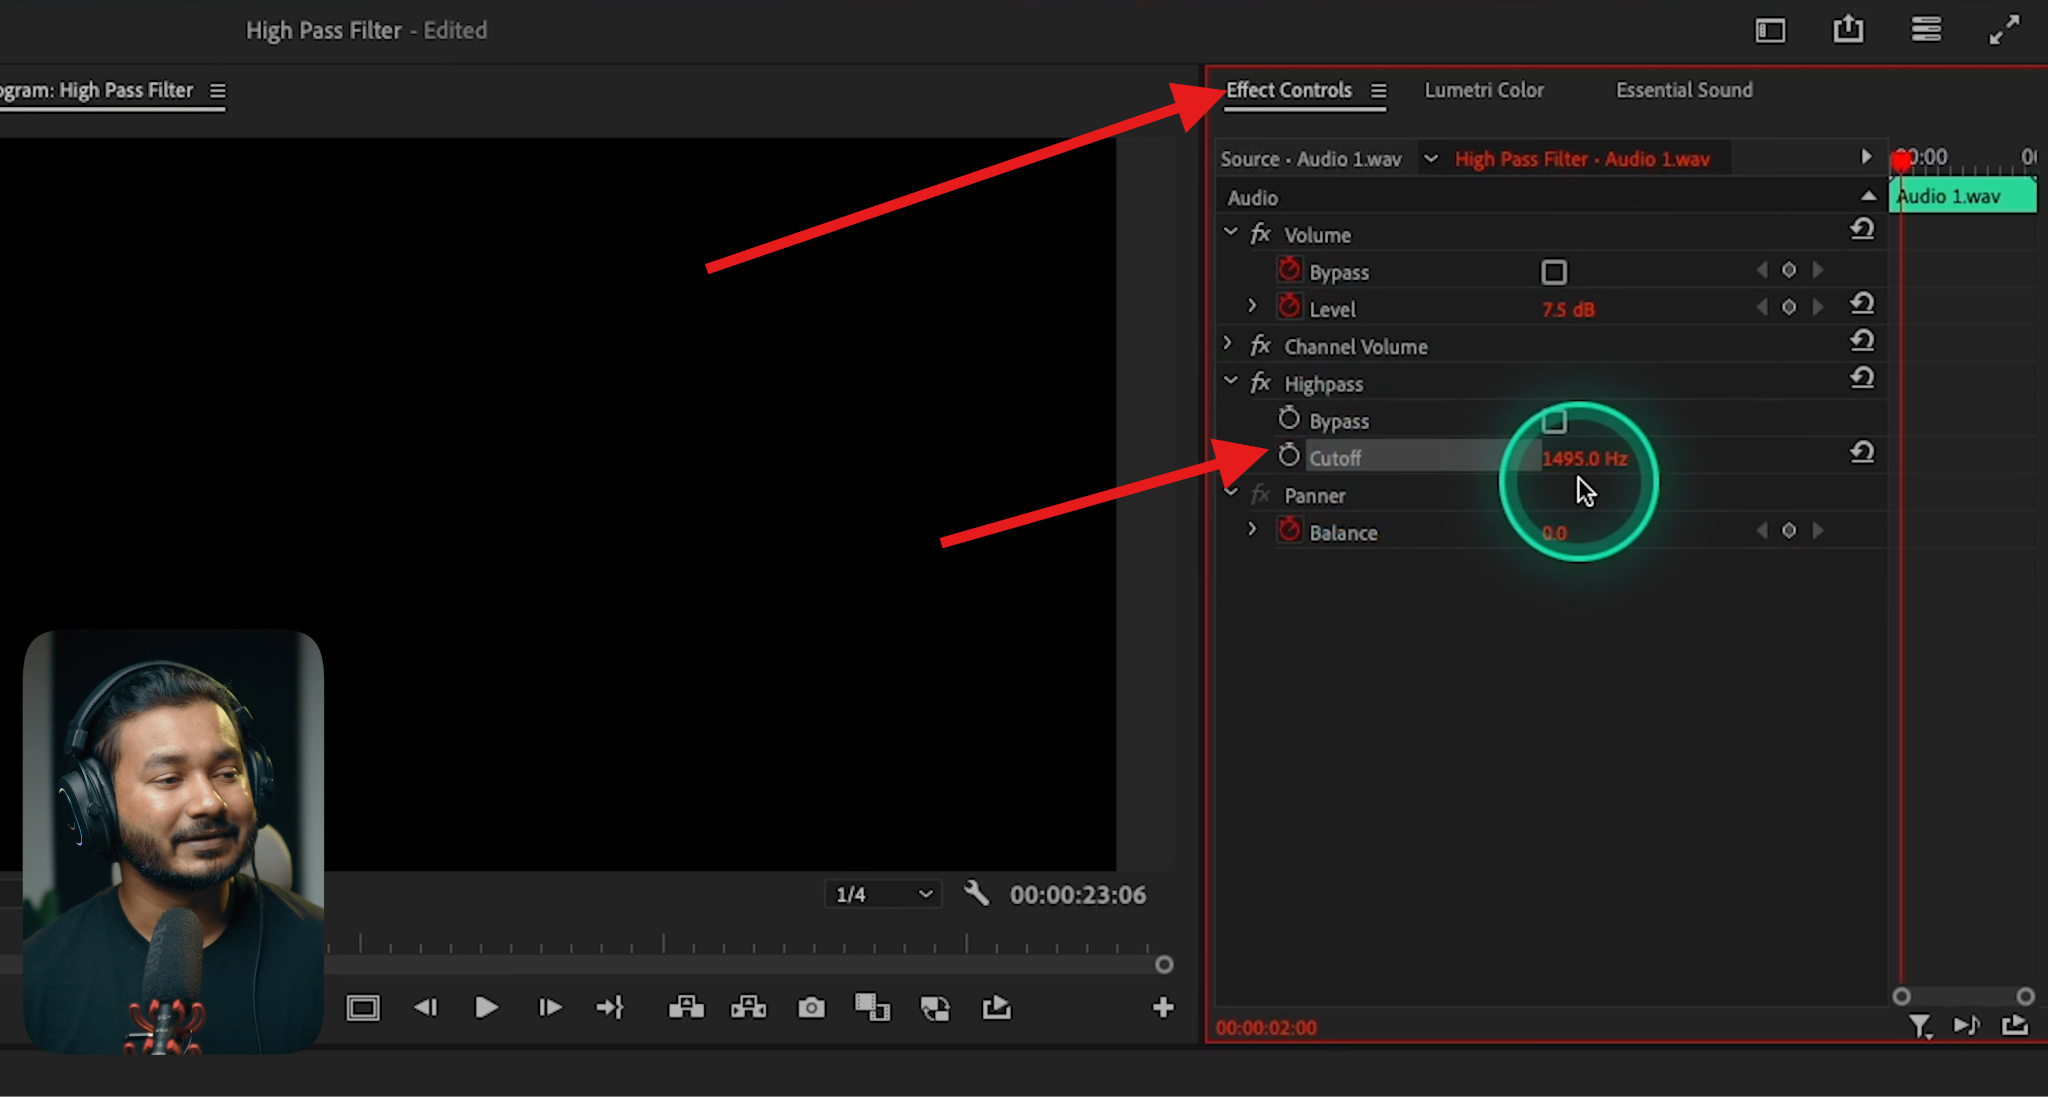
You will need to manually find the right cutoff frequency. It will take some trial and error, but you will get there.
Premiere Pro Remove Wind Noise with Parametric Equalizer
The Parametric Equalizer is yet another effect in Premiere Pro's library, and it offers a lot more precision than simple presets. It allows you to identify and gently reduce specific frequency areas where wind noise is strongest.
This approach works best when:
- Wind noise is present but not overwhelming
- You want more control than Essential Sound provides
- You're comfortable making subtle EQ adjustments
Here's how this effect works.
- Go to Effects > Filter and EQ, find the Simple Parametric EQ effect, and drag it to the timeline over the audio clip where you want to remove the wind noise.
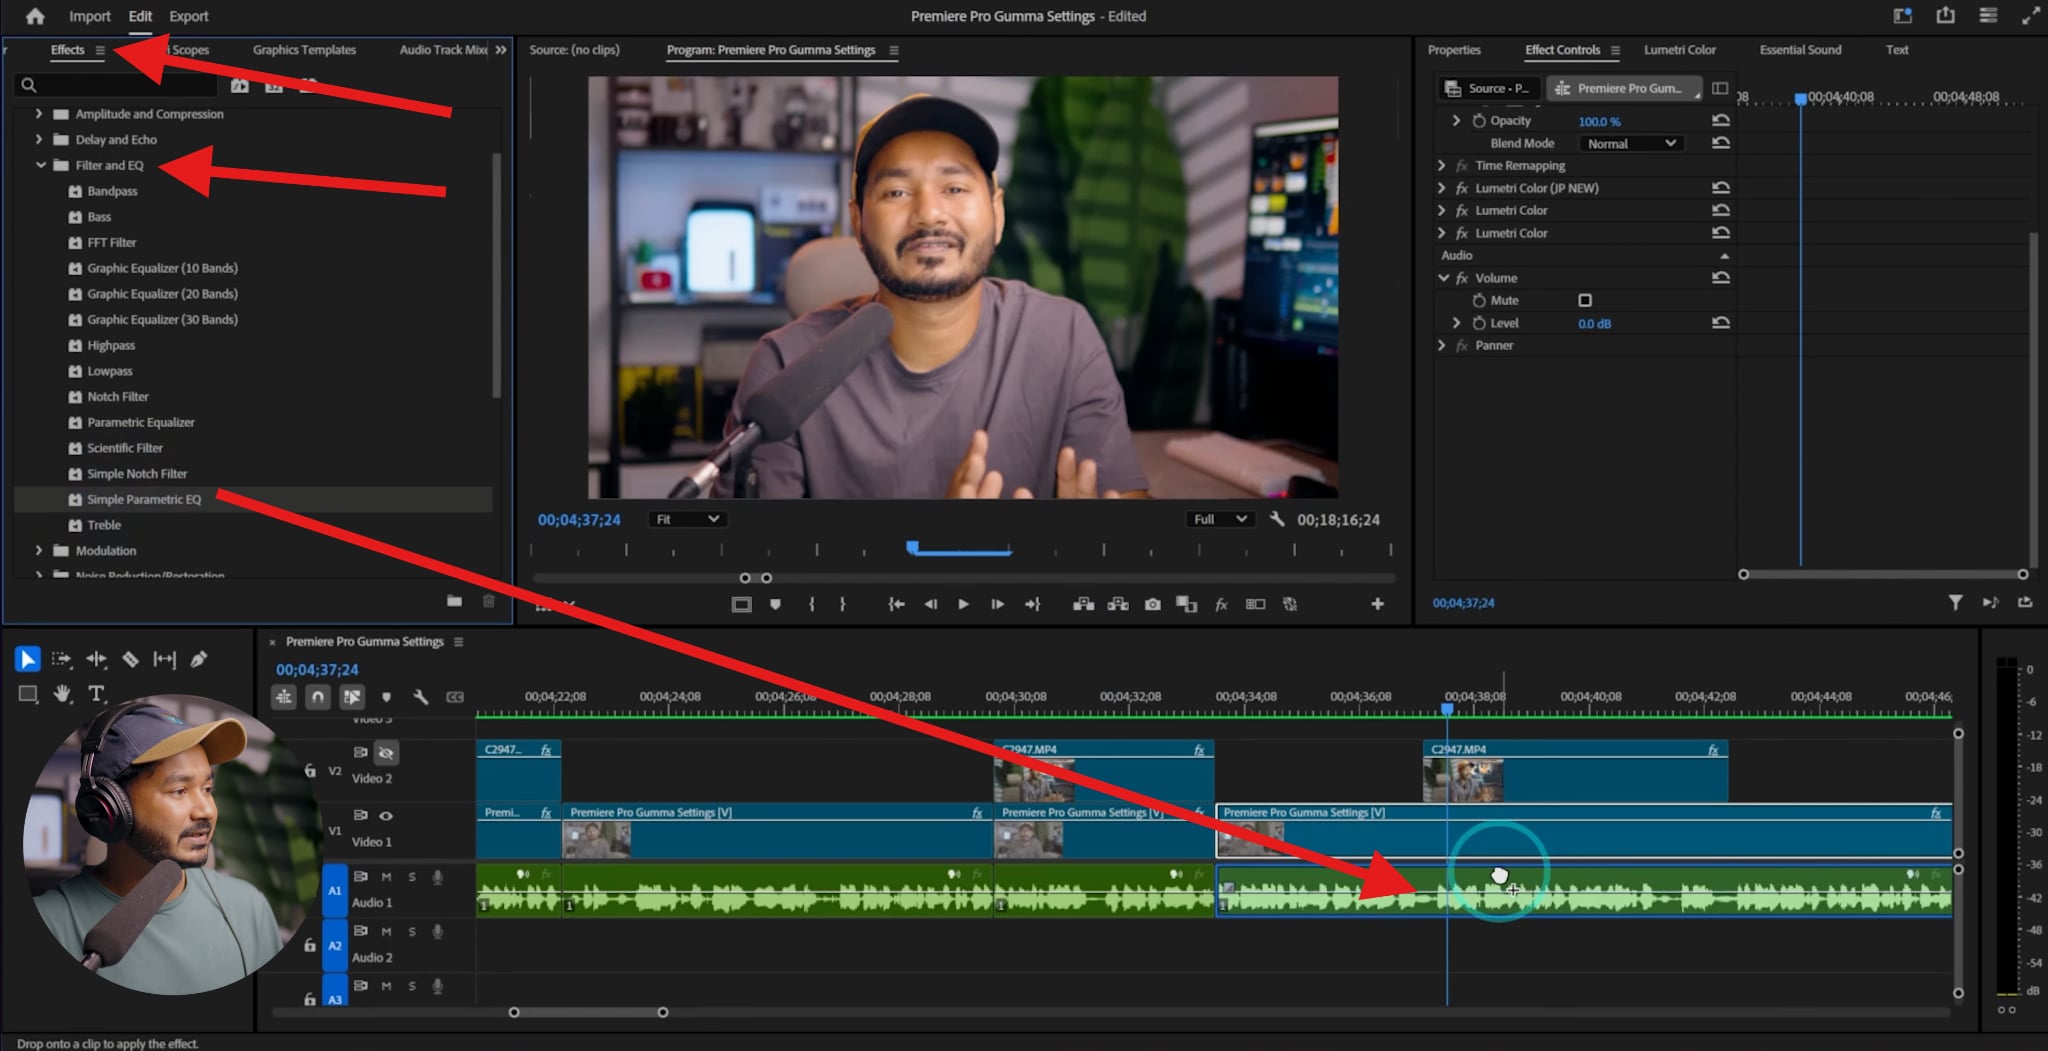
- You will see this effect in the Effect Controls panel. You need to click on Edit. This will open a new window with the Parametric Equalizer, where you can play with different frequencies, identify those related to wind noise, and remove them.
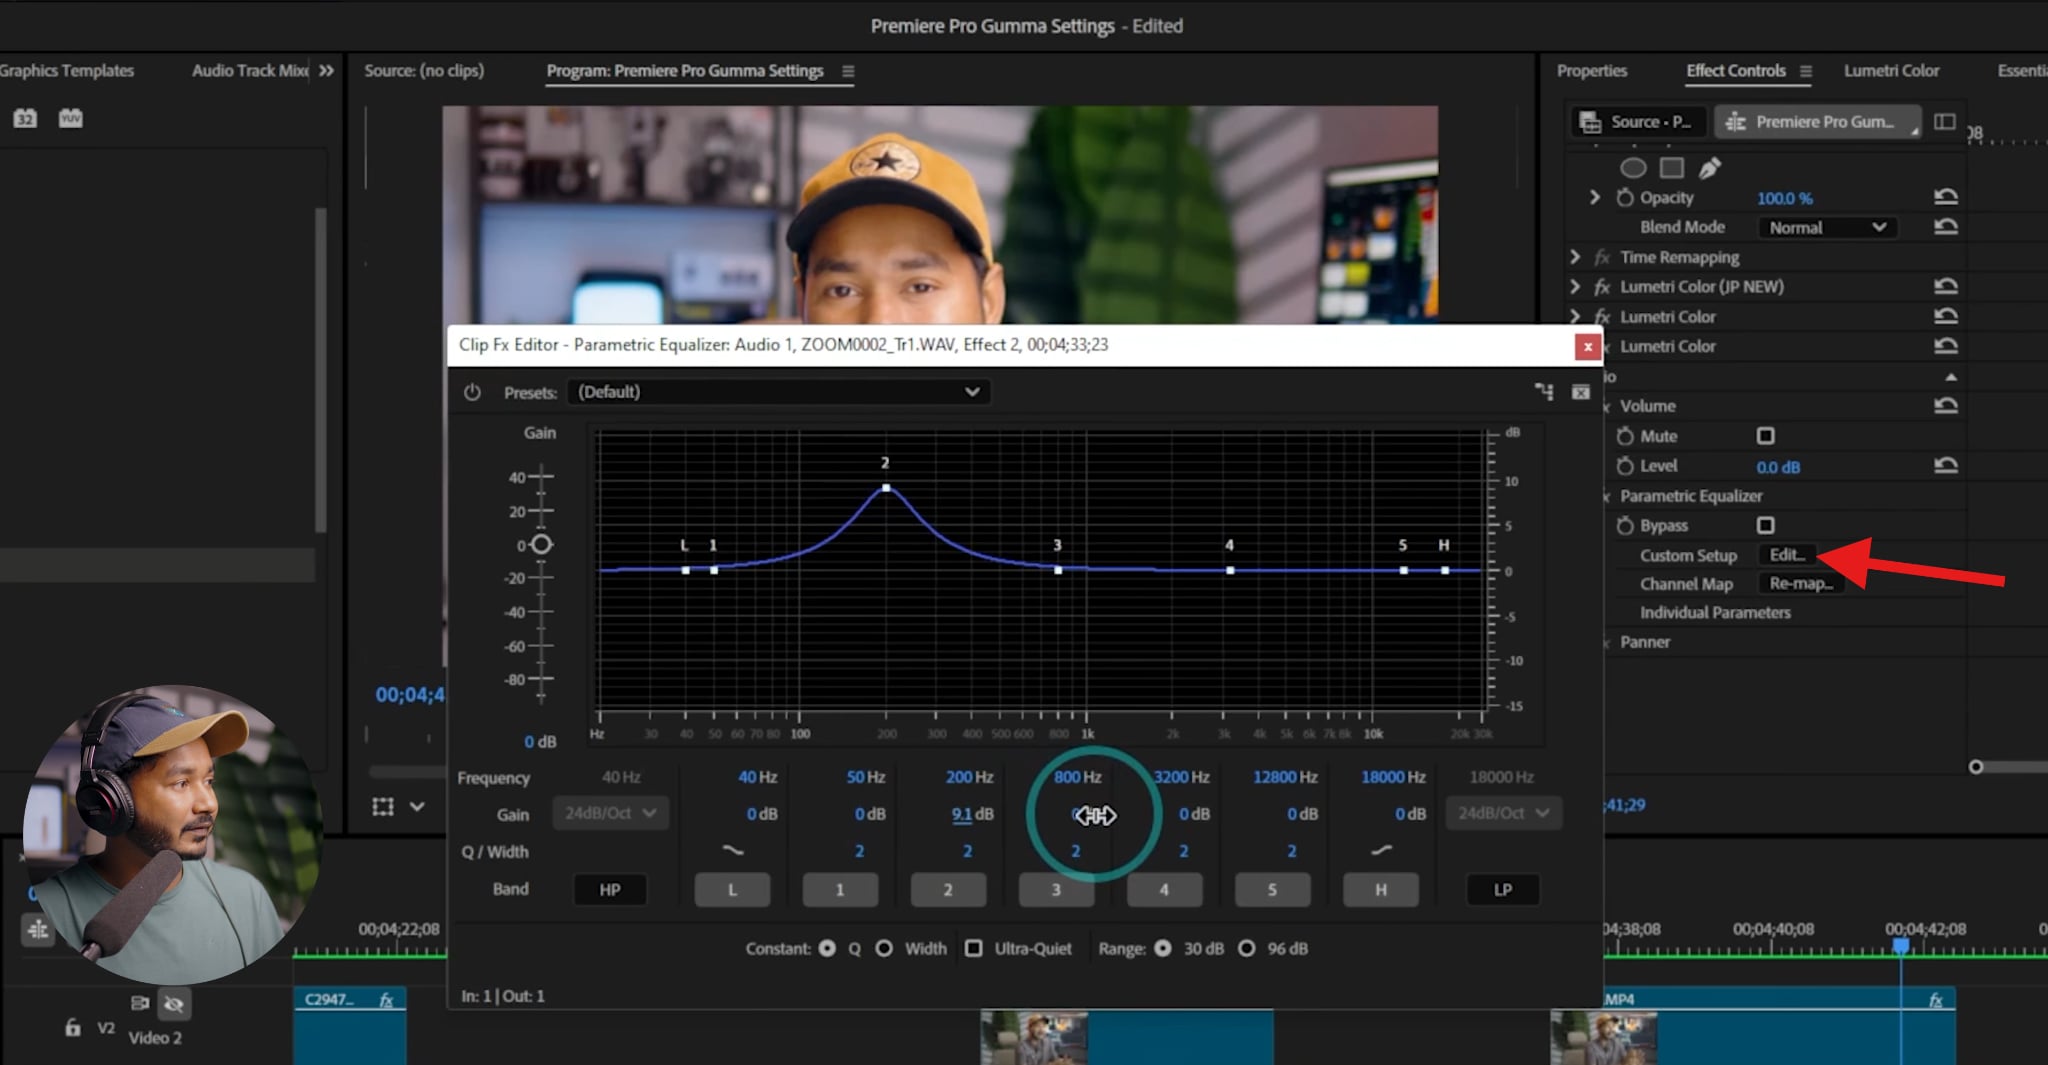
This method will also require some trial and error, but with time and patience, you will get the hang of it.
In addition to providing the common step-by-step guide to reduce wind noise in Premiere Pro, you can also explore the extensive tips for removing wind noise from specific files such as outdoor dialogue and action cameras and vlogs below.
Reduce Wind Noise Premiere Pro for Outdoor Dialogue
When working on outdoor dialogue in Premiere Pro, the main objective is intelligibility, and not total silence. Light wind noise is usually acceptable to viewers as long as speech is clear and natural.
Here are the best practices for outdoor dialogue cleanup:
- Start with high-pass filtering to remove low-end rumble before touching noise reduction.
- Apply Enhance Speech and Repair in the Essential Sound panel conservatively.
- Avoid aggressive EQ cuts that remove vocal warmth.
- Always monitor changes in context with background music or ambient sound.
A helpful mindset is to focus on improving clarity, not eliminating wind. If your processing makes voices sound thin, hollow, or metallic, you've gone too far, even if the wind noise is technically quieter.
Remove Wind Noise in Premiere Pro for Action Cameras and Vlogs
Action cameras, phones, and on-camera microphones are among the hardest to clean because they're highly susceptible to direct airflow. These microphones are often placed far from the speaker and lack adequate wind protection, resulting in strong low-frequency rumble and sudden bursts of distortion.
It's important to distinguish between the two types of wind issues:
- Steady airflow noise can often be reduced with high-pass filters and light noise reduction.
- Wind distortion is when the microphone overloads and clips the signal.
Once distortion occurs, the audio is damaged, and not just noisy. Premiere Pro can soften the impact, but it cannot restore missing or clipped speech detail.
For action cams and vlogs:
- Use high-pass filters early in the chain.
- Avoid pushing noise reduction too hard.
- Accept that some wind may remain if speech stays intelligible.
In many cases, a slightly noisy but natural-sounding voice is preferable to an aggressively processed track that feels artificial.
When Wind Reduction in Premiere Pro Isn't Enough

There's a point where continued tweaking stops helping and actually starts hurting. If reducing wind further makes dialogue harder to understand or noticeably degrades tone, it's a sign that Premiere Pro's tools have reached their practical limit. At this stage, switching tools is often the smarter move. Here, we will recommend you use an online AI-powered wind noise remover: Media.io.
AI-Based Alternative for Wind Noise Cleanup: Media.io
Media.io's AI Noise Reducer automatically detects and removes wind noise from audio online without manual adjustments.
It adapts to changing wind intensity in real time, protects speech clarity, and delivers cleaner results in just one click. Beyond wind removal, it can also eliminate reverb, hiss, hum, background noise, and unwanted clicks—making it an efficient solution for creators who need fast and professional results.
It's super easy to use. Here's how it works.
- You need to visit the noise-reducer feature from your browser. Then, simply upload an audio file from your device.

- Select the Wind noise reduction feature, then click Generate. After a short time, you will have access to a file with the wind noise removed.
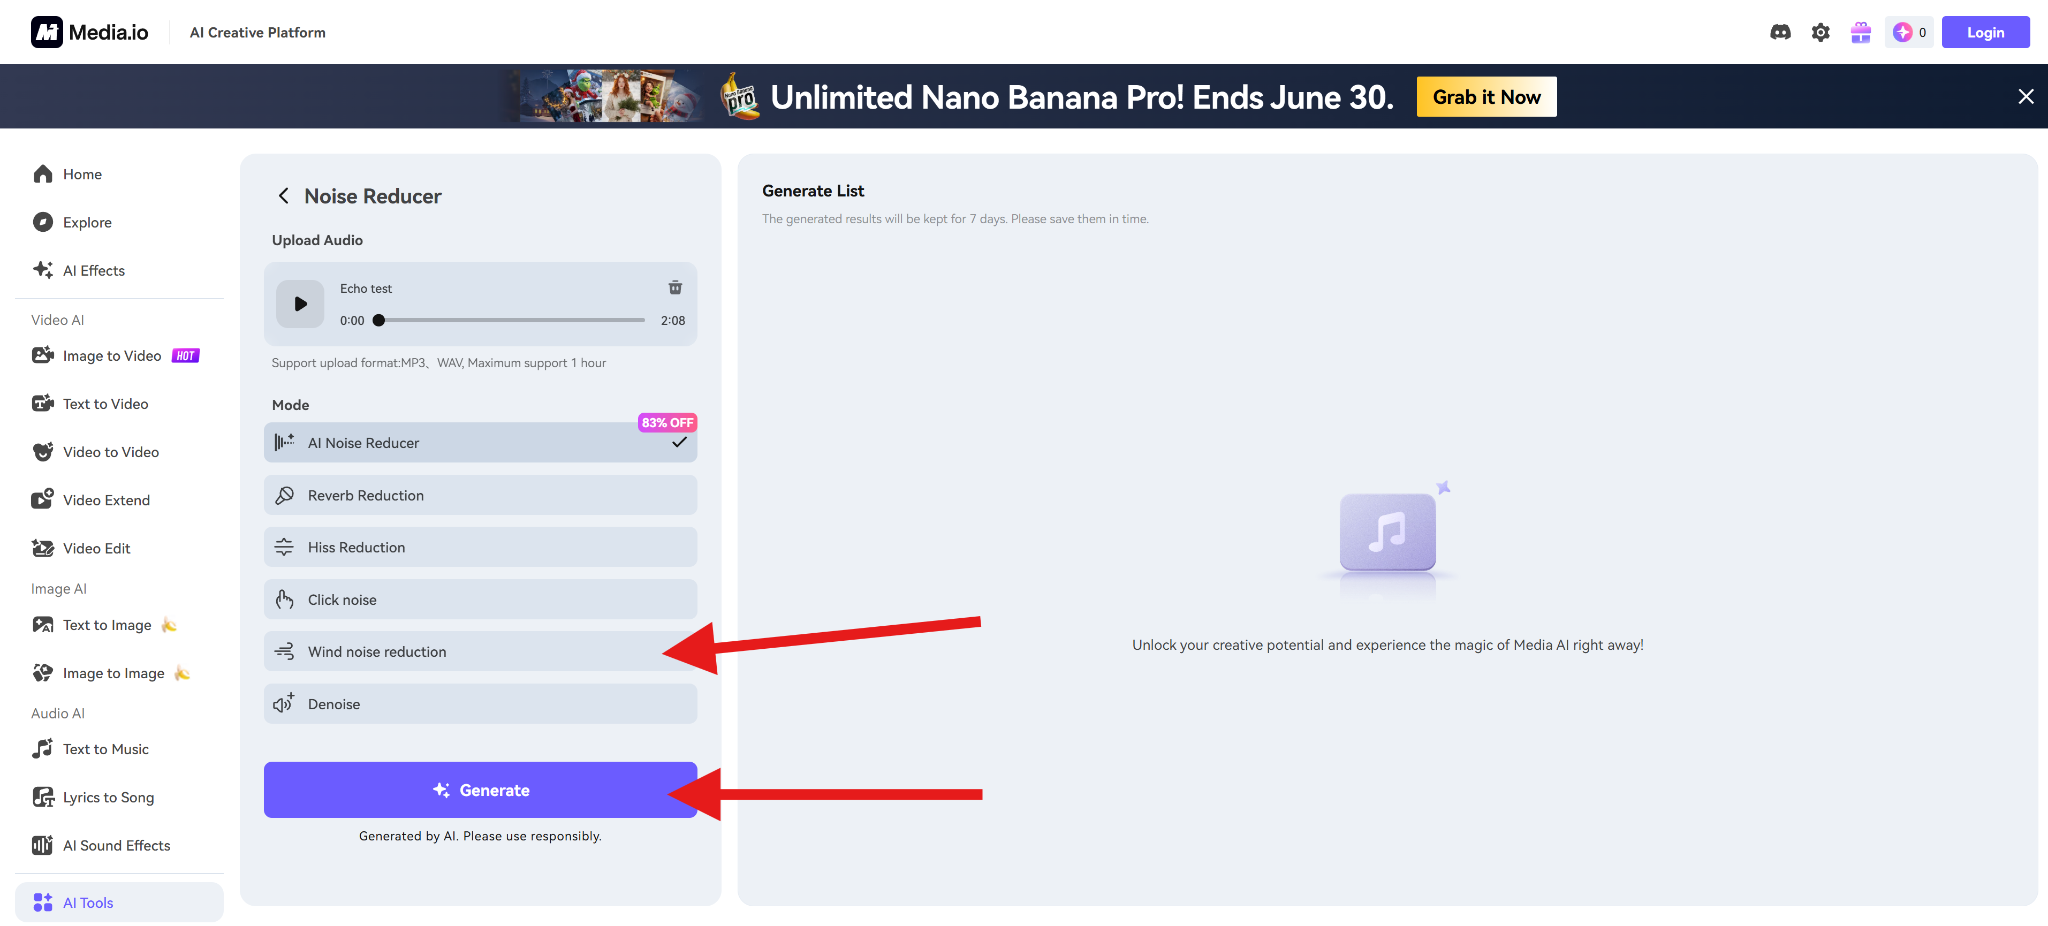
- Download the file and use it in your project. You can also try different features like the AI Noise Reducer, Reverb Reduction, Hiss Reduction, and a few more.
Tips for Avoiding Wind Noise When Recording
As a rule of thumb, no single post-production tool can outperform good recording practices. Preventing wind noise at the source will always save time and preserve audio quality.
Take a look at the best practical prevention tips:
- Use proper wind screens or dead cats on all outdoor microphones.
- Position microphones out of direct airflow whenever possible.
- Shield microphones with your body, clothing, or nearby objects.
- Move closer to the speaker to increase the signal-to-noise ratio.
- Record short test clips before full takes to check wind impact.
Even small adjustments, like changing the mic angle or stepping slightly out of the wind, can improve audio quality and reduce the need for heavy cleanup later.
Conclusion
Premiere Pro can reduce light to moderate wind noise, especially low-end rumble and steady airflow. However, it isn't designed to fix severe wind distortion or overloaded microphones. When wind noise becomes aggressive or unpredictable, switching to an AI-based approach often saves time and preserves audio quality. Ultimately, though, no software beats proper mic placement and wind protection.
In conclusion, wind noise can be reduced, but preventing it at the source will always produce better results.


