

With high-quality video recording on the iPhone, the chances of running out of storage space are quite high. Moreover, you would not want to lose any of your special videos accidentally and the best option to avoid these and more situations is to transfer video from iPhone to computer. There are several ways in which transfer can be done and the article below discusses the best solutions on how to get videos from iPhone to computer.
Solution 1. Transfer video from iPhone to PC using Wondershare UniConverter
To transfer videos from your iPhone to your Windows and Mac system effortless we recommend Wondershare UniConverter software. Using this excellent program you can transfer videos from your iPhone as well as iPad, camcorder, Android phone, and other devices to your computer. The added videos can also be edited and customized using features like cropping, cutting, adding effects, and more before saving them to your computer. You can convert your videos to over 1000 formats in lossless quality. If needed, the added videos can also be burned into a DVD or a Blu-ray disc. Video downloads from more than 10,000 sites, video transfer, and recording are some of the added features.
- · With UniConverter, you can easily convert video files to differnt formats for any need.
- · With UniConverter, you can burn videos to DVD with colorful DVD menu.
- · With UniConverter, you can transfer videos to your iPhone and Android devices effortlessly.
- · With UniConverter, you can compress videos to smaller size in a few steps for easier transfer.
Steps on how to upload videos from iPhone to computer using Wondershare UniConverter
Step 1: Launch Wondershare UniConverter and add iPhone videos
Open the Wondershare software on your system and then connect your iPhone to your PC using a USB cable. On the main interface choose the Convert tab and expand the drop-down menu at + Add Files option. Choose Add from Device option and the videos on your iPhone will appear. Choose the ones that you want to transfer to your computer.
Step 2: Select the output format
The selected files will now appear at the software interface. Editing can be done using the icons under the added file thumbnail image. Choose the target format and the resolution from the supported list at Convert all files to: tab at the top-right corner.Step 3: Convert and transfer videos to the computer
Step 3: Convert and transfer videos to the computer
The location at the desktop where you want to save the iPhone videos can be browsed and selected at the Output tab. Finally hit on the Convert All button to start the file conversion and transfer of videos to the desktop.
Solution 2. Transfer video from iPhone to PC and Mac wirelessly using iCloud
Videos from your iPhone can be wirelessly moved to your PC and Mac using the iCloud service. Apple’s iCloud offers 5GB of free storage space where you can move your videos, photos, and other mobile data as required. These videos on iCloud can be easily accessed from your computer and can be saved to the local system. While using this method all your videos will be synced to your iCloud and there is no option for selective transfer.
How to transfer video from iPhone to computer using iCloud
Before proceeding with the steps below ensure to connect your devices using a stable WiFi connection.
Step 1: On your iPhone and computer, set up an iCloud account and then sign in using the same account on both the devices.
Step 2: On your iPhone move to Settings > (your name) > iCloud > Photos and then turn on the iCloud Photos.
Step 3: Next, you need to turn on the iCloud Photos on your Windows and Mac devices.
Mac: Move to System Preferences > iCloud. Hit on the Options button that is present next to the Photos and then choose the iCloud Photos option.
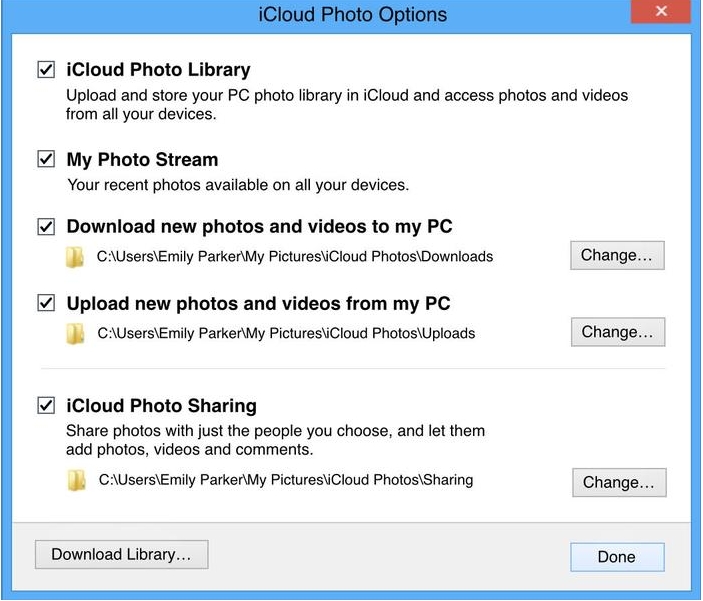
PC: After downloading the iCloud for Windows, set up iCloud Photos on your PC as the steps given. Click on the Done and then Apply button. Next, move to This PC > iCloud Photos > Downloads and you will have access to all the videos from your iPhone.
The videos on your iPhone will now be synced with your iCloud account and can be accessed from Windows and Mac systems.
Solution 3. Transfer Video from iPhone to PC in 3 Ways
Method 1: Transfer videos to PC Using AutoPlay
There are multiple solutions available for transferring videos from your iPhone to your Windows 10/8/7 system. Listed below are the 3 methods - AutoPlay, Photos App, and File Explorer.
Using the AutoPlay feature in your Windows 7 systems, photos and videos can be easily moved from your iPhone and other smartphones to your PC.
Steps to transfer videos from iPhone to PC using AutoPlay:
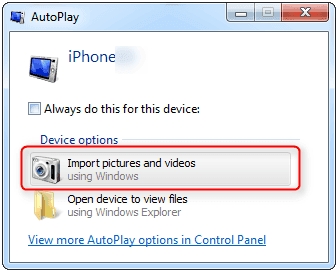
Step 1: Using a USB cable, connect your iPhone to your PC and the AutoPlay window will pop-up.
Step 2: From the AutoPlay window, select Import pictures and videos option.
Step 3: Next from the Import Settings, you can either select or also create a new folder where you want the videos to be transferred.
Step 4: Choose the videos that you want to import and then finally hit on the Import button to transfer the videos to the PC.
Method 2: Transfer videos to PC using Photos App
The Windows 8/10 system comes loaded with the Photos app that can be used for the transfer of videos and photos from your iPhone to your PC in a quick hassle-free manner.
Steps to transfer videos from iPhone to PC using Photos App:
Step 1: Using a USB cable, connect your iPhone to your Windows system.
Step 2: Unlock your iPhone and then if asked hit on the Trust button on the phone.
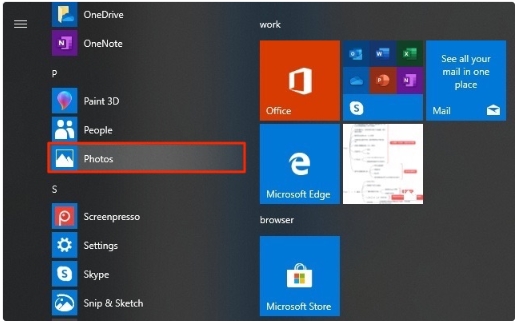
Step 3: On your PC run the Photos App and then select Import > From a USB device. The videos and the photos on your iPhone will be now searched by the app.
Step 4: The Import settings option lets you change the destination to save the photos, group the items by their date, and choose if you want to delete the videos after they are imported. To confirm the settings, click on the Done button.
Step 5: Finally, choose the videos that you want to transfer to your PC and click on the Import Selected button.
Method 3: Transfer videos to PC using File Explorer
File Explorer in Windows 8/10 (known as Windows Explorer in Windows 7) can be used to video as well as extract the videos, photos, documents, and music files from your iPhone as your iPhone is recognized by your PC as a storage device.
Steps to transfer videos from iPhone to PC using Windows Explorer:
Step 1: Connect your iPhone to your PC using a USB cable. Unlock your iPhone and hit on the Trust button if asked by the PC.
Step 2: On your system, open This PC and locate your iPhone. Next, right-click on the device name and then select Import Pictures and videos option.
Windows 10 users will click on Start > File Explorer > This PC.Step 3: Next, select Review, organize, and group items to import and or Import all new items now if you are using for the first time. Hit on the Next button to continue.
Step 4: Select and check the videos that you want on your PC and then finally press on the Import button to start video transfer.
Alternatively, you can also go to This PC > (iPhone name) > Internal Storage > DCIM > 100APPLE and then copy the videos from your phone and paste it your PC.

Solution 4. Transfer video from iPhone to Mac in 2 ways
On your Mac systems, the built-in Photos App and the AirDrop feature can be used for transferring the videos from your iPhone.
Method 1: Transfer videos to Mac using Photos App
The Mac OS 10.10.3 and later versions of the system come with a built-in Photos app that allows you to import the videos from your iPhone. Here the app can transfer the videos which are recorded using the camera.
Steps to transfer videos from iPhone to Mac using Photos App:
Step 1: Connect your iPhone to your Mac using a USB cable and launch the Photos App on your Mac system.
Step 2: Press on the Import button and then select the video that you want to transfer.
Step 3: Hit on the Import Selected to start the file transfer process.

Method 2: Transfer videos from iPhone to Mac using AirDrop
AirDrop is an exclusive iOS feature developed by Apple that facilitates quick and easy sharing of photos, videos, and other data between the Apple devices. So using the AirDrop option, the videos on your iPhone can be easily transferred to your Mac system without any need for additional programs or software.
Steps to transfer videos from iPhone to Mac using AirDrop:
Step 1: First of all you need to enable the AirDrop feature on your Mac system. Go to Finder > Go> AirDrop> and then Turn On Bluetooth and WiFi to turn on the AirDrop function on the Mac. Set the option Allow so that you can be discovered by as Everyone.
Step 2: To turn on the AirDrop feature on your iPhone, launch the Control Center by swiping up from the bottom or top of your screen (depending on the phone model) and then tapping on the AirDrop feature. Set your iPhone to be discovered by Everyone.
Step 3: From the Photos app on your iPhone select the videos that you want to transfer to the Mac and then tap on the share button and then select the name of your Mac system when it shows. The selected videos will be now transferred to your Mac system.

Summary
The above listed are several methods for transferring videos from your iPhone to your PC and Mac system. Depending on the type of videos to be transferred, (recorded or downloaded), system, and other features required you can pick up the most relevant method. If you require editing, converting and performing other functions with your videos in addition to transfer, Wondershare UniConverter is excellent software to use.