

There are several ways you can transfer data from your old iPhone to a new iOS device. That is, either using your Cloud, iTunes, or Finder.
However, if you're about to set up your new iOS device or you've set up your iPhone and your data are the only things missing. Your old iPhone should be running the latest version of iOS before commencing on this phone to phone transfer. This ascertains its compatibility with the newly acquired iPhone and reduces the risk of problems during the data transfer operation.
Part 1. Backup Your iPhone before Transferring Data
Backup Using iCloud
Step 1: Open the Settings app on your and tap the Apple ID, then select iCloud.
Step 2: Tap on iCloud Backup, choose Back Up Now, and wait for some time while the backup process gets completed.
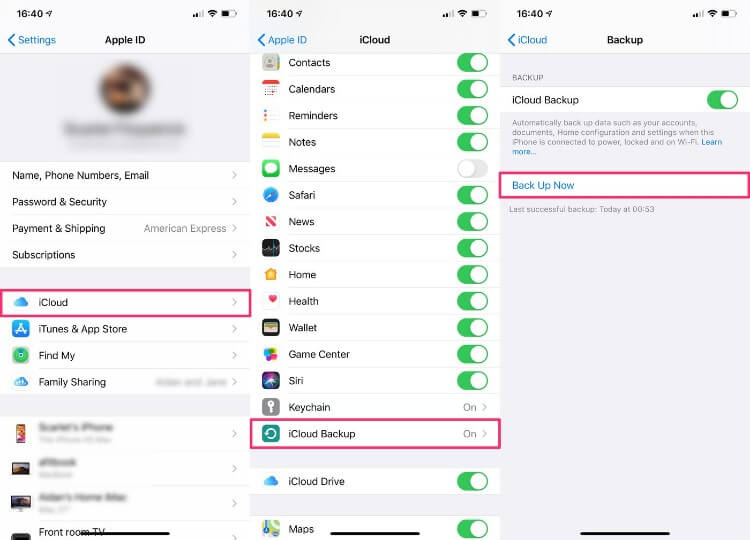
Step 3: After completing the backup process, turn off your old iPhone and remove your SIM card.
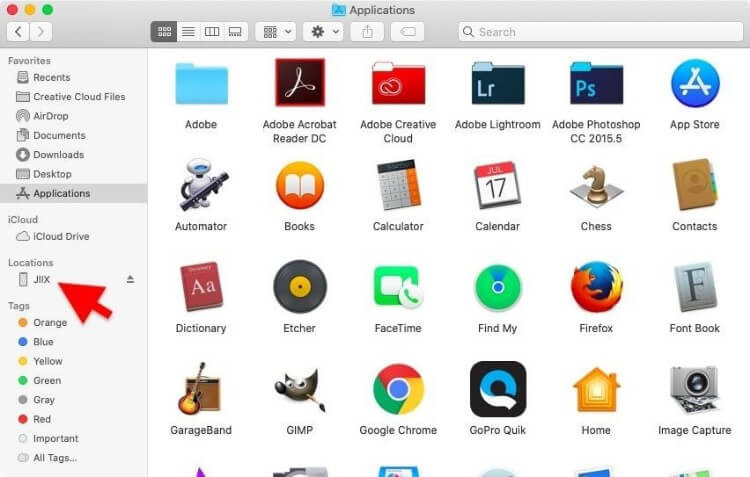
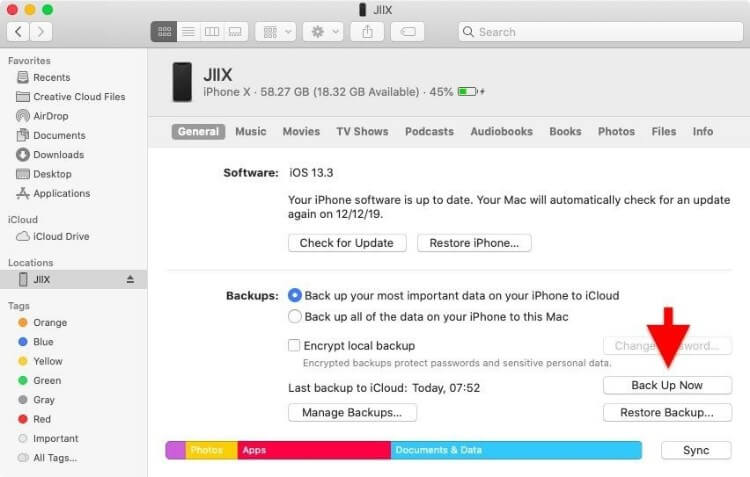
Backup Using Finder
Step 1: Connect your old iPhone to your Mac computer using its USB cable. Then launch the Finder app to begin the process.
Step 2: Select your iOS device under Location on the left pane of the Finder windows page.
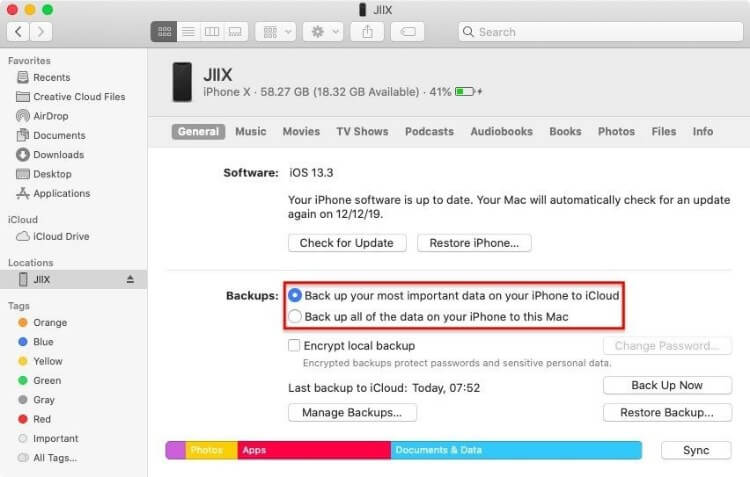
Step 3: Click Trust to trust the iPhone, then in the Backup option, select Back up all of the data on your iPhone to this mac and tick the Encrypt local backup checkbox.
Step 4: Step 4: A small window will pop up inquiring you to verify the password for your backup. Enter your password and click on Set Password. However, if it's your first time doing this, you can create a password.
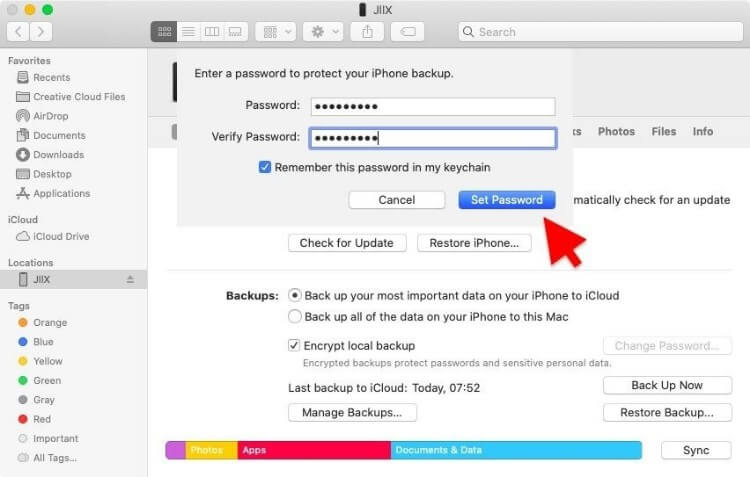
Step 5: Finally, click Back Up Now to backup your iPhone and complete the process.
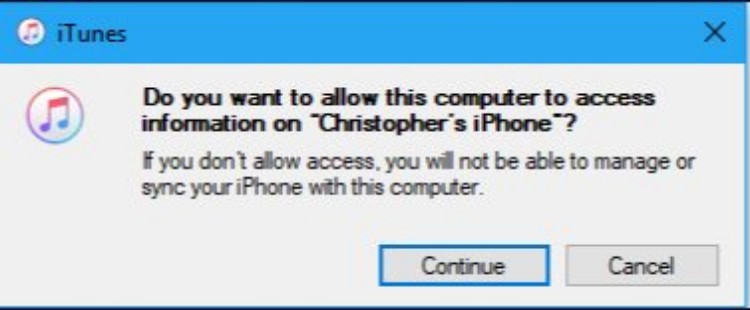
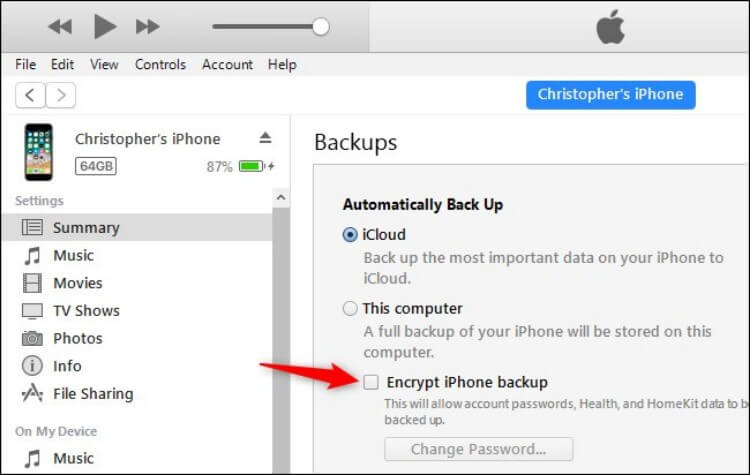
Backup Using iTunes
Step 1: Connect your iPhone to your Mac using its USB cable and click on Continue in iTunes to enable your computer to access your iPhone.
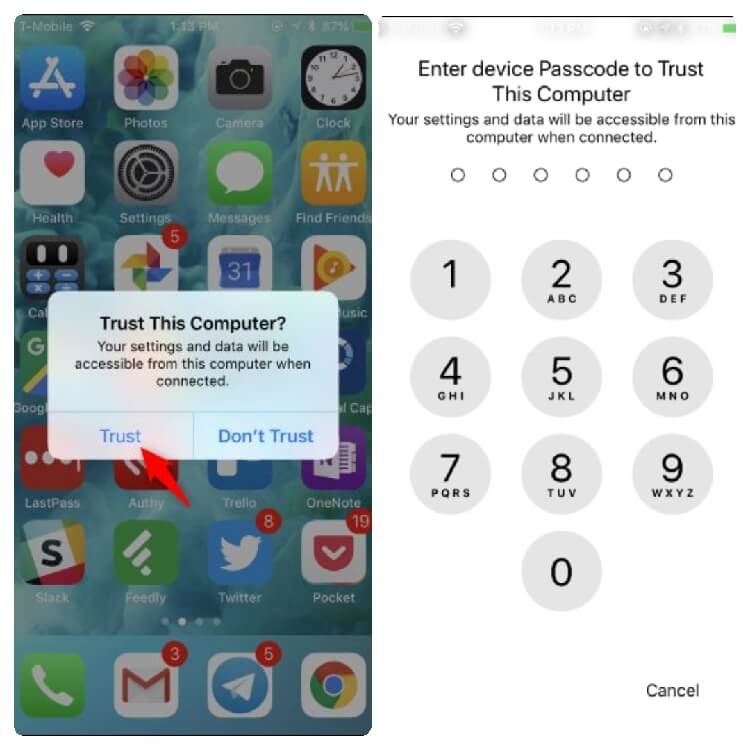
Step 2: On your iPhone, tap on Trust, and enter your Passcode.
Step 3: After you've enabled access to iTunes, you'll notice a small phone icon on your computer. Click on it, then iTunes should automatically display your phone's Summary.
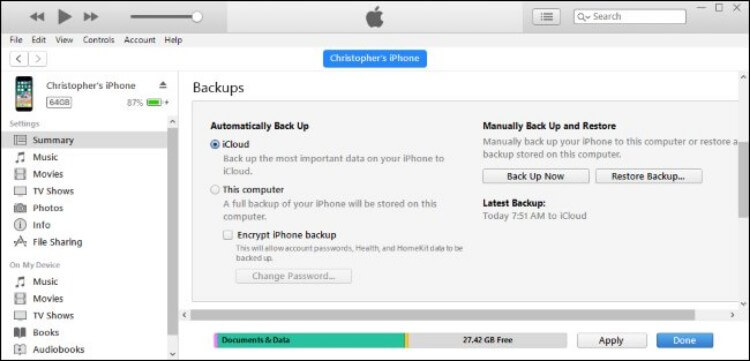
Step 4: Tick the
Step 5: Click Backup Now to begin the backup process.
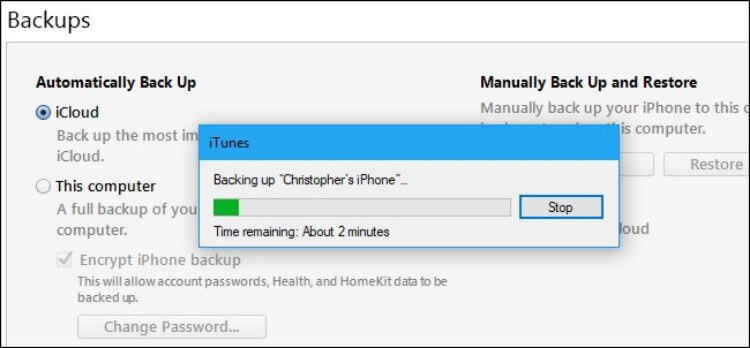
Step 6: Click on Done when it's completed.
Part 2. Set Up Your New iPhone
In the second phase, Turn ON your new iPhone and follow the instructions to complete the setup process.
Part 3. Restore Data from iCloud/iTunes/Finder Backup
Once you've completed the backup and set up process, It's time to transfer your essential data to the new iPhone by restoring from backup.
All you need to do is, log in to the new iPhone using your Apple ID. Then you'll be asked if you're willing to set your phone as a brand new iPhone or restore from an existing backup via iCloud or iTunes.
Select between Backup from iTunes or Backup from iCloud and choose the most recent backup from your old phone. After that, your data will be transferred from your former phone to the new iPhone.
Part 4. Transfer With Wondershare UniConverter
If you've utilized the process above to transfer your data from old iPhone to new iPhone. And you still discover some audios and video files are missing, you need the powerful Wondershare UniConverter software tool. UniConverter software is an extraordinary transfer tool that enables you to transfer videos and audio files just in a few clicks.
Follow the steps below to transfer your files.
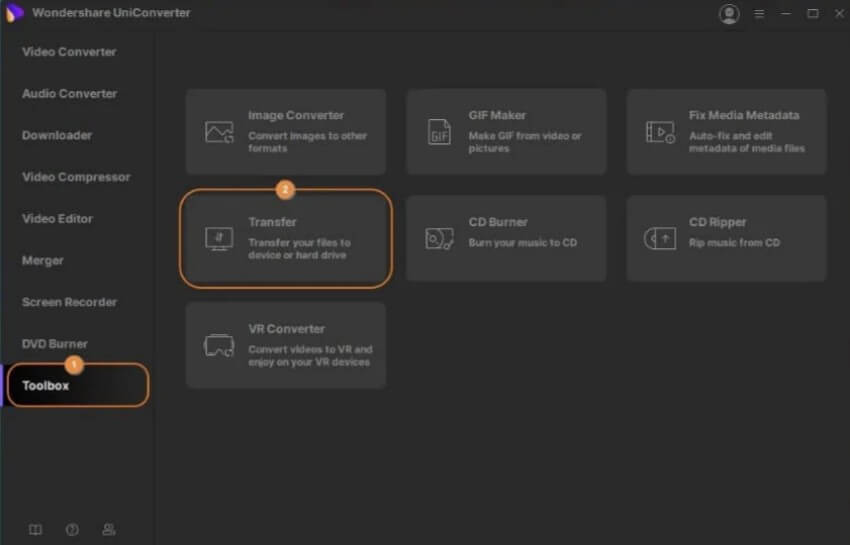
Step 1: Get to The transfer box
Launch the Wondershare UniConverter app on your Mac/Windows computer, click on the Toolbox at the bottom left side of your screen, and select Transfer.
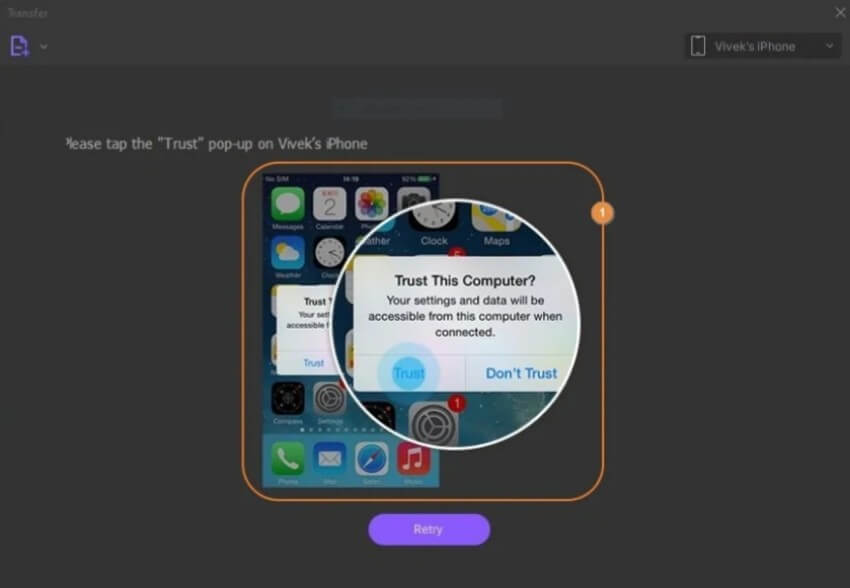
Step 2: Connect your iOS device
Using your iPhone USB cable, connect your device to the computer and tap on Trust on your phone when you're asked to do so. After that, enter your iPhone Password to verify the trust between the computer and your device.
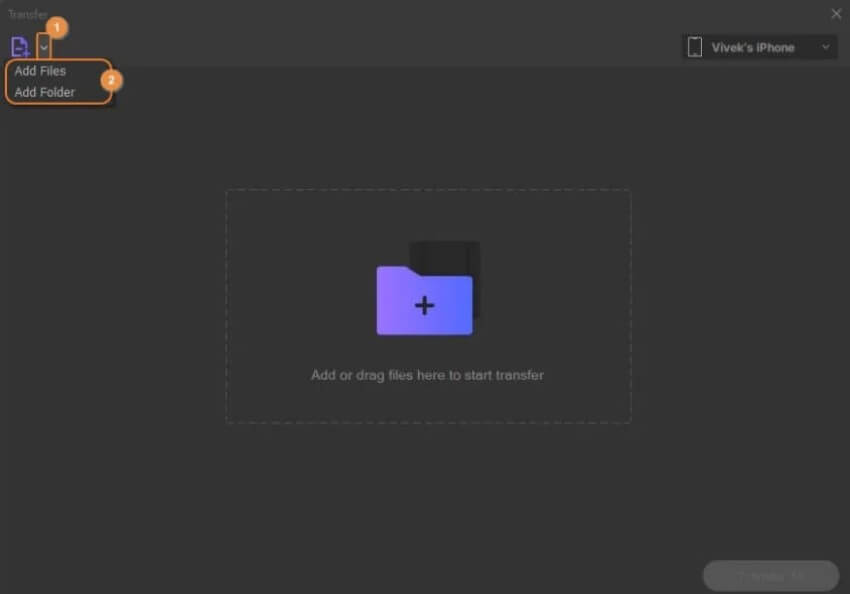
Step 3: Import files to the UniConverter app
At the top left corner of the Transfer box page, click on the Add files icon to import entire videos and audio files.
Step 4: Transfer files
Confirm that your iPhone's name is present in the drop-down at the top-right corner of the Transfer box. Thus, click on the Transfer All button at the bottom right side of the screen to transfer your files.
- Directly convert videos to MP4, AVI, MKV, and other 1,000 formats without quality loss at 30X faster speed.
- Convert videos to devices such as iPhone, iPad, iPod, and Android phones directly.
- Edit videos with advanced video editing functions, like trimming, cropping, adding watermarks, subtitles, etc.
- Download/record videos from YouTube and other 10,000+ video sharing sites.
- Burn videos to DVD or Blu-ray disc to play with your DVD player.
- Support additional functions like Video Compress, VR Converter, GIF Maker, Fix Video Metadata, etc.