


 ChatGPT
 Perplexity
 Gemini
 Claude
 Grok
Grok
Do you want to sign into iPhone iCloud or use iCloud Family Sharing, but you just don’t know where to start? Well, this comprehensive guide is tailor-made for you. Although Apple made things a bit complicated for iPhone users to access iCloud natively, there’s still an easy way around it. So, this article will furnish you with some helpful tips about how to log into iCloud, turn it off, and use iCloud Family Sharing on the iPhone with some simple steps. Read on!
Part 1. What is iCloud?
First of all, Apple iCloud is not a native app that runs on your iPhone. It’s not even physically installed on your phone. So, what exactly is iCloud? iCloud, as the name suggests, is a cloud-based service used to save data on a virtual cloud server. Therefore, with an iCloud account, you will not exhaust the physical storage space in your Mac, iPhone, iPad, or iPod touch.
That said, iCloud service uses a single Apple ID to sync data across other internet-connected computers, iOS devices, and Apple TV. In other words, all your iOS devices and computers, including PC, should use a similar Apple ID to share iCloud data like contacts, documents, calendars, messages, and more.
Note: iCloud subscription starts from as little as 99c/month for 50GB. You can upgrade to a 200GB plan by paying $2.99/month or 2TB at $9.99/month.
Part 2. How to Log into iCloud on Your iPhone with an Apple ID
You can log into iCloud on an iPhone using an updated web browser. But unfortunately, this method can be confusing for beginners because different web browsers such as Safari, Google Chrome, and Dolphin require varying techniques. So I’ve done some digging to uncover this easy step-by-step iCloud sign-in procedure via iPhone’s Settings app.
Below is how to create an iCloud account on iPhone and manage your storage:
Step 1: First and foremost, launch the Settings app, which is the small mechanical gear icon.
Step 2: Next, click the blue Sign in to your iPhone text on top of the screen.
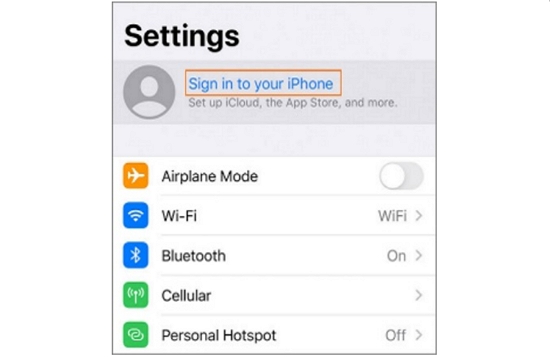
Step 3: Now use your Apple ID details to sign in to your iPhone.
Step 4: Wait for a while for the screen to load up. If prompted, key in the six-digit verification code of your phone to complete the sign-in process.
Step 5: After successfully signing up, you will see your Apple ID name and picture (if any) displayed on the Settings window. Click it.
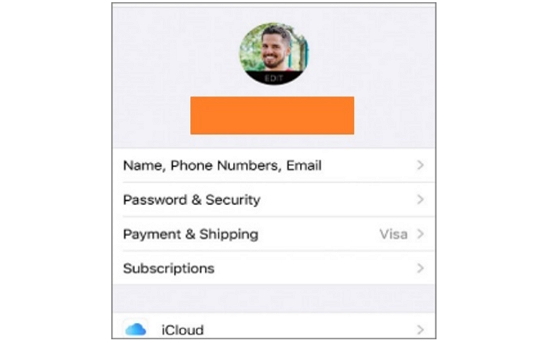
Step 6: Tap the iCloud tab then you can do the following:
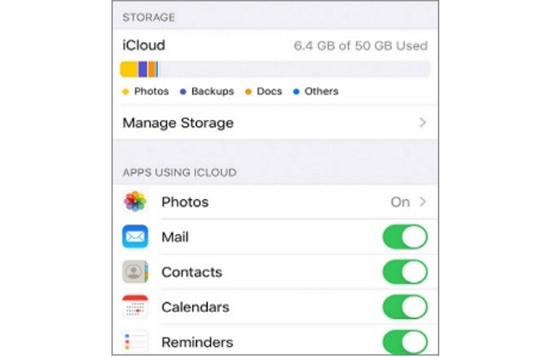
- View iCloud storage status.
- Enable critical features such as Messages, Photos, Contacts, and Mail.
- Upgrade your iCloud storage plan.
Note: If you don’t want to fill up your iCloud storage with unnecessary data, you can disable iCloud Backup. Here’s a video tutorial about how to turn off iCloud Backup on iPhone.
Part 3. How to Turn off iCloud
While the benefits of iCloud are evident for all to see, multiple reasons might compel you to turn off iCloud on iPhone. For example, you might not be comfortable sharing your vital documents and personal audios, photos, or videos with Apple. Another apparent reason to turn off iCloud is to prevent syncing data from one Apple device to another.
Even though I won’t recommend turning off iCloud, apply the instructions below to disable this cloud-based service on your iPhone when you need.
iOS 10.3 or higher:
Step 1: Open the Settings app.
Step 2: Scroll down the screen and hit the Sign Out button.

Step 3: When prompted, key in your Apple ID password and then press the Turn Off button. Take note, however, that this will automatically disable the Find My iPhone feature.
Step 4: Now choose the information that you’d like to keep a copy of on your iPhone. To do that, enable the toggles on each category. The categories include Stocks, Keychain, Contacts, Calendars, and Safari.
Step 5: Finally, click the Sign Out button on the pop-up dialog to confirm that you want to exit iCloud on iPhone. It’s that easy!
iOS 10.2 or lower:
Step 1: Open the Settings app.
Step 2: Click iCloud > Sign Out.
Step 3: On the pop-up dialog, tap the Delete from my iPhone button.
Step 4: Select the information to keep and then key in your Apple ID password if prompted.
Step 5: Hit Turn Off.
Part 4. How to Use iCloud Family Sharing
iCloud Family Sharing enables iPhone users to share their iCloud storage plans with six Family Members. You can also share Apple subscriptions, App Store purchases, and manage parental controls. And best of all, there’s no sharing of Apple ID details.
So, without wasting much time, below is how to set up and use iCloud Family Sharing:
Step 1: With you as the organizer, ensure that all family members have an iOS 8 or newer device. Also, everybody should register on iCloud using their Apple IDs.
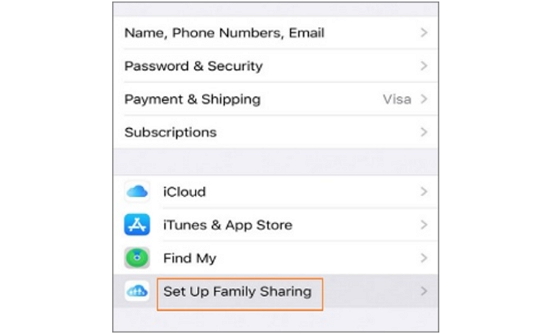
Step 2: Launch the Settings app and then hit your profile details to open the Apple ID window.
Step 3: Click Set Up Family Sharing before tapping the Get Started button.
Step 4: Tap Continue in the Family Setup window and then click Continue again in the Share purchases window.
Step 5: On the Payment method window, click Continue to confirm and then choose whether to share your location with family members.
Step 6: Click Add Filmily Member on the next window and then enter the name of your family member.
Step 7: Confirm if it’s the person and then tap their identity.
Step 8: Lastly, key in your credit card security code to confirm that you’re the organizer. You can now begin sharing Apple purchases with a Family Member.
Note: You can set up and delete only two Family Sharing groups per year.
Summary
Overall, using a computer will give you the best iCloud account management experience. However, your iPhone or iPad can still come in handy if you want to manage iCloud on-the-go. But if you find the iCloud file-sharing process too complicated to master, there’s a more straightforward way in Wondershare UniConverter. This desktop app is super-duper simple to use and transfers files between devices in a flash.
- Directly convert videos to MP4, AVI, MKV, and other 1,000 formats without quality loss at 30X faster speed.
- Convert videos to devices such as iPhone, iPad, iPod, and Android phones directly.
- Edit videos with advanced video editing functions, like trimming, cropping, adding watermarks, subtitles, etc.
- Download/record videos from YouTube and other 10,000+ video sharing sites.
- Burn videos to DVD or Blu-ray disc to play with your DVD player.
- Support additional functions like Video Compress, VR Converter, GIF Maker, Fix Video Metadata, etc.


