

Is your iCloud storage almost full? This article will furnish you with some tips to manage your iCloud storage like a pro. That aside, iCloud gives users free 5GB of cloud storage to sync data across devices. But considering that your device contains more than basic documents and photo files, the 5GB is just too small. Therefore, upgrading your iCloud plan is the smarter option, although that will cost you money. So to avoid iCloud’s monthly subscription charges, apply these iCloud storage management tips and tricks.
Part 1. What’s Taking Up Your iCloud Space?
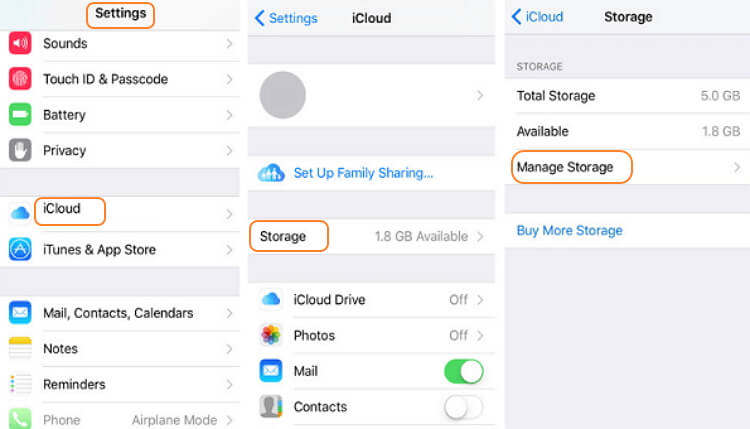
Firstly, you must know what kind of data is eating up your precious 5GB iCloud storage. To do that, navigate to the Settings app and then click Apple ID. Now click iCloud and then go to Manage Storage. Once you’re on iCloud, you can see the files taking up your space and how much space they occupy.
Typically, iCloud storage contains:
- Videos
- Photos
- WhatsApp backups
- Emails with attachments
- Notes
- iCloud backups
It’s also important to remember that music, movies, books, and apps, purchased on iTunes don’t save on iCloud. Now let’s proceed to discuss some proactive measures you can take to manage the iCloud storage problem.
Part 2. Upgrade Your iCloud Storage
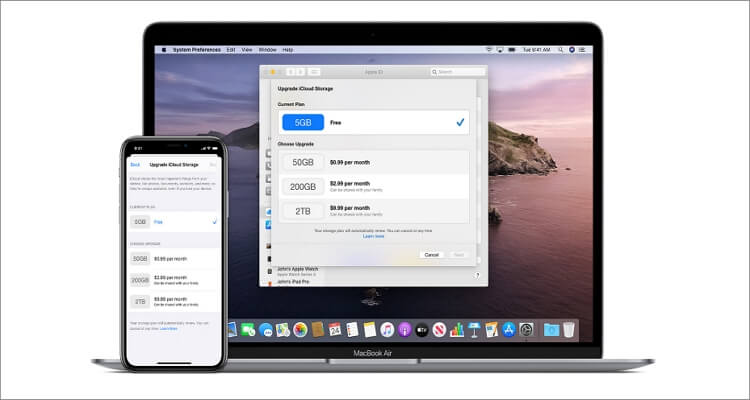
Of course, this should be the first thing to do if you don’t want to delete files from iCloud regularly. On top of the 5GB, iCloud also offers 50GB, 200GB, and 2TB monthly plans. The good thing about it is that you can even share your storage with family after purchasing.
Below are the subscription plans:
- 50GB - $0.99
- 200GB - $2.99
- 2TB - $9.99
How to upgrade iCloud storage on iPad, iPhone, or iPod touch:
Step 1: Navigate to Settings, tap your Apple ID, choose iCloud, and then select Manage Storage.
Step 2: Click Change Storage Plan or Buy More Storage.
Step 3: Select a plan.
Step 4: Click Buy and then make a payment.

To upgrade iCloud Storage on Mac, follow these steps:
Step 1: Tap the Apple icon, choose System Preferences, and then press Apple ID.
Step 2: Next, choose iCloud and then navigate to the lower-right corner to press Manage.
Step 3: Click Buy More Storage or Change Storage Plan before choosing a plan.
Step 4: Click Next, enter Apple ID password, and purchase.
Part 3. Delete Old iCloud Backups
If you’re running on a budget, clearing iCloud of unwanted files is the best move. It can be backups from old iPads or iPhones that you no longer use. However, you should back up your files on a Mac or Windows computer first before deleting. This way, you don’t lose vital information altogether. But if you insist on deleting iCloud files, here’s how to do it:
On iPad and iPhone:
Step 1: Open Settings and then tap your Apple ID.
Step 2: Click iCloud and then press Manage Storage.
Step 3: After that, click Backup and then choose a device.
Step 4: At the bottom, tap Delete Backup and then click Turn Off & Delete. You can choose a category to delete by enabling or disabling the toggle beside it.

On Mac:
Step 1: Tap the Apple icon and then click System Preferences. Now press Apple ID.
Step 2: Click iCloud and then press the Manage button on the lower-right corner.
Step 3: Choose Backups.
Step 4: Select a device whose backups you intend to delete.
Step 5: In the pop-up dialog, click Delete and then tap Done. Repeat the same process to delete another backup.

Part 4. Change Backup Settings
Another reason why your iCloud storage is always filling up pretty fast is that you might be saving unnecessary data. That might include browser data, email contacts, notes, and so on. Luckily, it’s pretty simple to filter out data to save on iCloud.
Step 1: Click Settings, tap your Apple ID, and then press iCloud.
Step 2: Tap Manage Storage and then click Backups.
Step 3: Under Backups, choose your iPhone or iPad’s name.
Step 4: Click Show All Apps and then disable the toggle next to an app you don’t want to backup on iCloud.
Part 5. Delete Old Photos, Messages, and Files from iCloud Drive
Lastly, you can manage your iCloud storage on iPhone, iPad, Mac, or PC by deleting old files on iCloud Drive. Again, it’s super-simple to do that.
On iPhone, iPad, and iPod touch:
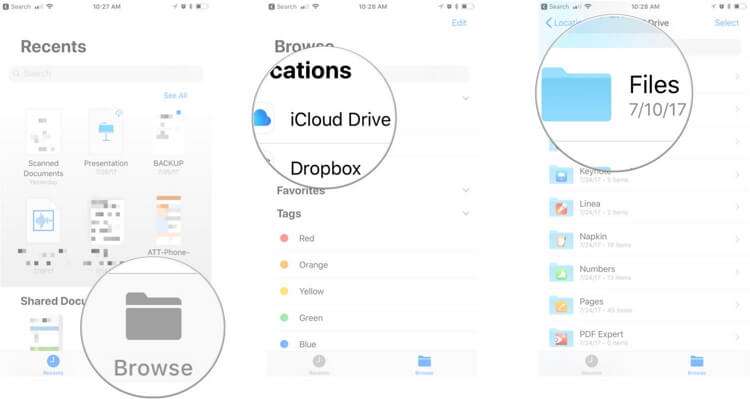
Step 1: Open the Files app and then tap Browse.
Step 2: Navigate to Locations and then click iCloud Drive before choosing Select.
Step 3: Select the files or folders you want to delete and then tap Delete.
Step 4: Navigate back to Locations, click Recently Deleted, and then tap Select.
Step 5: Select the files to delete and then tap Delete.
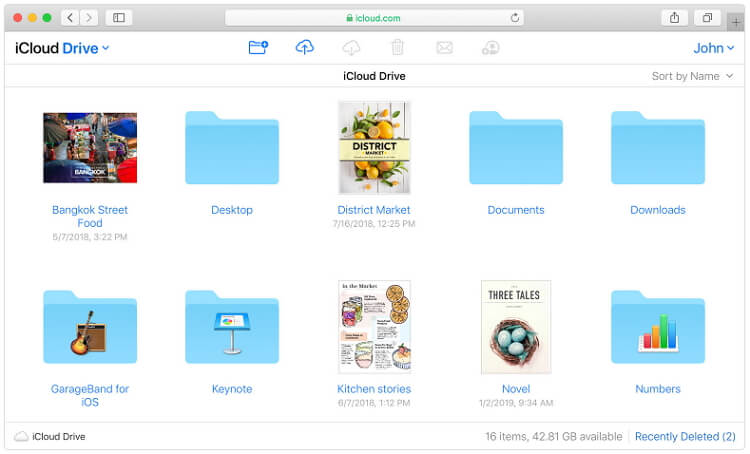
On Mac:
Step 1: Open Finder and then click the iCloud Drive folder.
Step 2: Drag a file to the Trash.
Step 3: Open Trash and then right-click the imported files.
Step 4: Click Delete Immediately.
Summary
Combining these iCloud management tricks is a sure way to drastically save space to backup your Mac, iPhone, or iPad. But if trimming enough iCloud space becomes a mission impossible, Apple is always at your service with more space for as little as $0.99.
Alternatively, you can back up data in your computer drive or an external flash. If you need to get your backup data transferred to your iPhone, you should get a third-party app like Wondershare UniConverter. This desktop file transfer app boasts of a straightforward UI and is 30x faster than the standard file transfer processes. And best of all, Wondershare UniConverter has a robust video editor and converter to customize your media files.
Here is how to back up iPhone on PC with Wondershare UniConverter:
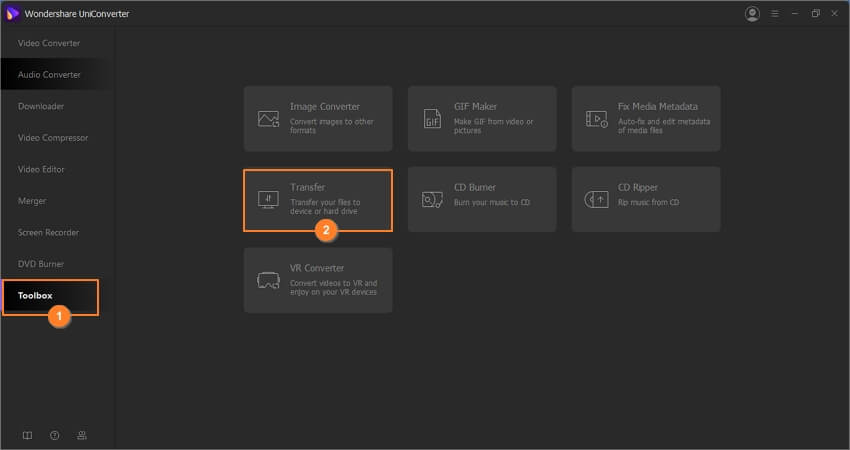
Step 1. Open the File Transfer tool
Install and run Wondershare UniConverter and then click Toolbox. After that, open the Transfer function before connecting your iPhone to desktop with a firewire or USB cable. Also, connect an external storage device to your desktop.
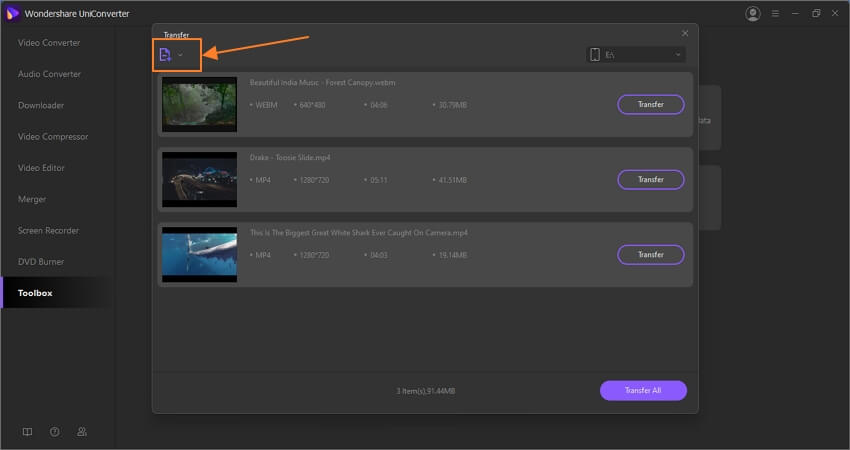
Step 2. Upload media files
Next, press the Folder button on the upper-left corner to upload videos and audios from iPhone storage. A more straightforward way is to drag-and-drop files on the Transfer window.
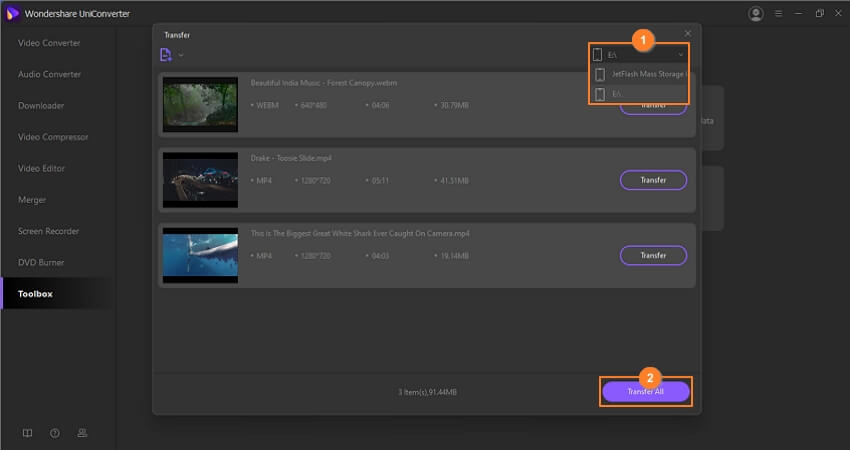
Step 3. Transfer files
Open the drop-down list in the upper-right corner and choose your external storage device. Lastly, press Transfer All, and Wondershare UniConverter will get your files transferred to your iPhone in a heartbeat.
- Directly convert videos to MP4, AVI, MKV, and other 1,000 formats without quality loss at 30X faster speed.
- Convert videos to devices such as iPhone, iPad, iPod, and Android phones directly.
- Edit videos with advanced video editing functions, like trimming, cropping, adding watermarks, subtitles, etc.
- Download/record videos from YouTube and other 10,000+ video sharing sites.
- Burn videos to DVD or Blu-ray disc to play with your DVD player.
- Support additional functions like Video Compress, VR Converter, GIF Maker, Fix Video Metadata, etc.